 Free shipping on orders over £29,85


how to polish UV resin
Achieve a smooth, mirror shine on UV resin projects with expert steps.


Polishing UV resin brings out its dazzling clarity and vibrant colour, transforming jewellery, art, and small crafts into professional-grade pieces. Whether your project has micro-scratches, a slightly uneven surface or just lacks that glossy brilliance, this guide covers the entire process for achieving a smooth, mirror-like shine. Suitable for first-timers or experienced makers, you’ll gain insights into essential tools, proper sanding and polishing technique, and vital dos and don’ts for perfect results on UV-cured resin.
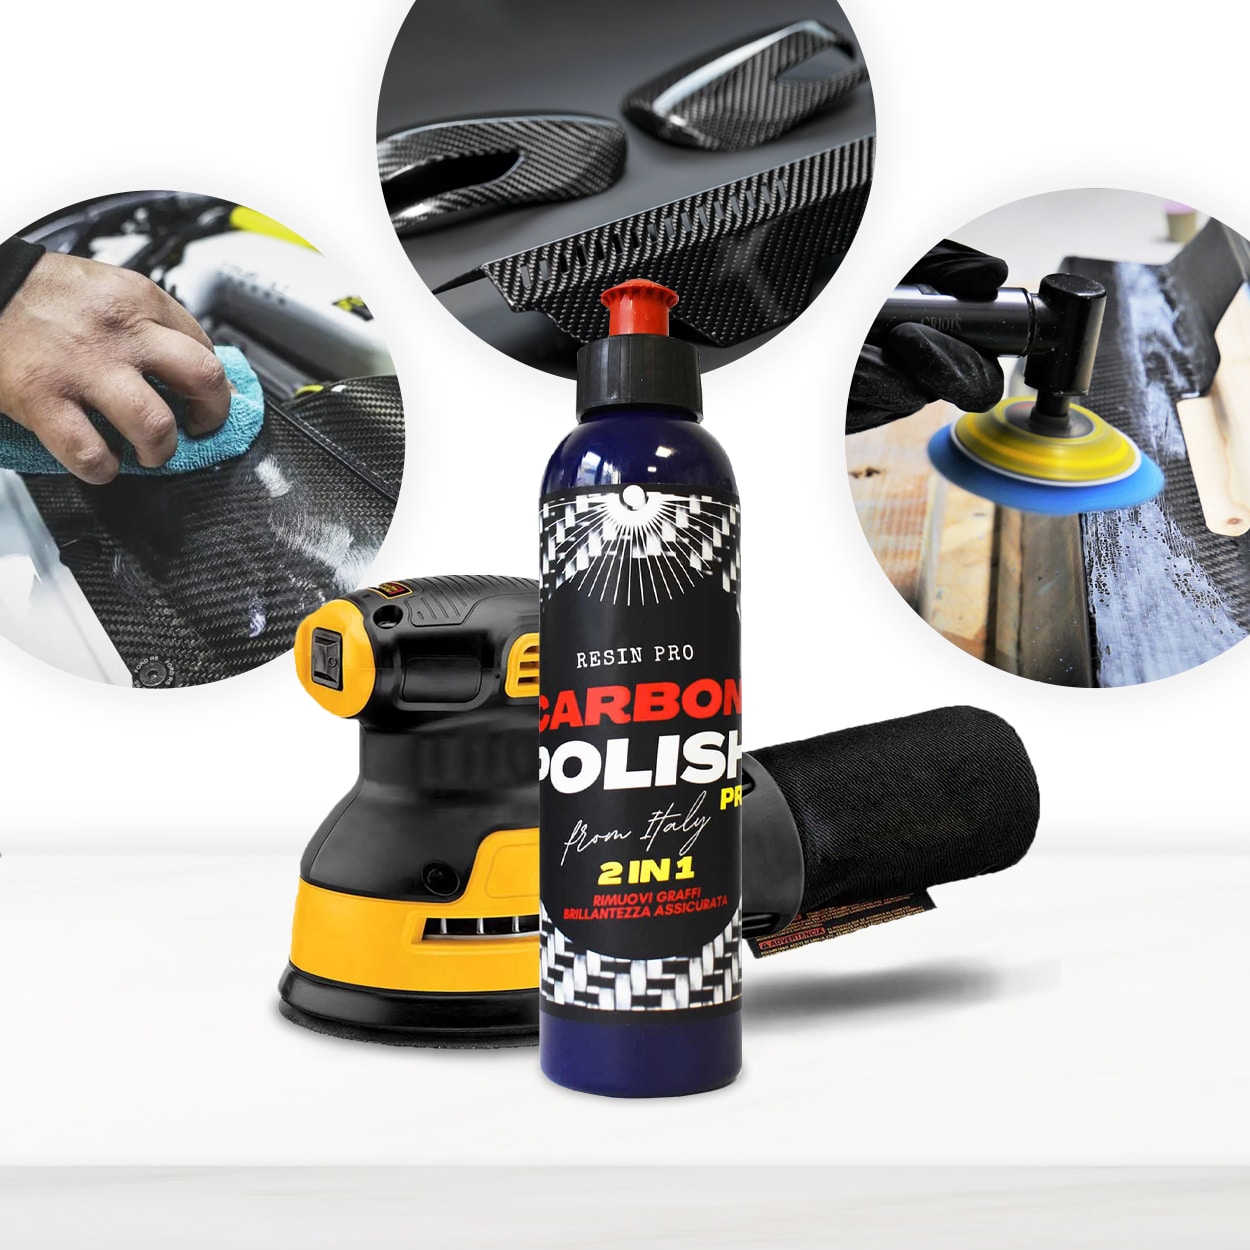
What You’ll Need
- “Ebonite Abralon” – Sanding Pads 360-4000 Grit for Resin and Wood: Gently levels out and smooths the resin surface.
- 1200W Polisher for Sanding and Buffing – Variable Speed, D-Handle: Supports fast, controlled sanding and polishing, but hand sanding is also possible.
- “Epoxy Polish” – Epoxy Resin Polishing System: Removes fine scratches and brings out a brilliant gloss on most UV resin surfaces.
- “Carbon Polish” – Polishing System for Dark and Black Surfaces, 250ml: Ideal for polishing black or dark resin without leaving white marks.
- Microfibre cloths and soft polishing pads: For hand application and final cleaning.
- Protective gloves and a dust mask: Essential for safety during sanding.

Choosing the Right Tools and Workspace
Set yourself up for success by preparing a dust-free workspace and laying out your sanding and polishing tools. The right sanding and polishing materials ensure a smooth workflow and superior results. Take time to read any detailed instructions included with your chosen products for safe, effective application. Proper preparation streamlines the process and avoids costly mistakes.

Clean the Surface Thoroughly
Start by removing all dust, oils and debris from your cured UV resin with a clean lint-free or microfibre cloth. Any particles left behind can cause scratches during sanding and compromise the final finish. Work in a well-lit space to examine the surface closely, looking for any sticky spots, imperfections or rough edges that need addressing before you begin sanding. Ensuring your resin is fully cured (check the manufacturer’s instructions) is also crucial for best results, as uncured resin can smear or hinder the polishing process.
Progressively Sand the UV Resin
The key to a flawless polish is gradual, even sanding with increasing grits. Start with a coarse pad (such as 360 or 500 grit) from the “Ebonite Abralon” – Sanding Pads 360-4000 Grit for Resin and Wood and moisten the pad slightly for wet sanding—this helps reduce dust and avoid overheating. Sand the surface in gentle circular motions, applying only light, even pressure to avoid gouging the resin. As surface unevenness and scratches are smoothed out, regularly wipe away the residue and move up stepwise to finer grits (up to 3000 or 4000, as appropriate for your finish). Overlapping strokes and patience at each grit level ensure a flawless base for polishing. If you have complex shapes or larger pieces, a tool like the 1200W Polisher for Sanding and Buffing – Variable Speed, D-Handle allows for a more efficient and uniform finish—adjust the speed for resin and always use with care to prevent surface burns.
Polish for a High-Gloss Finish
Once the UV resin is perfectly smooth and matte from fine sanding, it’s time to polish. Apply a small amount of “Epoxy Polish” – Epoxy Resin Polishing System to a clean polishing sponge or pad—either by hand for small items or with a rotary polisher for larger surfaces. Work the polish into the surface in tight, overlapping circles, keeping the pad moving continuously to avoid heat build-up. For dark or black-tinted resin, opt for the “Carbon Polish” – Polishing System for Dark and Black Surfaces, 250ml to ensure no white haze appears. Keep checking your progress, reapplying polish as needed, and gradually refine the gloss until the surface is mirror-bright and swirl-free.

Final Buff and Inspection
After the initial polish, take a clean microfibre cloth and gently buff away any remaining residue in soft, overlapping strokes, revealing the true clarity of your UV resin. Inspect the project under good lighting to ensure there are no leftover dull spots or swirl marks. If necessary, apply a final round of polish with a clean pad for ultimate shine. Thorough buffing not only enhances the gloss but also helps to remove any micro-dust and product remnants that may dull the finish over time.

Tips, Common Mistakes, and Troubleshooting
Always start with fully cured resin—polishing too soon can ruin the finish. Do not skip grit sizes when sanding, as this can leave visible scratches or haze. Avoid applying heavy pressure; both sanding and polishing should be gentle to prevent surface distortion. If a cloudy or streaky gloss remains, check that each grit and polish stage was completed thoroughly, and that you’re using the right polish for the surface colour. Replace sanding pads and cloths regularly to ensure no embedded grit scratches your work and consider wearing gloves for safety and minimal fingerprinting on finished pieces.
Showcasing Polished UV Resin in Real Projects
Expertly polished UV resin surfaces can dramatically enhance the appeal of jewellery, art pieces or décor. From crystal-clear pendants to bold, colourful accents, the right finish stands out. Explore our gallery or review case studies for inspiration, and see how attention to polishing detail makes every piece truly shine.

- "Epoxy Polish" – Epoxy Resin Polishing SystemPrice range: £17.85 through £44.85"Epoxy Polish" is a system designed to restore a glossy finish on resin projects with ease, suitable for professionals and DIY users.
- "Ebonite Abralon" – Sanding Pads 360-4000 Grit for Resin and Wood£3.95"Ebonite Abralon" Sanding Pads offer a selection of grits for consistent sanding on resin and wood, suitable for detailed finishing.
 "Carbon Polish" – Polishing System for Dark and Black Surfaces, 250mlPrice range: £17.85 through £44.85Carbon Polish Black is suitable for polishing dark and black surfaces in epoxy resin projects, offering easy application and a non-whitening formula.
 1200W Polisher for Sanding and Buffing – Variable Speed, D-Handle£85.951200W Polisher designed for sanding and buffing to support finishing UV resin and related resin projects.
Frequently Asked Questions
Do I need to sand before polishing UV resin?
Yes, sanding prepares the surface, removes scratches and levels imperfections. Polishing is only effective on a smooth, properly sanded base.
Can I polish UV resin without a machine?
Absolutely. Many small projects can be polished by hand using the right sanding pads and a microfibre cloth, though tool-assisted polishing saves time and effort on larger items.
What polish should be used on dark UV resin?
For best results, use a polish formulated for dark or black surfaces, such as Carbon Polish, to prevent white haze or streaks.
Why does my polished resin look cloudy?
Cloudiness often results from incomplete sanding or not thoroughly buffing in the polish. Progress through grits and fully remove residues for a clear finish.
Is polishing UV resin safe?
Polishing is safe with gloves and a dust mask. Work in a ventilated area to reduce inhalation risks and always clean up dust promptly.
How do you remove scratches from UV resin?
Gradual sanding with finer grits followed by resin-specific polish will remove most surface scratches and restore clarity.