 Free shipping on orders over £29,85


How to repair a tub with resin?
Restore cracked or leaking tubs for lasting, watertight results


Repairing a bathtub with resin can restore structural integrity, stop leaks, and extend the life of your tub without the need for costly replacements. Whether your tub is fibreglass, acrylic, or ceramic, a resin-based repair delivers a long-lasting, waterproof finish when performed correctly. This guide will walk you through each step for a professional-quality repair you can confidently do at home.
What You’ll Need
- Resin Fibreglass Repair Kit – Complete Polyester Resin and Hardener Set – ideal for structural repairs and waterproofing rigid tub surfaces
- CROP 2K Fiberglass Putty – 750 ml + Hardener – for filling deep cracks, dents or holes with strong, sandable reinforcement
- “Kintsugi” – Ceramic Repair Kit with Gold, Silver, or Copper Metallic Pigments – perfect for decorative or precise ceramic repairs
- “Klebfix” – Two-Component Fast Epoxy Glue 2K, 25g Syringe – for quick, strong bonds on small chips or multi-material joins
- Protective gloves, respirator or mask, sandpaper (various grades), clean cloths, acetone or cleaning alcohol, mixing tools, and a fine brush or spatula

Visual Overview of Tub Repair Essentials
See close-ups of resin repair in action and essential tools for fixing tub cracks, holes, and chips. Understanding the setup visually helps ensure each material is ready for efficient, safe, and effective repairs.

Step 1: Prepare and Clean the Damaged Tub Area
Start by draining and drying the tub fully. Clean the damaged spot with a gentle abrasive cleaner to remove any soap scum, oils, or dirt that may interfere with resin adhesion. Gently sand the area around the crack, chip, or hole with fine-grit sandpaper. Sanding roughens the surface, improving the resin’s grip. Clean again, wiping the area with acetone or alcohol and a lint-free cloth to eliminate any dust or grease.
Ensure all surfaces are dry before applying resin to avoid trapping moisture, which can weaken the repair or cause future delamination.
Step 2: Assess the Damage and Choose Your Repair Method
Examine the depth and extent of the damage. Superficial hairline cracks or chips may only need a small quantity of resin or epoxy glue, while deep cracks, holes, or large fractures will require structural reinforcement. For minor cracks and chips, a two-component adhesive or decorative resin may suffice. For larger holes or water-leaking zones, a fibreglass mat and polyester resin system offers the most reliable and permanent repair.
Step 3: Mix and Apply the Resin for Repair
Following the safety instructions and mixing ratios, blend your chosen product according to its packaging. For extensive repairs, the Resin Fibreglass Repair Kit – Complete Polyester Resin and Hardener Set provides a measured set of resin, hardener, and fibreglass mat. Cut the mat to size, saturate it thoroughly with the mixed resin, and layer it over the prepared area. Use a brush or spatula to work out air bubbles and ensure full contact. For filling deep cracks and dents, CROP 2K Fiberglass Putty – 750 ml + Hardener forms a thick, sandable filler with extra fibreglass strength.
For precise or decorative repairs on ceramics, the “Kintsugi” – Ceramic Repair Kit with Gold, Silver, or Copper Metallic Pigments can be used to fill and accent cracks using the provided spatulas and metallic pigments. For small chips or multipurpose joins, apply “Klebfix” – Two-Component Fast Epoxy Glue 2K, 25g Syringe directly from the applicator, aligning the surfaces firmly for a few minutes until initial set.

Step 4: Allow to Cure, then Finish the Surface
Patience is critical: allow the resin or putty to cure for the full recommended time (typically several hours to 24 hours, depending on product and room temperature). Avoid using the tub or exposing it to moisture during this period. After curing, sand the repair with progressively finer sandpaper for a smooth, flush finish. For filled or reinforced spots, repeat if needed to achieve an even surface, then finish with primer and paint if desired, matching your tub’s colour.
Always wear gloves and ventilate the workspace during application and sanding to minimise fume exposure and skin contact.

Tips and Troubleshooting for Strong Tub Repairs
Work in small batches to avoid resin curing before it’s applied, especially for fast-setting adhesives. For persistent leaks, ensure cracks are cleaned out properly and the resin is worked in thoroughly. If using decorative kits like Kintsugi, take the time to mask areas you do not want pigmented. Excessive resin can be removed with a razor after partial cure if needed. If unsure whether a repair has bonded fully, give the area extra curing time before exposing to water stress.
Work methodically for the strongest bond. Rushing preparation or cure steps risks repairs that may delaminate or crack again.
Before & After Results with Resin Repair
Examine comparisons of damaged and fully repaired tubs, highlighting how professional resin kits restore both integrity and appearance. Notice the difference precise preparation and the right resin system can achieve in restoring your bathware.

- Resin Fibreglass Repair Kit – Complete Polyester Resin and Hardener SetThe Resin Fibreglass Repair Kit provides structural reinforcement with a polyester resin and fibreglass mat, suitable for various rigid surfaces.
- CROP 2K Fiberglass Putty – 750 ml + Hardener£15.85CROP 2K Fiberglass Putty is designed for filling and repairing cracks, dents and holes with strength and durability.
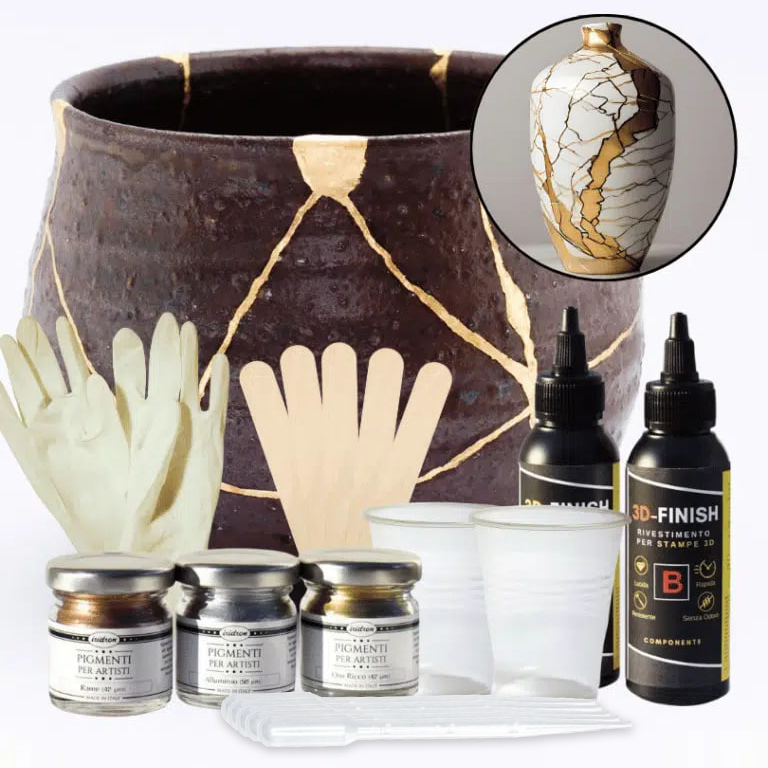 "Kintsugi" – Ceramic Repair Kit with Gold, Silver, or Copper Metallic PigmentsPrice range: £17.45 through £20.95The Kintsugi Ceramic Repair Kit uses high-viscosity resin for detailed ceramic restoration with metallic pigments suited to the repair theme.
 "Klebfix" – Two-Component Fast Epoxy Glue 2K, 25g Syringe£24.00This two-component fast epoxy glue bonds various materials with professional strength, suitable for repairs in resin-based tub repairs.
Frequently Asked Questions
Can resin repair fix deep cracks in bathtubs?
Yes, with a reinforced fibreglass kit or strong resin putty, deep cracks or holes can be permanently repaired.
Is resin tub repair waterproof and long-lasting?
Properly applied resin repairs create a waterproof, durable bond suitable for daily use in baths and showers.
What prep is needed for resin tub repair?
You must clean and dry the area, sand for adhesion, and degrease before applying the resin.
How long before I can use my tub again?
Wait for the full cure time recommended by your resin product—usually a minimum of 24 hours or as specified on the label.
Can I repair ceramic tubs with resin?
Yes, with a high-viscosity or decorative resin kit, chips and cracks in ceramic tubs can be precisely repaired.
Should I paint over resin tub repairs?
After sanding, you can finish tub repairs with suitable primer and paint to match the original surface.