 Free shipping on orders over £29,85


How do you polish resin jewellery after filing?
Simple guide to a flawless, high-gloss resin jewellery finish


Polishing resin jewellery after filing transforms rough, sanded edges into a brilliantly glossy, professional-quality finish. This guide walks you through each step to achieve a flawless result, whether you are creating unique handmade pieces or refreshing your finished designs. Learn the best approach for a glass-smooth surface with minimal effort and avoid common pitfalls for beautiful, durable jewellery every time.
What You’ll Need
- “Ebonite Abralon” – Sanding Pads 360-4000 Grit for Resin and Wood: Sanding pads for methodical grit progression
- Manual Polishing Pad Holder for Sanding & Polishind Pads: For precise manual control
- “Epoxy Polish” – Epoxy Resin Polishing System: Polishing compound to restore gloss
- Clean microfibre cloths and water for rinsing
- Optional: “Carbon Polish” – Polishing System for Dark and Black Surfaces, 250ml for dark resin pieces

Essential Polishing Tools in Action
See how detailed sanding and careful use of pad holders lead to a flawless finish on resin jewellery.

Step 1: Smooth the Surface After Filing
After filing your resin jewellery, the surface may appear scratched or cloudy. Begin by sanding with a coarse grit pad (around 360–400 grit), focusing gently on the filed areas to even out marks without gouging the resin. Keep the pad and jewellery damp; wet sanding minimises dust and prevents heat build-up that can damage resin.
Hold the jewellery securely and sand using small circular motions, applying even pressure. Regularly check your progress by rinsing and drying the piece. Move to a finer grit once you can no longer see or feel sharp edges left by the file.
Step 2: Progress Through Finer Sanding Grits
Achieve a flawless finish by sanding with increasingly finer grits (600, 1000, up to 4000 if possible). Always use gentle, circular motions for sanding and polishing and be sure to work thoroughly over the entire surface.
It’s vital to progress gradually through finer grits; skipping steps can leave visible scratches that will be difficult to polish out later. Clean the jewellery between each stage to remove grit residue, preventing unintentional surface scratches.
If you find it difficult to maintain a consistent grip or wish to access intricate areas, the Manual Polishing Pad Holder for Sanding & Polishind Pads provides stability and can help you reach corners comfortably.
Step 3: Apply Polishing Compound for a Gloss Finish
Once sanding is complete, it’s time to polish. Place a small amount of “Epoxy Polish” – Epoxy Resin Polishing System onto a clean microfibre cloth or a soft pad. Work the compound into the resin using gentle, circular movements, focusing on previously sanded areas for an even shine.
Add more polish as needed, but avoid over-applying. Continue until the surface appears clear and glossy. Buff away any remaining residue with a separate clean, dry cloth to reveal a mirror-like effect. For dark-coloured resin, choose a non-whitening polish like “Carbon Polish” – Polishing System for Dark and Black Surfaces, 250ml for optimum clarity and to prevent unwanted haze.

Tips, Troubleshooting and Common Mistakes
- Do not skip grit levels when sanding — each stage removes marks from the previous grit.
- Work in a dust-free, well-ventilated area to avoid contamination and ensure safe handling.
- Clean residue between each step to prevent dragging abrasive particles onto polished surfaces.
- If polish appears cloudy, repeat the sanding process or work the polish in small areas more thoroughly.
- For dark-coloured resin, choose a non-whitening polish to prevent visible haze or streaks.
Polished Results and Professional Tips
Achieving a long-lasting glass-like shine is possible with the right technique and products. Pay attention to detail and enjoy the satisfaction of a perfect finish every time.

- "Epoxy Polish" – Epoxy Resin Polishing SystemPrice range: £17.85 through £44.85"Epoxy Polish" is a resin polishing system designed to restore a glossy, mirror-like finish suitable for jewellery and other resin projects.
 "Ebonite Abralon" – Sanding Pads 360-4000 Grit for Resin and Wood£3.95Sanding pads designed for polishing resin and wood surfaces with grit options from 360 to 4000, supporting wet or dry use.
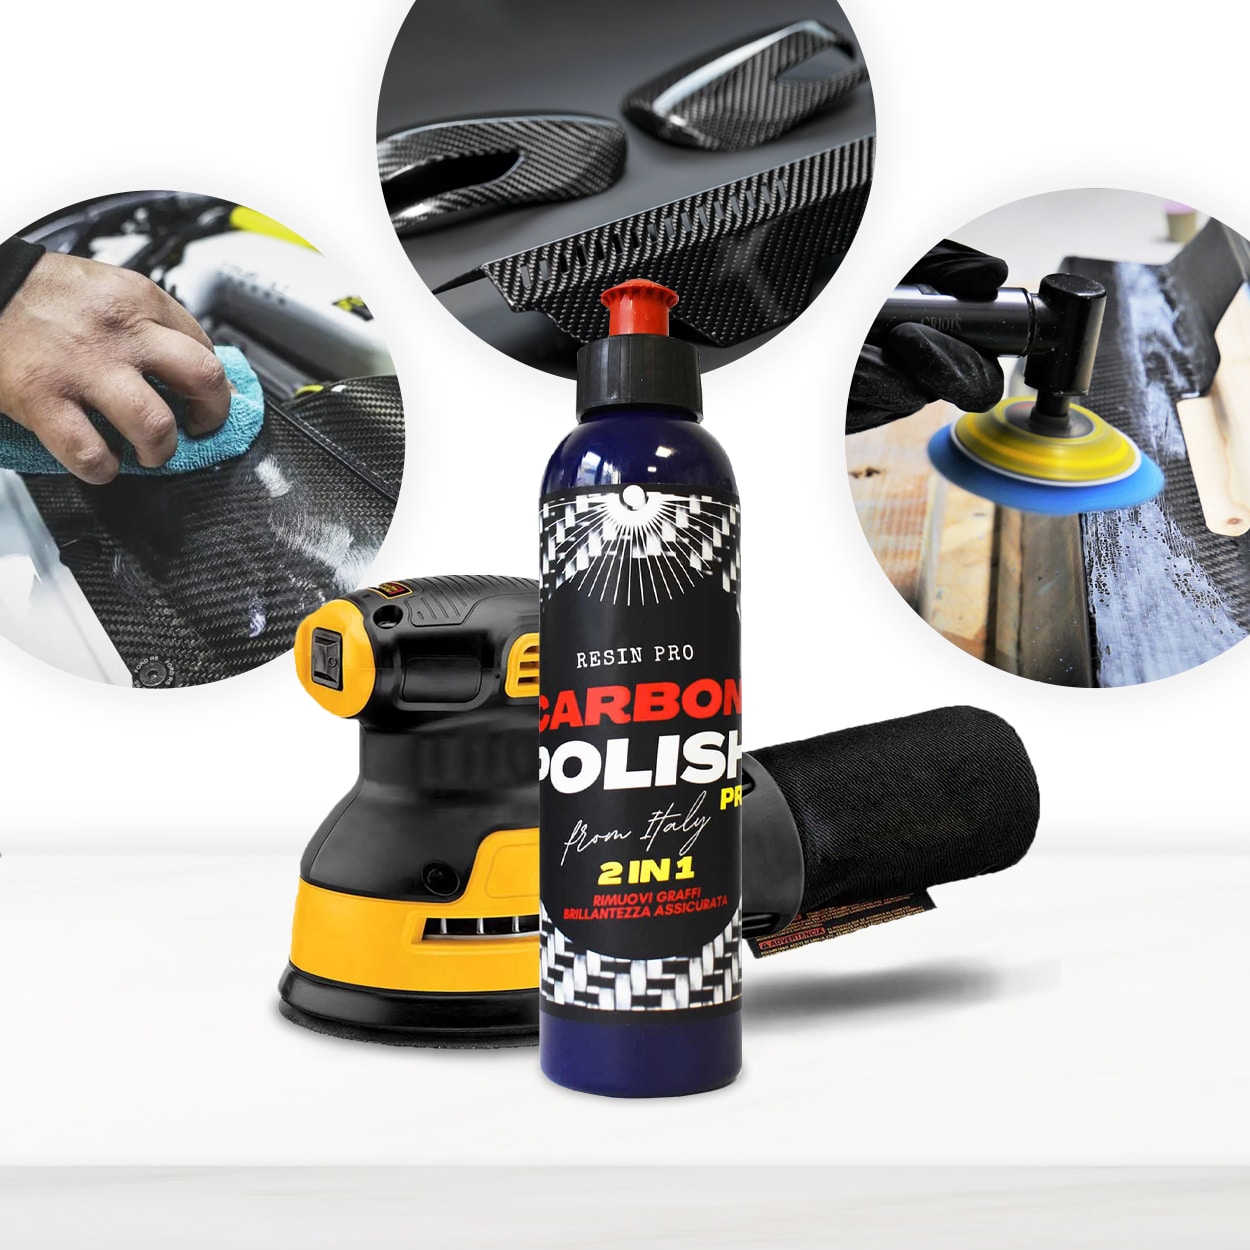 "Carbon Polish" – Polishing System for Dark and Black Surfaces, 250mlPrice range: £17.85 through £44.85"Carbon Polish" offers a finishing polish designed for dark surfaces like epoxy resin, suitable for achieving a refined finish in this theme.
 Manual Polishing Pad Holder for Sanding & Polishind Pads£4.85Manual Polishing Pad Holder is designed for manual polishing and sanding to aid detailed resin jewellery finishing.
Frequently Asked Questions
Do you need special polish for resin jewellery?
It is best to use polish formulated for resin to achieve a lasting, high-gloss finish and prevent streaks or residue.
Why does my polished resin look cloudy?
Cloudiness is often caused by incomplete sanding or insufficient buffing with polishing compound. Repeat fine sanding and polish steps.
Can I polish resin jewellery by hand?
Yes, manual sanding and polishing are effective for small jewellery pieces. Use pad holders and microfibre cloths for best control.
How long does polishing resin jewellery take?
Depending on project size and finish, polishing can take 10–30 minutes. Take your time with each sanding stage for the best results.
Is it necessary to use all sanding grits?
Progressing through each grit removes previous marks. Skipping grits leaves visible scratches and reduces gloss.
What polishing pad should I use for resin jewellery?
Choose fine microfibre or dedicated resin polishing pads for uniform results. Use manual holders for precision.