 Free shipping on orders over £29,85


How to use acrylic resin?
Achieve flawless, quick-setting resin projects with simple UV techniques


Acrylic resin is an accessible, versatile material that enables artists, jewellery makers, and DIY enthusiasts to create clear, glossy designs in just minutes. This guide will walk you through using UV-curable acrylic resin for stunning results, ensuring you know the technique from preparation to curing and finishing. Whether you’re new to resin crafts or looking to refine your skills, these steps will help you avoid common pitfalls and achieve professional-quality finishes.
What You’ll Need
- “UV–Creation” – Fast Acrylic Resin, 3 Minute UV Cure – a ready-to-use, fast-setting resin for clear, glossy pieces.
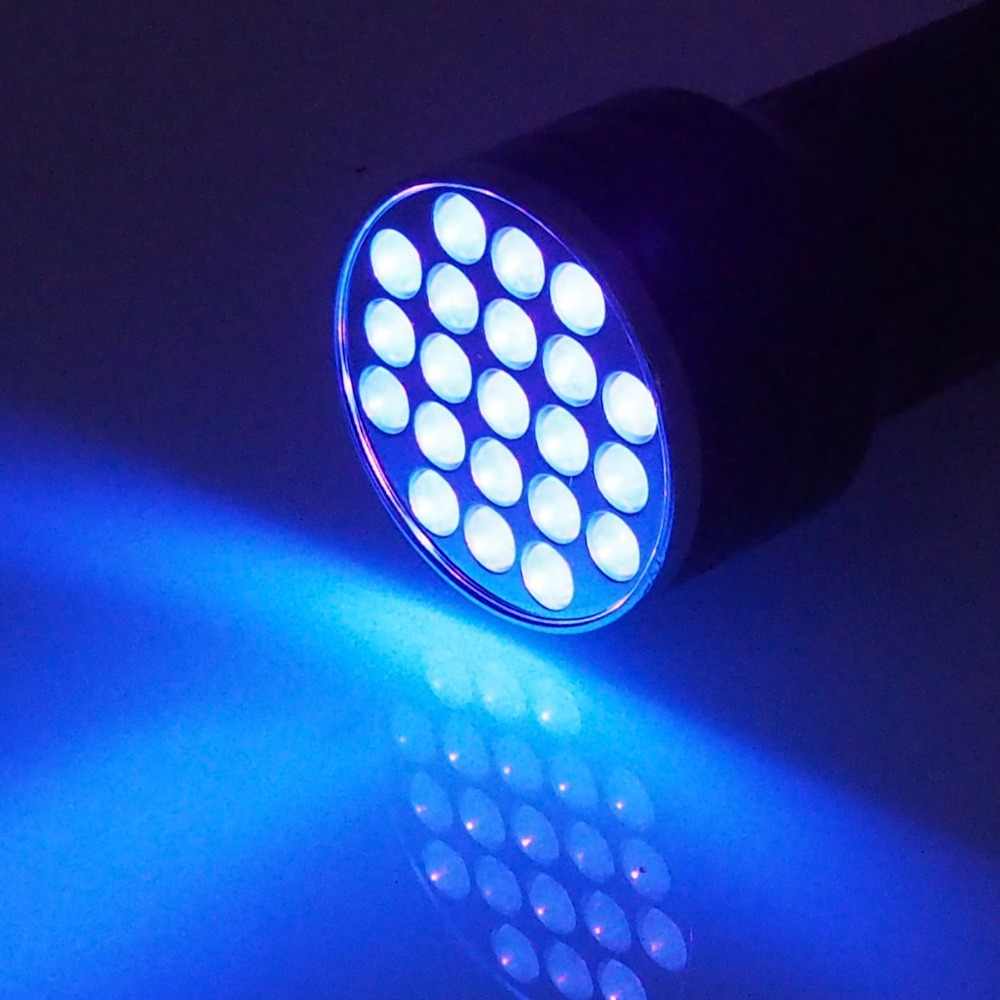
- 21 LED UV Torch for Fast Acrylic Resin Curing – ensures even, reliable curing every time.
- “Fairy Wings” – UV Resin for Volumetric Reliefs, Dual Colour, 30ml – ideal for 3D details and decorative surface effects.
- “3 Sphere” – Silicone Mould for Jewellery and Crafts, 1cm-2.5cm Spheres – creates smooth, reusable forms for casting resin shapes.
- Protective gloves and a well-ventilated workspace.
- Mixing sticks and a dust-free cover for curing.

Key Tools and Setup for Acrylic Resin Projects
For consistent resin results, select a reliable UV torch and work with high-clarity fast-curing acrylic resin. Position moulds and safety gear within easy reach before starting.

Step 1: Prepare Your Workspace and Moulds
Clear a clean, flat surface in a dust-free area to prevent particles from affecting your resin. Always wear nitrile or latex gloves and work with good ventilation to avoid skin contact and inhalation of fumes. Lay out your silicone moulds, ensuring they are clean and dry. If using a mould such as the “3 Sphere” – Silicone Mould for Jewellery and Crafts, 1cm-2.5cm Spheres, double-check for residue or dust as this can impact the clarity of your cured pieces.
Wear gloves and work in a ventilated area for the safest crafting experience.
Step 2: Pour and Shape the Acrylic Resin
Slowly dispense the UV acrylic resin into the mould or onto your project surface. Pour in thin layers (no more than 3mm thick per application) to ensure complete and even curing. This is especially important if you are using fast-curing resins like “UV–Creation” – Fast Acrylic Resin, 3 Minute UV Cure, which cure quickly under UV light when applied at the recommended thickness.
Use a cocktail stick or silicone tool to guide the resin into any intricate details and to help pop surface bubbles before curing. For creative projects with 3D patterns, try “Fairy Wings” – UV Resin for Volumetric Reliefs, Dual Colour, 30ml, which is formulated for fine decorative reliefs.
Step 3: Cure the Resin Under UV Light
Hold your UV torch, such as the 21 LED UV Torch for Fast Acrylic Resin Curing, a few centimetres above the resin surface and expose it for 2–3 minutes (follow product timing directions). Ensure all areas receive direct UV exposure, especially if you are working with transparent or coloured resins. Avoid curing thick layers in one go—for deeper pieces, build up in stages and cure each layer individually.
Once cured, allow the resin to cool for a minute before handling. The surface should be hard and non-tacky; if some spots remain soft, re-apply the UV light for a short interval.
Do not attempt to cure thick layers all at once to prevent undercuring or bubbling.

Step 4: Demould and Finish Your Project
Gently flex or twist the silicone mould to release your finished piece. The smooth surface of the mould, especially one like the “3 Sphere” – Silicone Mould for Jewellery and Crafts, 1cm-2.5cm Spheres, helps to ensure details remain sharp and glossy on your cured resin. For any slight overflows or rough edges, sand lightly with fine-grit paper once fully cured.
If adding additional elements or layers, repeat the pour and UV cure process as needed. Customise further with suitable colourants—avoiding alcohol inks, which are not compatible with most UV acrylic resins.
Tips and Troubleshooting for UV Acrylic Resin
Work in small batches to maintain control over curing and quality. Never force-cure thick pours—layering ensures clarity and strength. Protect uncured resin from ambient light sources, and store both resin and UV lamps in cool, dry places away from sunlight when not in use.
If you notice sticky spots after curing, expose them to the UV torch for an additional minute. Avoid using aggressive solvents on silicone moulds to extend their life. Clean tools immediately after use to prevent resin buildup.
Store resin and UV lamps away from sunlight to maintain performance and longevity.
Expert Finishing for Long-Lasting Results
After each project, protect your cured resin from extreme temperatures and store leftover resin in tightly sealed bottles. For best results, apply multiple thin layers for depth and durability.

- "UV–Creation" – Fast Acrylic Resin, 3 Minute UV CurePrice range: £8.45 through £62.95"UV–Creation" Acrylic Resin cures rapidly under UV light, offering a clear, glossy finish suitable for jewellery and craft projects.
- 21 LED UV Torch for Fast Acrylic Resin CuringOriginal price was: £10.45.£7.45Current price is: £7.45.The 21 LED UV Torch provides reliable and consistent curing, suitable for acrylic resin projects in a portable format.
 "Fairy Wings" – UV Resin for Volumetric Reliefs, Dual Colour, 30mlOriginal price was: £15.15.£2.85Current price is: £2.85."Fairy Wings" UV resin is a ready-to-use acrylic gel for detailed 3D reliefs, suitable for artists and crafters using acrylic resin.
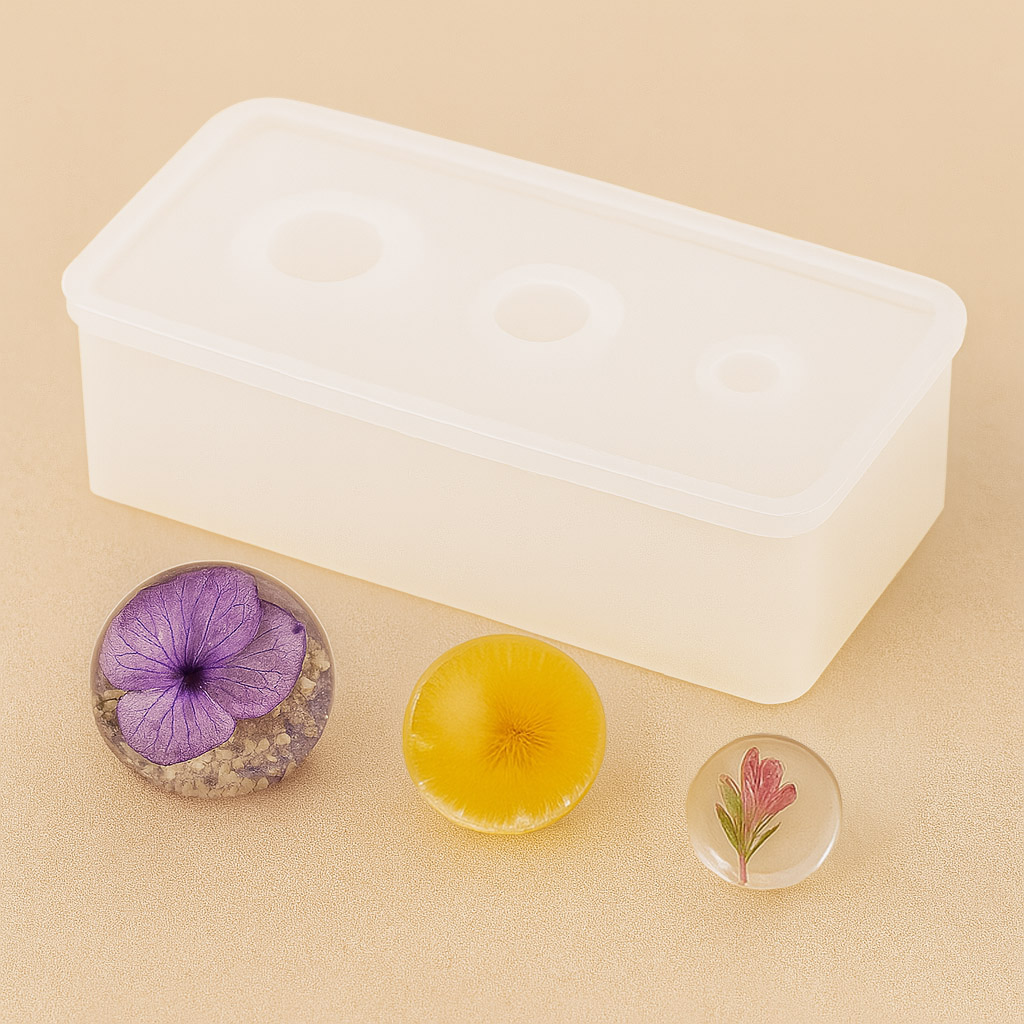 "3 Sphere" – Silicone Mould for Jewellery and Crafts, 1cm-2.5cm SpheresOriginal price was: £7.45.£6.45Current price is: £6.45."3 Sphere" silicone mould offers semi-transparent, reusable forms suitable for various materials for crafting and decoration.
Frequently Asked Questions
Can I colour acrylic UV resin safely?
Certain colourants such as Colourfun are compatible, but avoid alcohol inks as they may disrupt curing and clarity.
How thick can each UV resin layer be?
Apply UV resin in layers up to 3mm thick. For thicker items, build up in several stages, curing each separately.
What is the best way to cure acrylic resin?
Use a UV torch or lamp, holding it close to the resin for the recommended time. Ensure even exposure for full curing.
Can I use regular moulds for UV acrylic resin?
Silicone moulds are ideal as they are non-stick and flexible, making demoulding easy and ensuring a glossy finish.
Why is my resin sticky after curing?
Sticky areas usually mean undercuring. Reapply UV light where needed for a fully hardened surface.
Is UV acrylic resin safe to use at home?
UV acrylic resins are generally odourless and non-toxic, but always use gloves and work in a well-ventilated space.
Can I layer UV acrylic resin for depth?
Yes, simply cure each layer before pouring the next. This technique adds dimension and clarity to your designs.
How do I clean tools after using acrylic resin?
Wipe tools with a paper towel immediately. Avoid harsh chemicals; most residue can be removed before it fully hardens.