 Free shipping on orders over £29,85


How to use resin?
Explore starter kits and courses for fun, safe resin projects at home.


Curious about starting with resin crafting? Whether you’d like to make unique jewellery, functional art, or striking decorative coasters, resin is a versatile and accessible material for creative projects. This page guides beginners and DIY enthusiasts through the top starter kits and hands-on masterclasses available at ResinPro. Learn about key differences between approaches, what’s included in each option, and which might be best for your goals and confidence level.
Comparing the Best Ways to Start Using Resin
Diving into resin art can be daunting, but finding the right starting point makes all the difference. Resin classes offer guided, interactive learning for those who prefer hands-on demonstrations, while beginner kits bundle everything needed for projects at home. For functional objects such as coasters and trays, a Resin Class – 3D Effects Coasters Masterclass, 120 Minutes provides expert-led tuition and direct answers to your questions. If you prefer independent crafting, a resin starter kit like the Wooden Resin Coaster Starter Kit or Resin Geode Coaster Starter Kit gives you all the tools and step-by-step guidance for creative experiments from your own workspace. Jewellery makers will benefit from an all-in-one kit with detailed inclusions, such as the “Evershine Collection” – Artisan Jewellery Epoxy Resin Kit with 100+ Accessories. Each approach delivers clear instructions, safety pointers, and a focus on creative results, but your ideal choice depends on your preferred learning style and project ambitions.

Starter or Class? How Beginners Can Approach Resin
Beginners often wonder whether to start with a class or a kit. Hands-on classes offer expert advice, direct feedback and live demonstrations, making them ideal for those who learn best by watching and asking questions. Starter kits, on the other hand, provide the flexibility to experiment at your own pace, with all essentials included in the box. Both approaches ensure you have everything needed for your first successful project in resin art.
Resin Class – 3D Effects Coasters Masterclass, 120 Minutes
This masterclass is designed for beginners wanting a guided introduction to epoxy resin. Perfect for those curious about resin but unsure where to start, it covers both theory and practice: from workspace preparation and essential safety gear to mixing, pouring, and shaping resin art. Over 120 minutes, learners discover colour techniques, working times, and when to demould and manipulate resin for different results. The course project includes making coasters, trays, and folded bowls — ideal for functional art with a personal touch. The class demonstrates various ways to colour resin, integrate glitters and inclusions, and best practice for working with different moulds.
Covers theoretical and practical aspects of resin work. Includes techniques for colouring resin and shaping semi-cured resin. Guidance on materials, workspace preparation, and safety equipment.
“Evershine Collection” – Artisan Jewellery Epoxy Resin Kit with 100+ Accessories
The Evershine Collection is an all-in-one solution for anyone wanting to create custom jewellery or small decorative resin pieces. This kit contains crystal-clear 1:1 epoxy resin (easy measuring for beginners), over 100 accessories such as moulds, findings, and mini drill tools, 12 pigments, dried flowers, and an alphabet mould for personalised gifts. Its straightforward mixing process, enhanced degassing for clear finishes, and detailed instructions make it especially friendly for those new to resin. If you’re looking to explore wearable resin art or make thoughtful, bespoke gifts, this kit puts a full workshop at your fingertips.
Includes 500g crystal-clear epoxy resin with 1:1 mixing ratio for ease of use Over 100 premium accessories including keyrings, clasps, tassels and alphabet mould Enhanced degassing helps remove bubbles for transparent detailed finishes
Resin Geode Coaster Starter Kit – Create Stunning Crystal-Style Coasters at Home
If you’re inspired by mineral patterns and want to experiment with resin’s artistic possibilities, the Geode Coaster Starter Kit provides everything required to craft crystal-inspired coasters at home. This kit stands out for its 800g of epoxy resin, themed coaster moulds, a selection of colourants, and easy-to-follow, illustrated instructions. It’s beginner-friendly with clear pointers on mixing ratios, colour-layering techniques, and how to create dramatic geode or ocean effects. Protective gloves and mixing tools are included for immediate use.
Includes 800 g epoxy resin, silicone moulds, colourants, gloves and mixing tools Step-by-step instructions guide the process from mixing to curing Allows creation of various effects including layered geode patterns and ocean art
Wooden Resin Coaster Starter Kit – Create Beautiful Handmade Coasters at Home
The Wooden Resin Coaster Starter Kit is a comprehensive bundle for crafting elegant, colourful wooden coasters using glossy epoxy resin. It includes both round and square wooden bases, a generous supply of resin, 10 different colourants, gloves, tools, and clear step-by-step instructions. With this kit you can experiment with blends, marbling effects, metallic highlights, or soft natural tones. It’s ideal for crafters focused on home décor or handmade gifts, and offers practical tips to achieve bubble-free, professional-looking finishes.
Includes 830 g epoxy resin and wooden coaster bases in square and round shapes Comes with 10 resin colourants, gloves, mixing tools, and step-by-step instructions Designed for decorative and gift-making resin coaster projects with multiple colour effects
Essential Tips for Safe and Successful Resin Projects
Regardless of your chosen kit or class, some universal tips help ensure success in any resin project. Always prepare a well-ventilated, dust-free workspace and wear the recommended safety equipment (mask and gloves). Carefully follow mixing ratios — incorrect ratios can prevent proper curing. For the clearest finishes, pour slowly to minimise air bubbles and use a torch or heat gun gently if bubbles appear. Give resin pieces ample time to cure (typically 24–48 hours) on a flat surface free from disturbance. Cleaning up promptly before the resin cures makes maintenance much easier, and storing leftover resin tightly sealed helps extend its shelf life. Most importantly, take your time and enjoy the process of creating unique handmade pieces.
Beginner Mistakes to Avoid in Resin Work
Common beginner errors include improper mixing, skipping safety steps, and rushing the curing process. Take care to follow the instructions closely for mixing ratios and working times. Shield your space from dust, and wear gloves and a mask. Remember that resin needs time to cure — avoid touching or moving pieces too soon for best results.

- Resin Class – 3D Effects Coasters Masterclass, 120 MinutesThis course introduces working with resin to create coasters, trays and bowls, suitable for DIY enthusiasts exploring resin art.
 "Evershine Collection" – Artisan Jewellery Epoxy Resin Kit with 100+ Accessories£21.95"Evershine Collection" offers a complete jewellery epoxy resin kit with clear 1:1 resin and accessories, suitable for creating glass-like artisan…
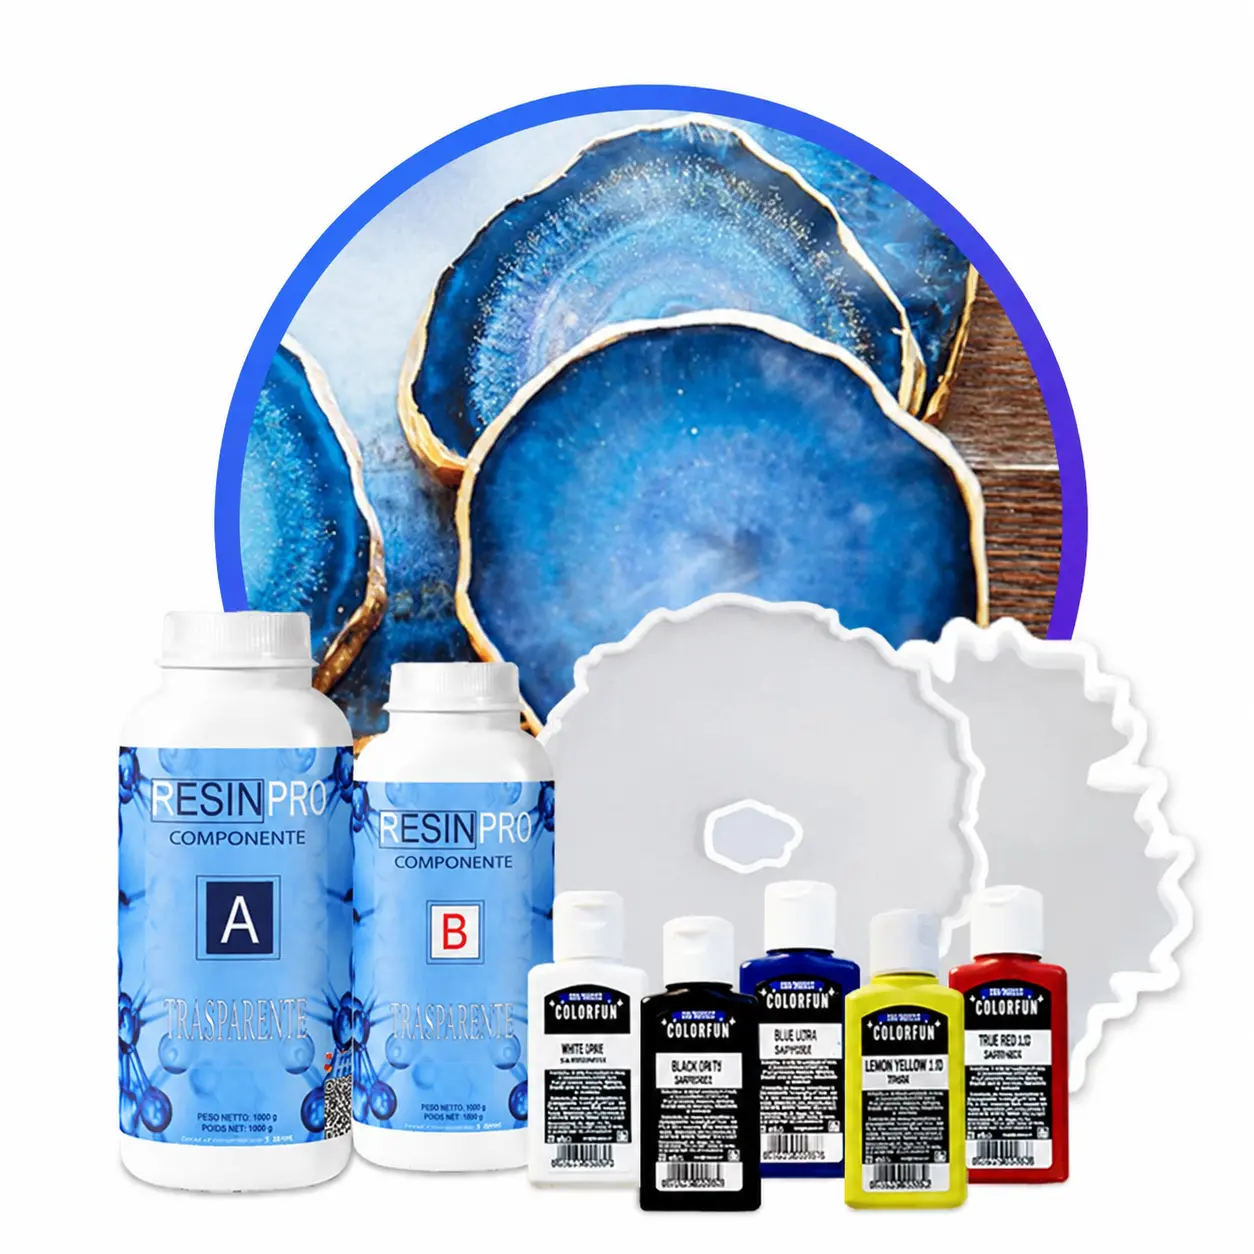 Resin Geode Coaster Starter Kit – Create Stunning Crystal-Style Coasters at Home£42.85This starter kit includes resin, moulds, colourants and tools for making crystal-style coasters at home.
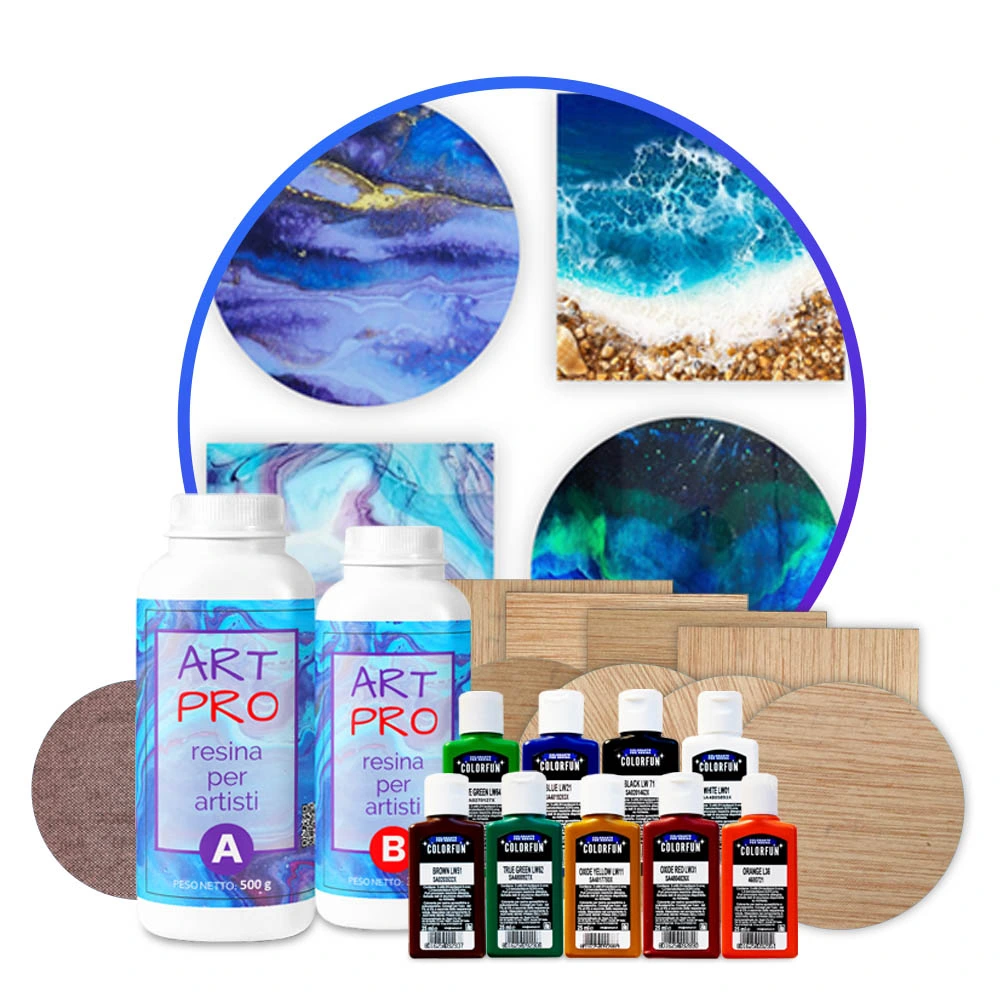 Wooden Resin Coaster Starter Kit – Create Beautiful Handmade Coasters at Home£50.85This starter kit includes the essentials for making wooden resin coasters, suitable for beginners exploring creative resin art at home.
Frequently Asked Questions
Should I start with a resin masterclass or use a starter kit?
A masterclass is best for guided learning with direct support, while a starter kit offers self-paced flexibility at home.
What are good resin projects for beginners?
Coasters, simple jewellery, and decorative trays are ideal projects as they require minimal moulds and straightforward techniques.
What safety precautions should I follow when using resin?
Work in a ventilated area, use gloves and a mask, and avoid direct skin or eye contact with uncured resin.
How do I avoid bubbles in my resin projects?
Pour slowly, allow bubbles to rise before curing, and use a torch or heat gun gently over the surface to remove trapped air.
How long should I wait for resin to cure?
Most resin pieces require 24–48 hours to fully cure. Avoid moving or touching artwork until the curing process is complete.