 Free shipping on orders over £29,85
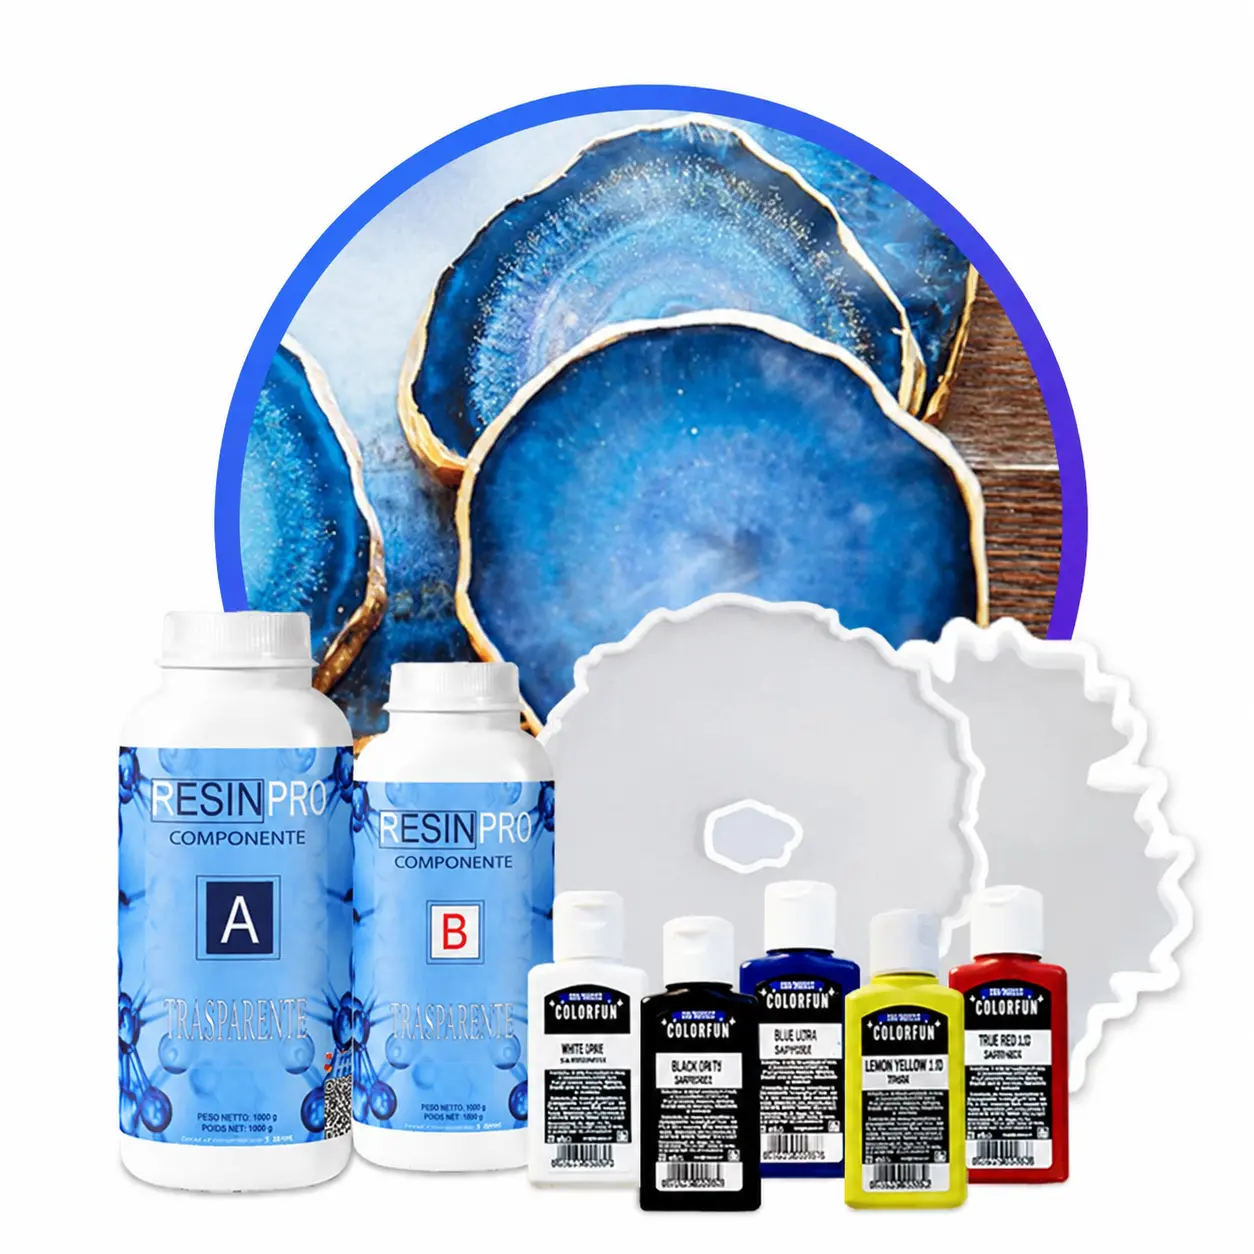

Resin Geode Coaster Starter Kit – Create Stunning Crystal-Style Coasters at Home
 Available, ready for shipping
 Order now to receive your product between Friday 19 June and Saturday 20 June.
 Shipping from £1.97 - Free for orders over £29.85
£42.85
Wed, 17. Jun
Ordered
Wed, 17. Jun - Thu, 18. Jun
Order Shipped
Thu, 18. Jun - Fri, 19. Jun
Estimated delivery
Create beautiful handmade resin coasters inspired by natural geodes, crystals and stone patterns. This complete kit contains everything you need to start making elegant, professional-looking resin coasters, even if you are a beginner.
✔️ 800 g epoxy resin
✔️ Silicone geode coaster mould
✔️ 5 resin colourants
✔️ Gloves and mixing tools
✔️ Step-by-step instructions
Perfect for creating unique table décor, handmade gifts, decorative pieces and stylish home accessories. Simply mix, pour, add colour, and watch stunning geode-style patterns appear in the resin.
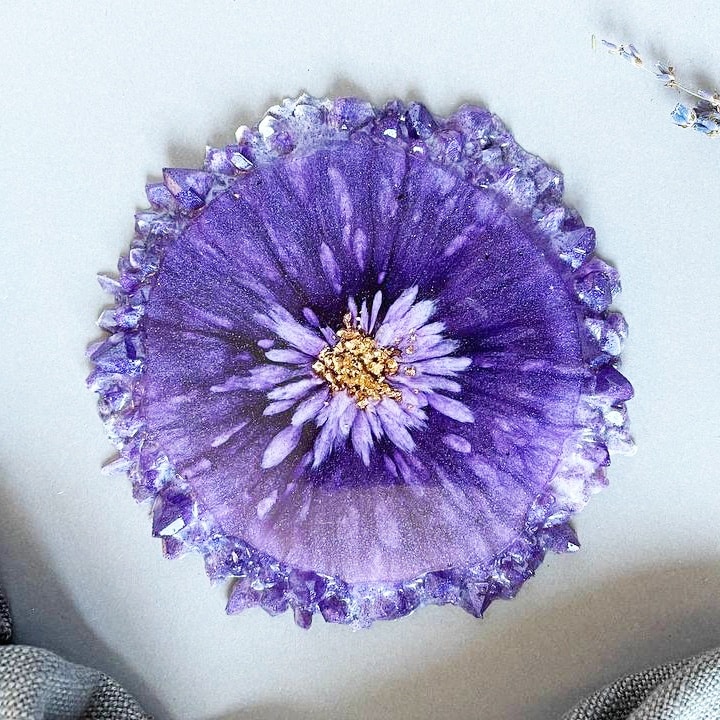
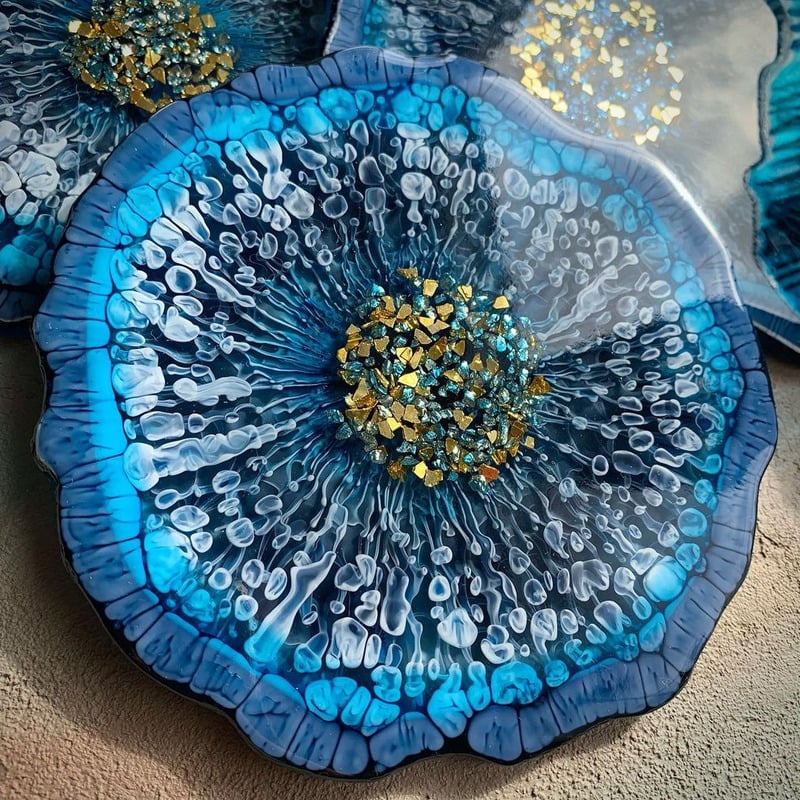
Experiment with ocean colours, soft natural tones, pressed flowers or golden edges to create your own unique design.
Whether you are exploring resin art for the first time or looking for a creative gift, this kit makes it easy to achieve beautiful artistic results.
Start creating your own resin geode coasters today! ✨
Description
Description
KIT INSTRUCTIONS
This kit contains:
✔️ 800 g epoxy resin
✔️ 2 silicone geode coaster moulds
✔️ 5 resin colourants
✔️ Gloves and mixing tools
✔️ Step-by-step instructions
Step-by-step guide:
1️⃣ Prepare your workspace
Cover your work surface with a plastic protective sheet to keep it clean and safe. Make sure your silicone moulds are clean, dry and free from dust. Place all materials within easy reach before you start.
Wear disposable gloves and work in a well-ventilated area. For the best result, keep the room temperature stable and avoid moving the moulds once the resin has been poured.
2️⃣ Mix the epoxy resin
Mix the epoxy resin according to the ratio of 100:60 by weight. For a 5–7 mm pour, you can use 80 g of component A and 48 g of component B.
Weigh both components carefully using digital scales. Pour them into a clean mixing cup and mix slowly for about 3 minutes. Scrape the sides and bottom of the cup several times to make sure the resin and hardener are fully combined.
After mixing, let the resin rest for 2–3 minutes. This helps reduce air bubbles before pouring.
3️⃣ Add your colours
Divide the mixed resin into separate cups, depending on how many colours you want to use. Add a small amount of resin colourant to each cup and mix until the colour is even.
Start with a small amount of colourant and add more if needed. This gives you better control over the final shade and helps keep the resin clear and glossy.
4️⃣ Choose your pouring technique
For a dynamic abstract effect:
Pour different colours into one larger cup without fully mixing them together. Then slowly pour the resin into the moulds. The colours will naturally flow and create beautiful, organic patterns.
For a controlled geode pattern:
Pour each colour separately into specific areas of the mould. This allows you to create rings, layers and natural stone-inspired lines.
For extra depth:
Use a mix of transparent resin, white resin and coloured resin. This creates a more realistic geode effect with beautiful contrast and dimension.
5️⃣ Remove air bubbles
After pouring, let the resin sit for 15–20 minutes so air bubbles can rise to the surface.
Use a small gas torch or heat gun and pass it gently over the surface to pop the bubbles. Do not hold the flame too close or in one place for too long, as this may damage the resin or the silicone mould.
6️⃣ Let it cure
Leave the moulds in a flat, dust-free area for 24–48 hours. Avoid touching or moving them while the resin is curing.
Once the resin is fully hard and no longer sticky, carefully remove the coasters from the moulds.
Your handmade geode resin coasters are now ready to use, display or give as a beautiful creative gift.
More creative ideas:
🌟 Realistic geode effect
To create a true geode-inspired look, work in layers:
✅ Divide the resin into several cups and prepare transparent, white and coloured resin.
✅ Start with transparent resin in the centre or around the centre of the mould.
✅ Add layers of white, transparent and coloured resin, allowing the colours to flow naturally.
✅ Finish with a final layer of clear resin to add depth, shine and a professional finish.
🌊 Ocean resin art
Use different shades of blue, turquoise and white to create a sea-inspired design. Add small shells, sand or mini starfish for a beautiful coastal look.
🌸 Dried flowers
Place dried flowers, petals or leaves into the resin to create delicate, natural-looking coasters with a timeless handmade style.
✨ Gold accents
Add gold leaf, metallic flakes or a gold edge after curing for a luxurious geode finish. This gives your coasters an elegant, premium look.
🎨 Make it your own
Experiment with colours, layers, metallic effects and natural decorations. Every coaster you create will be completely unique — a small piece of resin art made by you.
Enjoy the creative process and start making your own stunning geode resin coasters today!
 Instruction
Reviews
Reviews
COD:
GEODEARTKIT