 Free shipping on orders over £29,85

How do you make a coffee table with phosphorescent resin?
Step-by-step guide for a glowing, decorative centrepiece

Transform your living space with a coffee table that glows in the dark using phosphorescent resin. This guide walks you through each stage— from planning your concept and preparing materials, to pouring layers and finishing for a striking, luminous centrepiece perfect for modern interiors or creative DIY projects.

What You’ll Need
- Phosphorescent Pigment – Glow-in-the-Dark Additive for Resin, Paint, and Varnish: Adds a vibrant, glowing effect to your resin pours.
- “Epoxytable 10-Ten” – Deep Pour Epoxy Resin for Tables, Up to 10cm Casting: Ideal for thick, clear castings on larger tables.
- “EpoxyTable 5-Five” – Deep Pour Epoxy Resin for Tables and Large Projects – Up to 5cm: Suitable for moderate pour depths and stable surfaces.
- “River-Table” – Complete Kit for Creating Your First Epoxy Resin Table: Great for beginners, with essential tools and guidance.
- Wooden panels or slabs
- Mixing containers, stirrers, gloves and protective gear
- Silicone or plastic mould (size of your planned table)
- Sandpaper, polish, and buffing pads for finishing
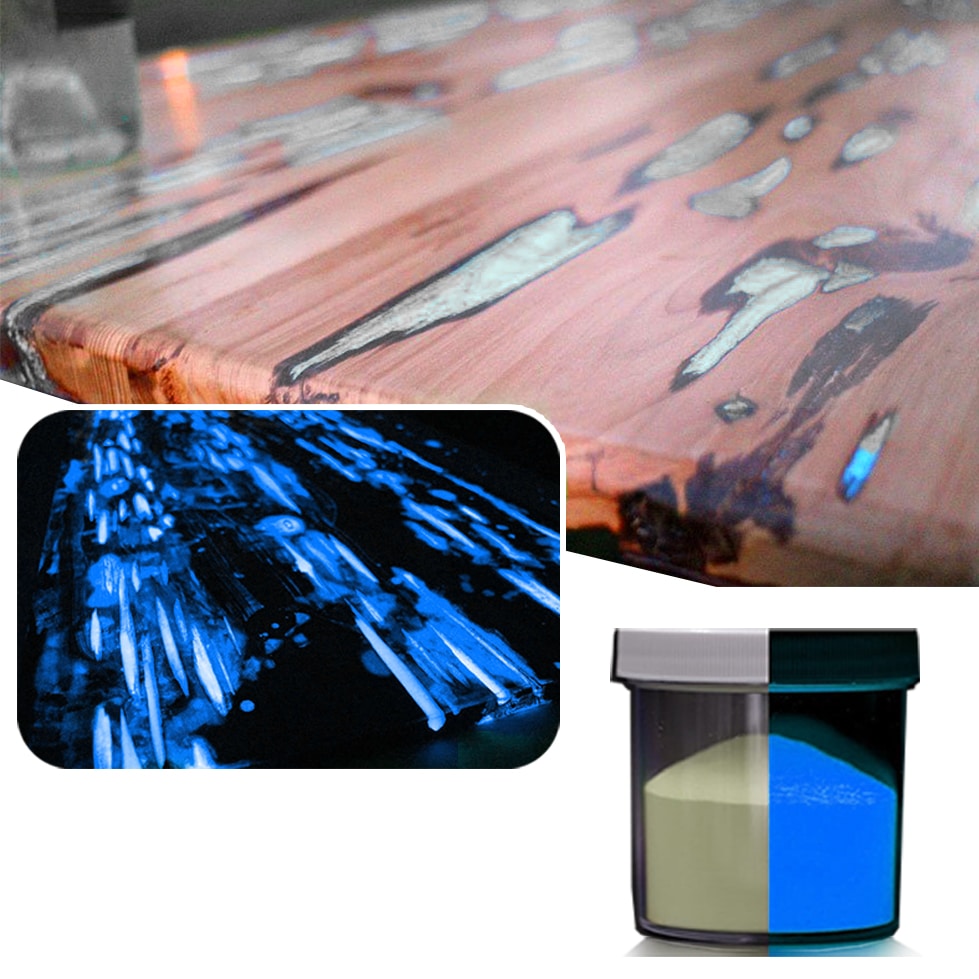
Visual Inspiration: Phosphorescent Resin Table in Action
See how phosphorescent resin brings a coffee table to life in low light: the glow permeates the resin sections, revealing contemporary form and a magical ambient effect. Designs can feature central river channels, swirling inlays or sky-like patterns—highlighting the creative flexibility of phosphorescent techniques in functional furniture.
Step 1: Design and Prepare Your Coffee Table Base
Begin by conceptualising the style and structure you want for your coffee table. Decide where you’d like the phosphorescent glow— such as river-like channels, inlays, or entire resin areas. Plan your design in advance so you can map out wood placement and space for the resin. Use a robust wooden slab or secured panels as your base, ensuring all pieces are dry, clean, and free from oils.
Carefully assemble your formwork or mould. Seal all internal edges with silicone or tape to prevent leaks. Ensure your workspace is clean and dust-free; this helps avoid debris setting in the resin and ensures a professional finish.


Step 2: Mix the Epoxy Resin with Phosphorescent Pigment
Before mixing, measure your workspace temperature (ideally 18–25°C) and prepare in a well-ventilated area. Choose an appropriate deep pour resin depending on thickness—use “EpoxyTable 5-Five” for up to 5cm or “Epoxytable 10-Ten” for thicker sections. Wear gloves and review the resin instructions for the correct ratio.
Gradually add Phosphorescent Pigment – Glow-in-the-Dark Additive for Resin, Paint, and Varnish to the resin, mixing thoroughly. The pigment amount determines glow intensity; usually, a small percentage by weight is sufficient. Mix resin and phosphorescent pigment thoroughly for even luminosity without streaks or clumps.
Step 3: Pour the Resin and Create the Phosphorescent Effect
Once your mixture is ready, gently pour it into the table mould or carved channels. If your design includes layered or river effects, pour resin in stages. Pour in controlled layers for optimal effect, allowing each layer to settle slightly before adding more. This minimises bubbles and ensures the pigment stays suspended.
If the table is especially large or deep, consider working in several pours to avoid excess heat build-up, following resin manufacturer guidance. Secure the table to prevent accidental movement while the resin cures.


Step 4: Curing, Demoulding, and Polishing
Allow the resin to cure undisturbed; curing times vary depending on resin type and room conditions, often between 24–72 hours. Once fully set, carefully demould your tabletop. Allow for proper curing and careful demoulding to prevent cracks or surface imperfections.
Sand rough edges and work through increasingly finer grits of sandpaper, finishing with a polish and buffing pad for a high-gloss, transparent look. A final clean removes dust and reveals the phosphorescent glow effect. Attach table legs to finalise your creation.
Tips, Mistakes to Avoid, and Troubleshooting
Always follow safety instructions and ensure thorough mixing to avoid soft spots. Watch out for air bubbles—degas with a heat gun if needed. Avoid overloading with pigment, which can hinder curing or cause uneven luminosity. Ensure every component is dry to prevent cloudiness in the finished table.

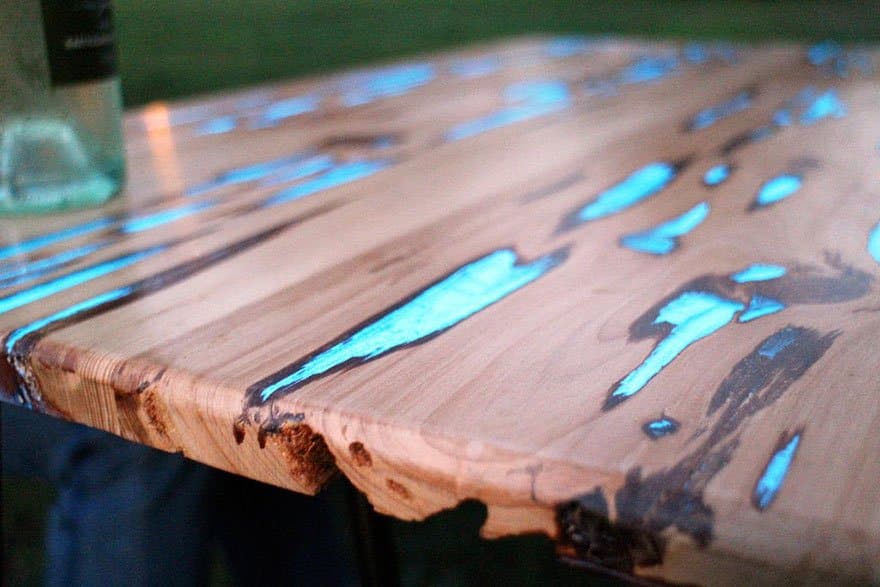
Close-Up: Finish, Glow, and Polishing Results
The final coffee table showcases a seamless, glossy finish and captures light during the day for striking nighttime luminosity. Proper sanding and careful polishing are crucial for a glass-like surface, while correct pigment dispersion ensures a radiant, even glow through all the resin areas.

- Phosphorescent Pigment – Glow-in-the-Dark Additive for Resin, Paint, and VarnishPrice range: £8.45 through £13.95Phosphorescent Pigment adds a glow-in-the-dark effect to resins, paints and varnishes and is suitable for decorative and DIY projects.
- “Epoxytable 10-Ten” – Deep Pour Epoxy Resin for Tables, Up to 10cm CastingPrice range: £35.95 through £351.95“Epoxytable 10-Ten” is designed for deep pouring up to 10cm, suitable for tables and artistic projects in the coffee table making theme.
- "EpoxyTable 5-Five" – Deep Pour Epoxy Resin for Tables and Large Projects – Up to 5cmPrice range: £17.95 through £1,154.95"EpoxyTable 5-Five" is designed for deep pouring tabletops and large projects, suitable for clear, scratch-resistant surfaces up to 5cm thick.
 "River-Table" – Complete Kit for Creating Your First Epoxy Resin TablePrice range: £198.45 through £467.45"River-Table" kit provides materials and instructions to create a wood and resin table, suitable for those new to epoxy projects.
Frequently Asked Questions
What is the best resin for a phosphorescent coffee table?
Choose a deep pour epoxy resin suitable for your table thickness, such as EpoxyTable 5-Five for up to 5cm or Epoxytable 10-Ten for thicker pours.
How much phosphorescent pigment should I use?
Generally, 1–5% by weight of the epoxy resin provides a strong glow. Too much pigment can affect curing, so always follow guidelines.
Is this project suitable for beginners?
Yes, with careful planning and a complete kit, beginners can make a coffee table with phosphorescent resin. Detailed instructions are recommended.
Do I need special tools or equipment?
You will need mixing tools, safety gloves, a suitable mould or form, and basic sanding and polishing supplies for the finishing steps.
How do I avoid bubbles in the resin?
Mix slowly and thoroughly, and use a heat gun briefly over the poured resin to remove surface bubbles before curing.
How long does a phosphorescent resin table take to cure?
Most deep pour epoxies cure in 24–72 hours, depending on thickness and room temperature. Wait until fully hardened before demoulding.