 Free shipping on orders over £29,85


How do you colour liquid resin?
Master colour application for flawless and vibrant resin finishes.


Adding colour to liquid resin opens a world of creative possibilities, from jewelled effects in resin jewellery to bold, opaque art pours, realistic sea scenes, and transparent finishes. This guide covers the essential steps, tips, and best practices to achieve vibrant, reliable colours every time, whether you are making coasters, river tables, or abstract artworks. Understand how to prepare your resin, select the right type of colourant for your project, and apply it evenly for stunning results.
What You’ll Need
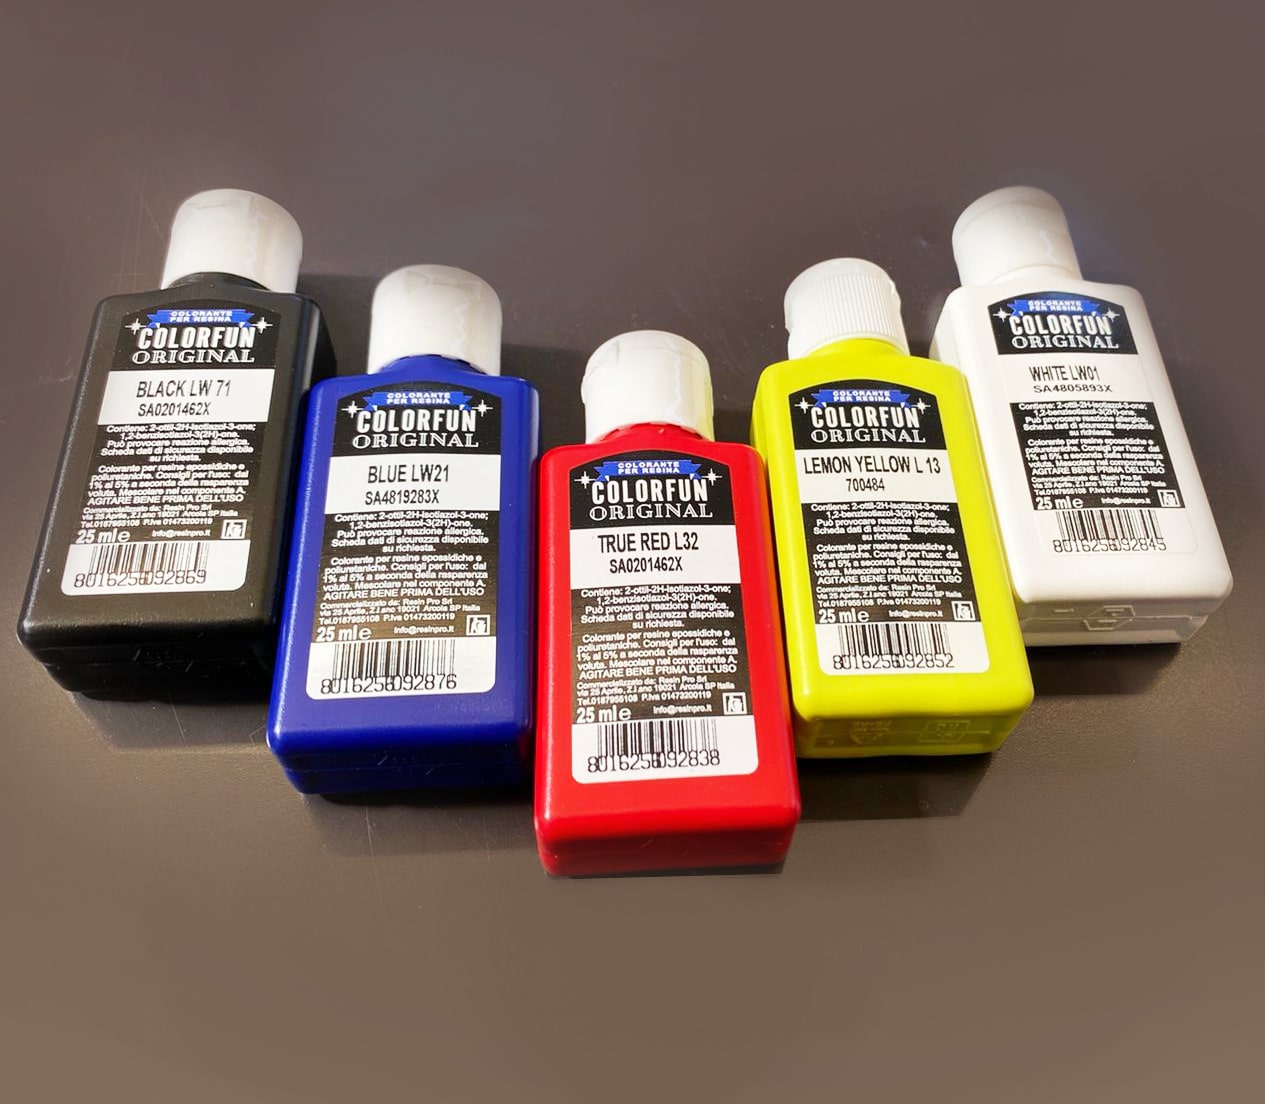
- “Colourfun” – Liquid Epoxy Resin Colourant 25-100ml – High coverage – liquid pigment for bold, customisable shades
- “Colourfun Set” – Liquid Epoxy Resin Colourant Set for Solid Colour Effects – pre-mixed pastes for smooth, intense coverage
- “Marine Palette” – Set of Dyes for Ocean Art, Epoxy Resin, and Beach Effects – ready-to-use dyes for ocean-inspired pieces
- “Magic Crystal” – Transparent Resin Colour 45ml – transparent colourant for vivid, glass-like effects
- Clear liquid resin system (compatible with your chosen colourant)
- Disposable mixing cups and stir sticks
- Protective gloves and workspace covering
- Measuring scales for resin batching

See Resin Colouring in Action
Watch how colours blend into resin and transform clear mixes into oceanic hues or gemstone effects. These gallery images capture vibrant results achieved with different colourant types on real projects.
Step 1: Choose the Right Colourant for Your Resin
Not all colourants are created equal—some are specially developed for resin, ensuring even dispersion and unbeatable vibrancy without compromising resin clarity or cure strength. Decide whether your project aims for bold opacity, subtle translucency, or a crystal-clear tinted appearance. Liquid pigments such as those in the Colourfun range are highly concentrated, ideal for versatile projects and custom blending. If you plan to create marine effects or beach scenes, a specialised set like the Marine Palette can simplify colour selection and keep results consistent.
Step 2: Prepare the Resin and Workspace
Ensure your working area is dust-free, level, and protected with suitable covers. Measure and mix your resin and hardener precisely, adhering strictly to the manufacturer’s ratio and stirring instructions. Proper mixing is crucial—under or over-mixing can affect the resin set and cause cloudiness or sticky patches. Wait for bubbles to settle before adding any colourant, as trapped air may interfere with colour clarity and distribution.
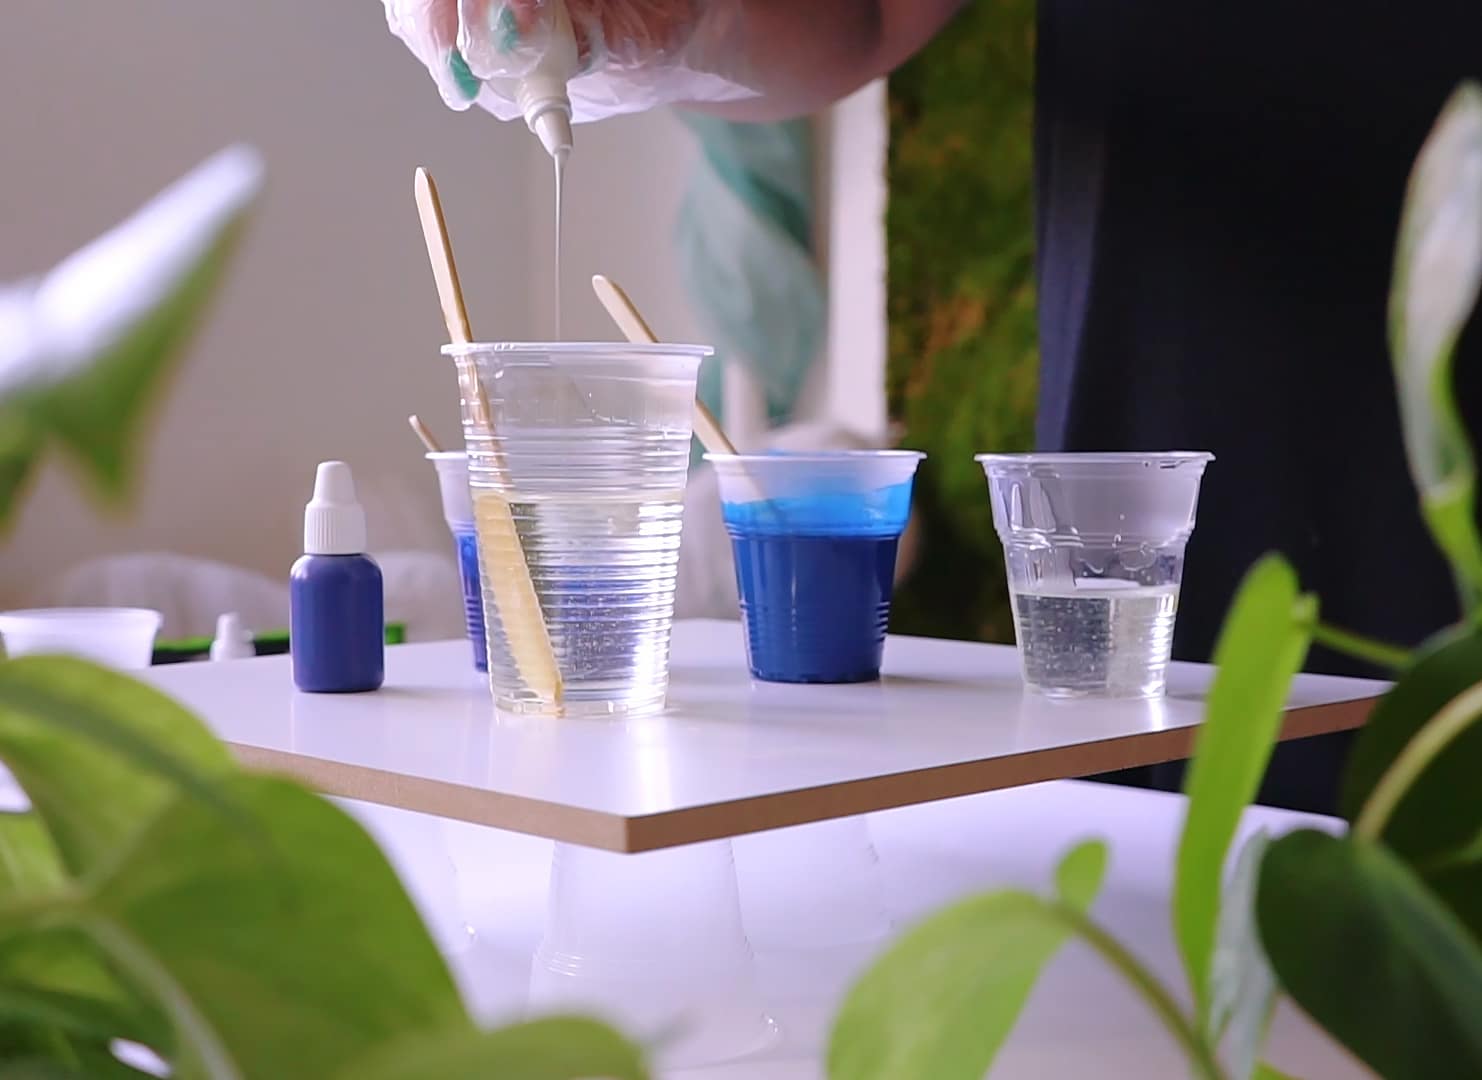
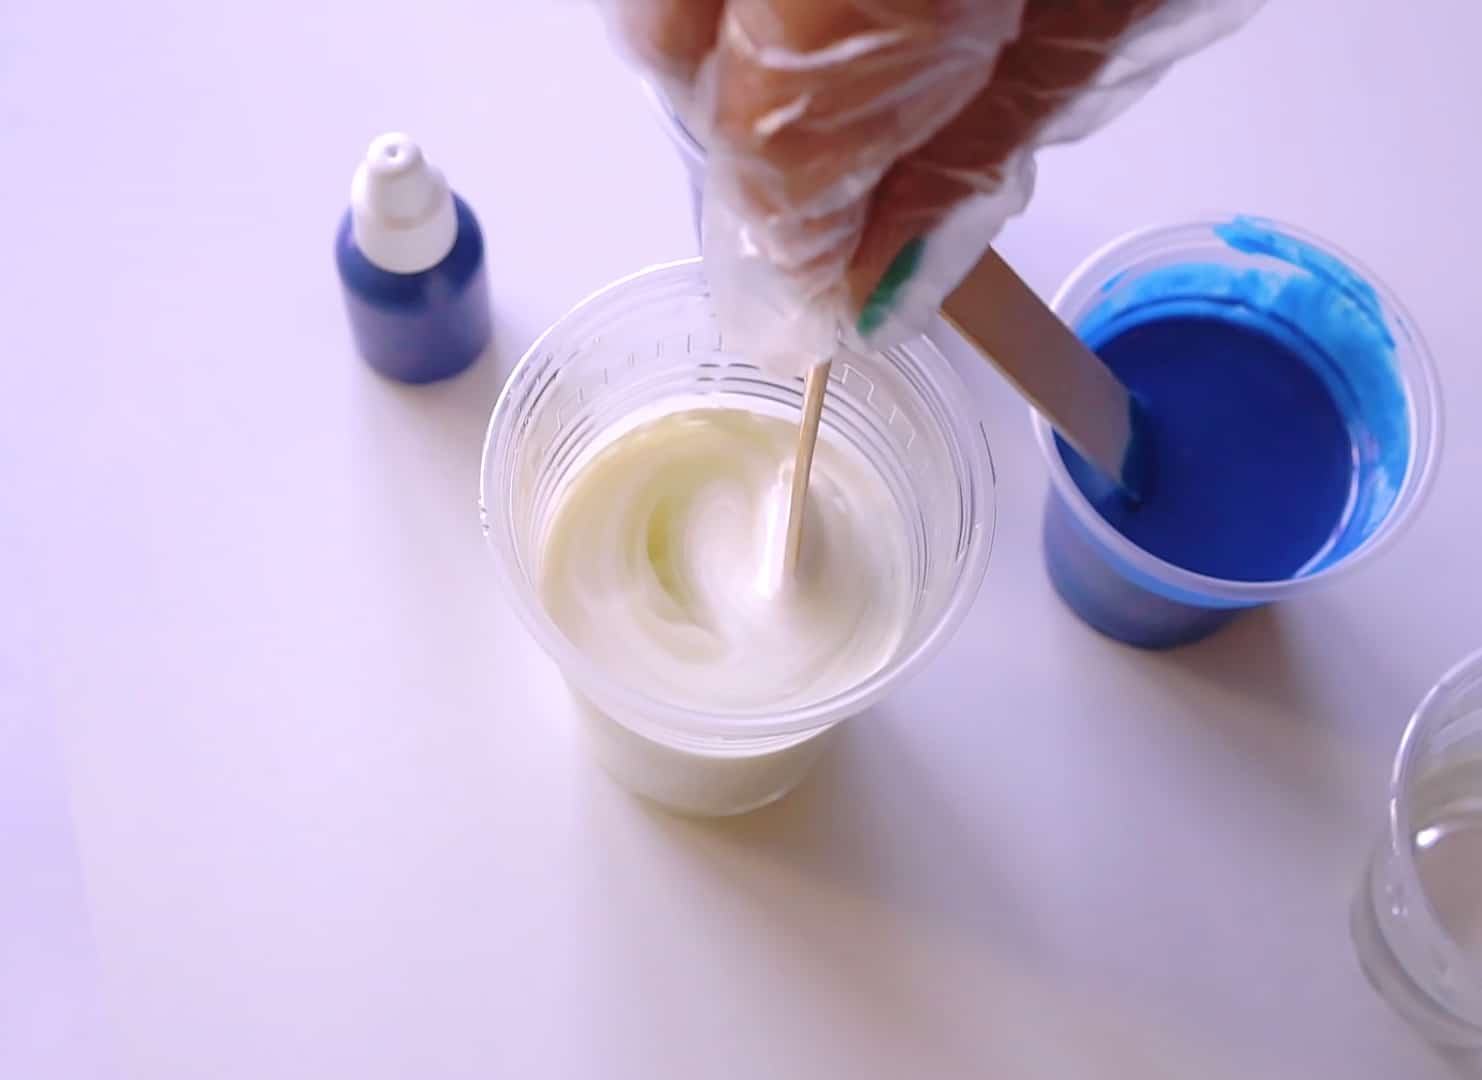
Step 3: Add and Blend Your Colourant
Gradually introduce your chosen colourant to the mixed resin, starting with the minimum recommended amount (often only a few drops per 100g for concentrated liquids). Stir gently but thoroughly to ensure total dispersal without introducing excess bubbles. Adjust the dose incrementally to achieve your desired intensity—transparent tints use less pigment, while bold, solid effects may require more. Avoid exceeding the maximum percentage indicated on the product to prevent interference with curing.
For vibrant solid colours or blended pastels, the Colourfun Set offers ready-to-use pastes that mix smoothly and produce high coverage without streaks. For crystal-clear, glass-like transparencies, opt for Magic Crystal dyes—they remain stable and brilliant even after curing.
Step 4: Pour and Cure with Care
Once your resin colour is perfectly blended, pour it gently into your chosen mould or onto your prepared surface. Pour in layers if you aim for gradient or wave effects—use a kit like the Marine Palette for seamless transitions between blues and aquas. Eliminate surface bubbles using a heat gun or torch, carefully following safe handling practices. Maintain the recommended curing environment—avoid dust, moisture, or temperature swings until the piece is fully set and ready to demould or display.

Tips, Troubleshooting, and Common Mistakes
Always pre-test colour intensity with a small batch, as pigment strengths vary greatly and it is easier to deepen than lighten. Overloading resin with colourant can lead to incomplete curing or soft finishes—stay at or below suggested maximum concentrations. Clean mixing utensils and cups between batches if switching colours, as residue can alter results. If streaks or patchiness occur, blend longer and make sure the colourant is fully compatible with your resin type. For unique custom shades, experiment with small quantities until satisfied.
Inspiration: Artistic Liquid Resin Colouring
Explore resin art pieces, pours, and jewelled effects created using liquid resin colourants. See marine palettes, intense solid overlays, and glass-like transparencies for your next project ideas.
- "Colourfun" – Liquid Epoxy Resin Colourant 25-100ml – High coveragePrice range: £3.65 through £9.85"Colourfun" – Liquid Epoxy Resin Colourant offers vibrant, intense pigments suitable for resin art and professional castings in the theme How do you…
- "Colourfun Set" – Liquid Epoxy Resin Colourant Set for Solid Colour EffectsPrice range: £13.45 through £48.15The "Colourfun Set" offers intense translucent colour pastes designed for liquid epoxy resin, suitable for effects like sea water and resin river…
 "Marine Palette" – Set of Dyes for Ocean Art, Epoxy Resin, and Beach EffectsPrice range: £10.85 through £16.85The Marine Palette set offers ready-to-use epoxy-safe dyes for ocean-themed resin art with vibrant colours and safe studio use.
 "Magic Crystal" – Transparent Resin Colour 45ml£4.65"Magic Crystal" Transparent Resin Colour 45ml is designed for creating clear, vibrant resin effects with an intense, glass-like finish.
Frequently Asked Questions
Can I mix different resin colourants?
You can blend compatible resin colourants for custom shades, but always test compatibility with your resin system first.
Why is my coloured resin cloudy or streaky?
Cloudiness or streaking is usually due to under-mixing or using incompatible colourants. Ensure thorough blending and use colourants made for resin.
How much colourant should I add?
Start with a few drops per 100g resin and increase gradually. Do not exceed the maximum stated amount to avoid curing issues.
Can these colourants be used with UV resin?
Most of these colourants are compatible with UV resin, but always check the product guidance for optimal results and thickness.
How do I create translucent effects in resin?
Use transparent dyes sparingly—less pigment creates subtle tinted effects. Transparent ranges like Magic Crystal are ideal.
What’s the best way to avoid bubbles in coloured resin?
Mix gently, wait for air to rise, and use a heat gun on the surface. Pour slowly to keep air out of the blend.
How to match specific shades when colouring resin?
Combine small samples of colourants gradually, recording your ratios, until you achieve the desired hue and intensity.