 Free shipping on orders over £29,85

How to make hollow resin statues?
Step-by-step process for sculpting lightweight, detailed resin art


Crafting hollow resin statues allows artists and hobbyists to produce lightweight, beautifully detailed sculptures without the bulk and material demands of solid resin. This guide will walk you through the essential steps, from preparing your mould to achieving a flawless, hollow result, making it suitable for both beginners and advanced crafters seeking professional outcomes.
What You’ll Need
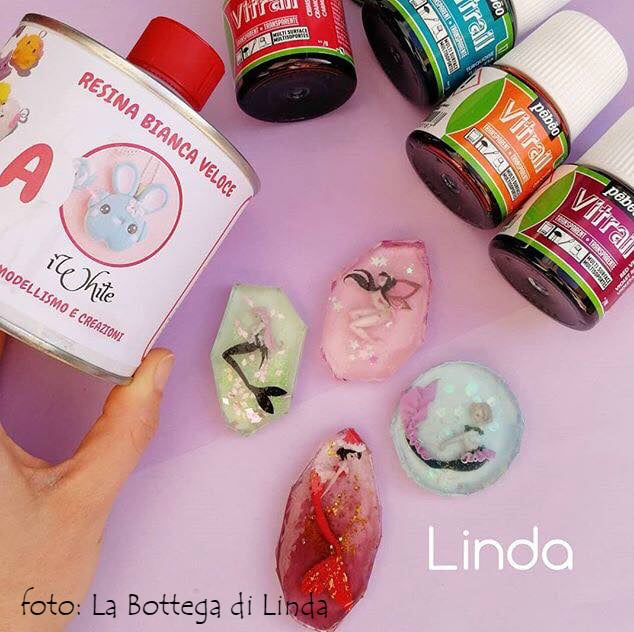
- “IWhite” – Polyurethane Casting Resin – White, Fast-Curing Two-Part System – for rapid, detailed castings, especially in multi-part or complex statues
- “Epoxytable 10-Ten” – Deep Pour Epoxy Resin for Tables, Up to 10cm Casting – for large-scale statues or thick-walled casts
- “EpoxyTable 5-Five” – Deep Pour Epoxy Resin for Tables and Large Projects – Up to 5cm – best suited for statues requiring controlled layering up to 5cm
- Flexible silicone mould (pre-made or self-fabricated for statue shape)
- Release agent suitable for resin casting
- Mixing cups, stirrers and pipettes
- Personal protective equipment (PPE): gloves, mask, eye protection

Visual Inspiration for Hollow Resin Creations
Look at a variety of hollow resin statues and sculptures for inspiration. Notice how artists use colour layering, metallic finishes, and dynamic forms to bring their pieces to life. Your hollow statue can be both visually striking and practical when designed with thoughtful detail.

Step 1: Prepare Your Mould and Workspace
Begin by ensuring your mould is completely clean and free of dust or old release residue. A contaminated mould can leave imperfections and jeopardise your statue’s finish. Apply a release agent to the inside of the mould, giving special attention to intricate areas to guarantee easy demoulding. Lay out your workspace with easy access to PPE and all mixing tools. Wear gloves, eye protection and ensure good ventilation to safeguard yourself from resin fumes and accidental splashes.
Step 2: Mix and Pour the Resin
Choose a resin suited for your project’s detail and wall thickness. If your statue requires rapid demoulding and superior detail replication, the “IWhite” – Polyurethane Casting Resin – White, Fast-Curing Two-Part System is ideal for thin, complex surfaces. For statues needing walls thicker than 5cm, opt for “Epoxytable 10-Ten” – Deep Pour Epoxy Resin. Mix your resin as per the manufacturer’s instructions, combining both parts thoroughly to prevent unmixed patches.
Begin pouring a thin layer into the mould, swirling gently to coat all the fine details. For a hollow statue, rotate the mould or use a brush to move resin up the sides for even coverage. Allow this initial layer to partially gel (but not fully cure) before repeating as necessary to achieve the desired wall thickness. Avoid pouring too thick or too fast as this can cause overheating, distortion, or bubble entrapment.
Step 3: Curing and Demoulding
Let the resin cure according to the product specifications. Polyurethane resin like “IWhite” typically cures in about 30 minutes, while deep-pour epoxies will take several hours up to overnight, depending on the layer thickness. Do not remove the statue prematurely, as under-cured resin can warp the shape and leave sticky surfaces. Demould only after full cure for best results and structural integrity.
Gently peel the mould away, taking care not to stretch or tear intricate sections. Inspect the interior; if your statue is to remain sealed, ensure all wall surfaces have cured evenly. If joining multiple parts (for larger hollow statues), use a compatible resin as adhesive along the seam and clamp lightly until set.
Step 4: Finishing Touches and Detailing
Trim any seam lines, flashing, or excess material using a craft knife or fine file. Sand uneven surfaces with progressively finer grit until smooth. Now is the time to paint, patina, or further embellish your hollow resin statue. If the interior is visible, you may wish to paint it for a cohesive look.
For statues cast with “IWhite”, you can paint directly onto cured resin with suitable primers and acrylics. If you have used coloured or clear epoxy, ensure all surfaces are fully cured before decorating. Touch up imperfections with care and consider sealing the entire piece with a compatible varnish for enhanced durability and visual appeal.
Tips, Common Mistakes and Troubleshooting
Take your time when layering resin, especially for larger statues, to prevent heat build-up and potential deformation. Always check the mixing ratio – inaccurate measurements are a leading cause of tacky, soft, or brittle casts. Watch out for bubbles and avoid vigorous stirring. For best detail retention, use slow, controlled pouring and rotate the mould as the resin sets.
If you notice thin spots after demoulding, you may apply a second batch of resin to reinforce from the inside, provided the initial cast has cured. Always wear PPE and work in a ventilated zone to prioritise your safety throughout the process.
Close-Up Techniques and Project Examples
Explore step-by-step project snippets showing layering, demoulding, and finishing touches on real hollow resin statues. Get a feel for resin clarity and surface smoothness achievable with careful technique and the right product choice for your project’s scale.

- “IWhite” – Polyurethane Casting Resin – White, Fast-Curing Two-Part SystemPrice range: £24.00 through £36.95IWHITE is a fast-curing, highly fluid polyurethane resin designed for detailed, rapid casting suited to the theme of making hollow resin statues.
- “Epoxytable 10-Ten” – Deep Pour Epoxy Resin for Tables, Up to 10cm CastingPrice range: £35.95 through £351.95Epoxy resin designed for deep pour casting up to 10cm, suitable for tables and artistic projects with clarity and reduced yellowing.
 "EpoxyTable 5-Five" – Deep Pour Epoxy Resin for Tables and Large Projects – Up to 5cmPrice range: £17.95 through £1,154.95"EpoxyTable 5-Five" is designed for deep pouring applications up to 5cm thick, with low viscosity and strong UV filters.
Frequently Asked Questions
What resin should I use for hollow resin statues?
Choose polyurethane resin for fast, detailed small statues, or deep-pour epoxies for larger, thicker-walled projects.
How can I avoid bubbles when making hollow resin statues?
Pour slowly, gently rotate the mould, and use low-viscosity resins to minimise air entrapment.
Should I use mould release when casting hollow statues?
Yes, always apply a suitable release agent to protect both the mould and your finished piece from sticking.
Can I make large or multi-section statues hollow?
Yes. Cast parts separately, then bond using compatible resin after curing for lightweight, joined sections.
How thick should the walls of a hollow resin statue be?
Walls between 3 to 10mm are typical, but always match the thickness to statue size for stability.
How long should I let my hollow resin statue cure?
Cure time depends on resin type: polyurethane sets in under an hour; deep-pour epoxy can take 12–48 hours.