 Free shipping on orders over £29,85


how to make resin creations by erikakawaii
Resin crafting has become a vibrant creative outlet, combining art and science to produce unique coasters, ocean scenes, jewellery, and so much more. If you admire the playful, vibrant resin creations popularised by makers like ErikaKawaii, this guide will show you each stage of the process, from planning and preparation to the final touches that make every piece stand out. Whether you are a beginner or looking to refine your skills, you’ll learn the key techniques, safety considerations, and artistic ideas needed to make your own resin masterpieces.
Essential guide for stunning coasters, ocean art, and jewellery

What You’ll Need
- Free Step-by-Step Lesson “Kiwi Coasters” by Natalia Natirum: Step-by-step free video lesson for creating resin coasters resembling kiwi fruit.
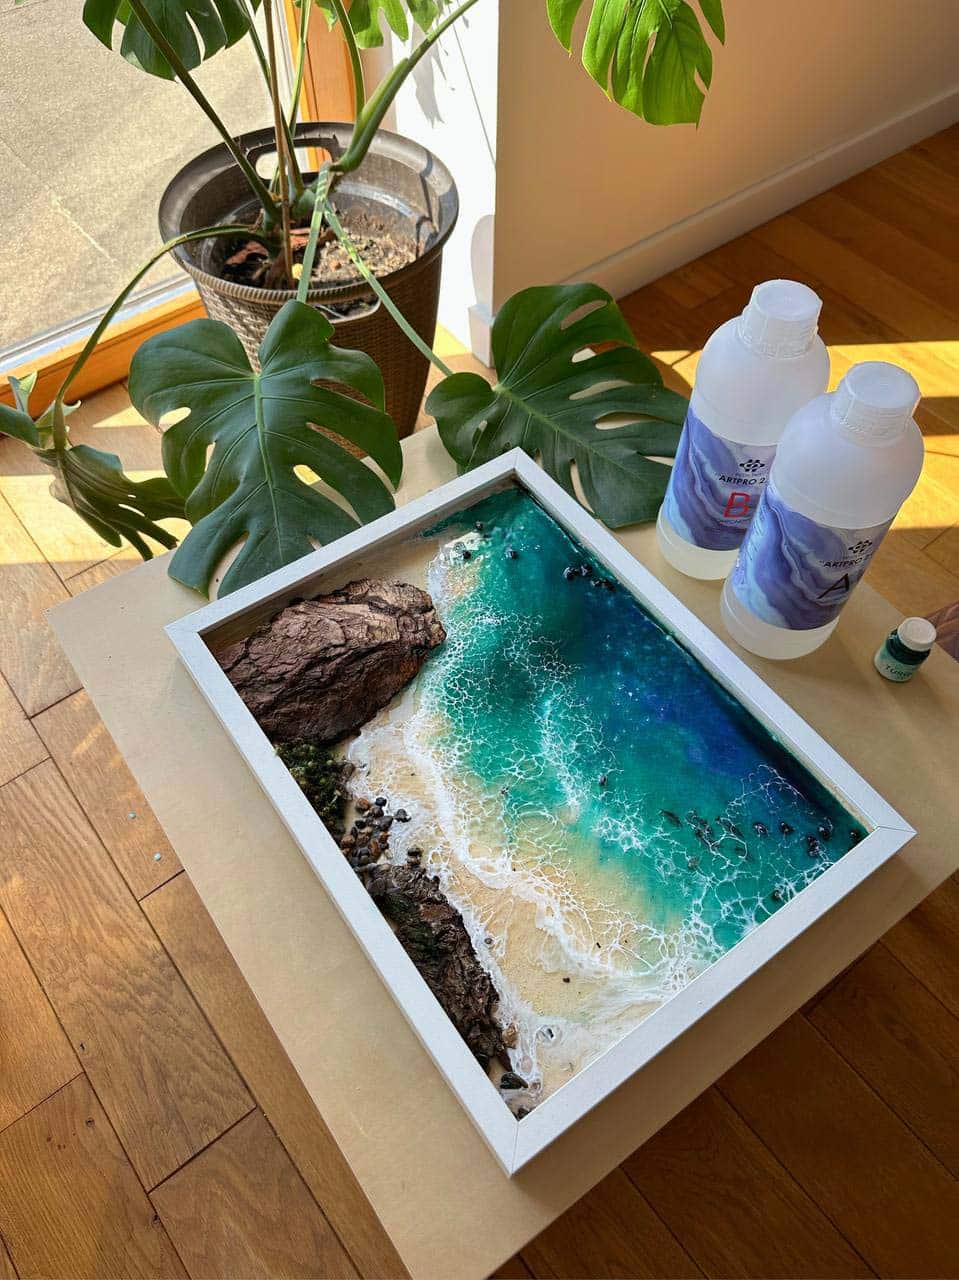
- Free Step-by-Step Resin Ocean Art Lesson by Natalia Natirum: A free video lesson for creating resin ocean art using medium or high viscosity resins and assorted decorative materials.
- “Sea” – Resin Kit for Creating Ocean Art, 1.7kg Epoxy, Pigments & Canvas: Complete resin kit designed for creating ocean-inspired art scenes with pigments and wave effects.
- “Evershine Collection” – Artisan Jewellery Epoxy Resin Kit with 100+ Accessories: An all-in-one epoxy resin starter kit for crafting bespoke jewellery with crystal-clear finishes and premium accessories.

Materials Spotlight: Resin Kits and Guides That Inspire
Starting with the right resources accelerates your creative process. Step-by-step lessons such as the Kiwi Coasters tutorial provide actionable advice, while complete resin kits set you up with matched components for both beginner and advanced projects.

Take safety seriously
Before working with resin, ensure your crafting space is well-ventilated and free from dust. Wear gloves to minimise skin contact, and consider eye protection, especially when mixing or pouring. Always follow the instructions provided by your chosen resin kit. Many beginners overlook safety, but it’s crucial for healthy, enjoyable crafting. Dispose of waste and left-over resin responsibly.
Plan your project and prepare your workspace
Decide what you want to create—whether inspired by kiwi coasters, ocean art, or jewellery. Read or view the relevant lesson or kit instructions to fully understand each step. Gather all your materials, cover your surface to protect from spills, and lay out your moulds, mixing utensils, and pigments. Proper preparation avoids last-minute problems and helps you work efficiently.
Pour and colour your resin
Mix your resin and hardener according to the package instructions, usually with precise 1:1 or other ratios. Stir gently but thoroughly for a clear, bubble-free result. If creating ocean art, consider a kit like “Sea” – Resin Kit for Creating Ocean Art, which includes everything for pouring layered ocean tones and wave effects. For jewellery, a starter set such as “Evershine Collection” – Artisan Jewellery Epoxy Resin Kit helps with colour mixing and adding decorative accents like dried flowers or glitter. Use smooth, controlled pouring to achieve clean layers or effects, and don’t rush—resin can generally be worked with for 20–45 minutes, depending on type.

Demould and add finishing touches
Allow your piece to cure fully, following the recommended time (often 24–48 hours). Don’t remove from moulds too early, as this can result in warping or fingerprints. Once demoulded, sand or trim any rough edges carefully. Attach hardware to jewellery, add extra embellishments, or apply another resin coat for a high-gloss finish if needed. For inspiration and demonstration, the Free Step-by-Step Resin Ocean Art Lesson by Natalia Natirum is an excellent guide for achieving professional final results.
Tips, Common Mistakes, and Troubleshooting
Work in small batches to reduce waste and avoid curing issues. Warm (not hot) resin can be easier to mix and pour, but never overheat. Always measure your components accurately, as incorrect ratios cause sticky or soft results. Air bubbles can often be removed by gently blowing over the surface with a straw or using a heat tool. If colours blend unintentionally, wait a minute for the resin to thicken before pouring. Should your surface remain tacky after curing, ensure you have used the correct resin for your project and refer to the troubleshooting guidelines provided in your chosen kit or lesson.
Discover More Resin Creation Possibilities
Ready to expand your resin skills? Explore other project tutorials or resin starter kits for new design ideas and fresh creative approaches. Each project helps build your confidence and technique in resin art.

- Free Step-by-Step Lesson "Kiwi Coasters" by Natalia NatirumOriginal price was: £99.00.£0.00Current price is: £0.00.This free tutorial shows how to make resin kiwi coasters using recommended materials in the theme how to make resin creations by erikakawaii.
- Free Step-by-Step Resin Ocean Art Lesson by Natalia NatirumOriginal price was: £99.00.£0.00Current price is: £0.00.Free video tutorial shows how to create resin ocean art, supporting the theme how to make resin creations by erikakawaii.
- "Sea" – Resin Kit for Creating Ocean Art, 1.7kg Epoxy, Pigments & Canvas£44.85"Sea" resin kit includes thick epoxy and pigments for ocean art, suitable for resin creations by erikakawaii.
- "Evershine Collection" – Artisan Jewellery Epoxy Resin Kit with 100+ Accessories£20.85"Evershine Collection" offers a beginner-friendly epoxy resin kit with a 1:1 mix and over 100 accessories for jewellery crafting.
Frequently Asked Questions
What safety measures are important for resin crafting?
Work in a ventilated area, wear gloves, and protect skin and eyes. Always follow kit instructions for safe, enjoyable results.
Which resin is ideal for jewellery making?
Crystal-clear epoxy resin with good bubble release properties is preferred. Kits like the Evershine Collection offer these qualities.
How do I avoid bubbles in my resin creations?
Mix resin gently and pour slowly. Use a heat tool or exhale over the surface to remove remaining bubbles before curing.
Why is my cured resin sticky or soft?
Incorrect resin-to-hardener ratio or poorly mixed batches cause tacky finishes. Measure and mix accurately for reliable results.
When should I demould my resin project?
Wait until the resin is fully cured, usually after 24–48 hours, to ensure proper strength and smooth demoulding.
What if my resin overflows the mould?
Remove excess resin with a craft knife once set or sand carefully after demoulding. Work on a protected surface to catch spills.