 Free shipping on orders over £29,85

How to use resin with molds?
Achieve clean, bubble-free resin castings in silicone moulds


Working with resin and silicone moulds opens the door to endless creative possibilities—whether casting coasters, decorative objects, or personal mementos. This guide walks you through the full process, from preparation to demoulding, ensuring you get crisp results for your next resin craft or art project.

What You’ll Need
- “Pure Mould” – Translucent Liquid Silicone Rubber for Mould Making (for creating your own custom moulds)
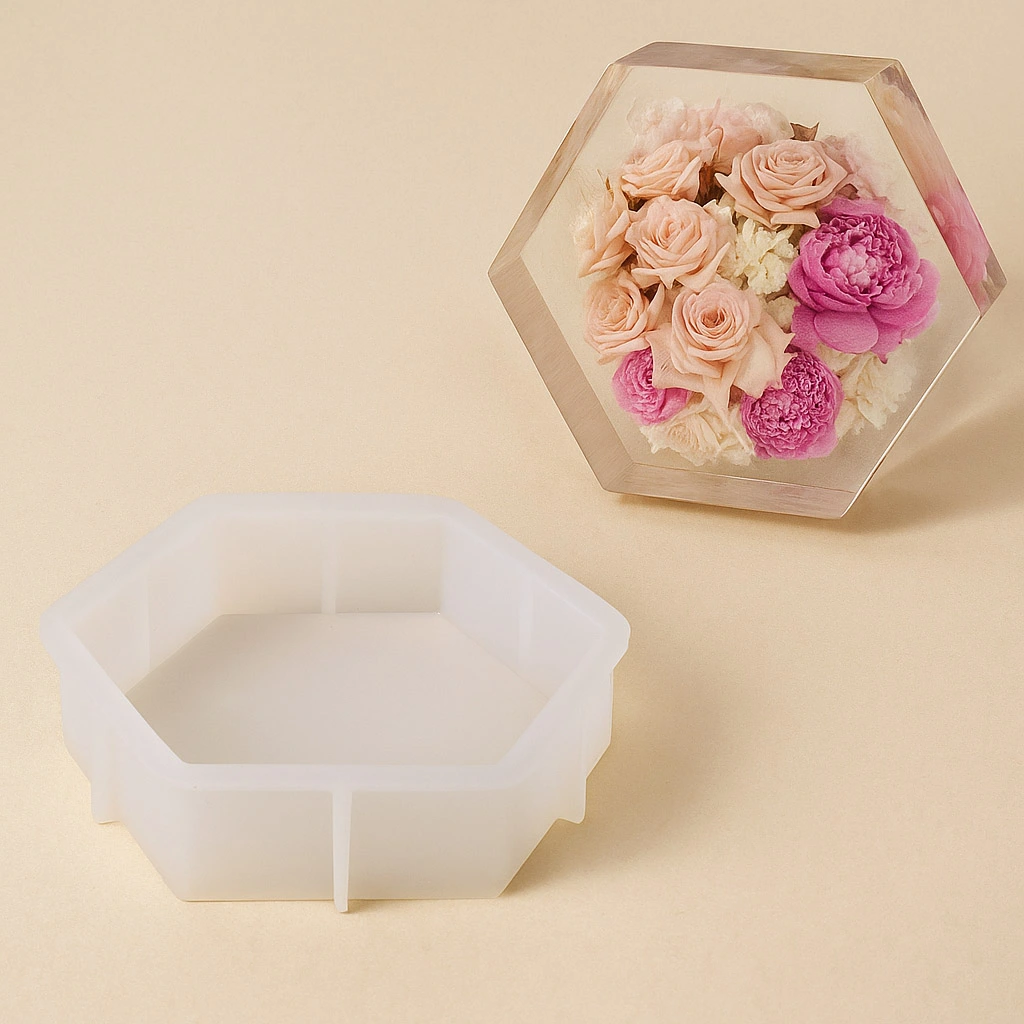
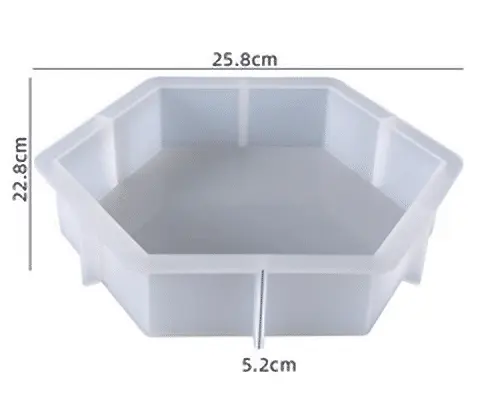
- “Silicone Hexagons Mould” – For Creating with Epoxy Resin – 24x21cm (ready-made geometric silicone mould)
- “Silicone Circle Mould” – For Creating with Epoxy Resin, Ø 20cm (classic round silicone mould)
- “Silicone Heart Mould” – For Creating with Epoxy Resin, 19.5 x 16.5cm (heart-shaped resin mould)
- Epoxy resin kit suitable for mould casting
- Protective gloves, mask, apron, and eye protection
- Mixing cups, stirrers, and pipettes
- Level, dust cover, and heat gun or torch (optional for bubble removal)

Essential Tools for Resin and Mould Casting
Using quality silicone moulds and reliable measuring tools makes all the difference in your resin projects. Ensure your space is prepared and work with clean, dust-free equipment for best results. Protective gear such as gloves and goggles should always be worn during mixing and pouring stages.
Step 1: Prepare Your Workspace and Mould
Set up your workspace on a flat, dust-free surface in a well-ventilated area. Cover your worktable with plastic sheeting or paper to catch drips. Ensure your silicone mould—whether it is a custom piece made with “Pure Mould” – Translucent Liquid Silicone Rubber for Mould Making or a ready-made version—is absolutely clean, dry, and free of oil or residue. If using a new mould, wash it lightly with soapy water and let it air dry fully before use.
Choose the right silicone mould for your project to match your intended shape and size.


Step 2: Measure and Mix Your Resin
Carefully read the instructions of your chosen resin. Use precise ratios and tools to measure out the two components—resin and hardener. Pour them into a mixing cup and gently stir for several minutes, scraping sides and bottom. Avoid whipping air into the mixture, as this can cause bubbles in your cast.
For custom-mould creation, prepare your silicone rubber following the same accuracy—typically a 1:1 ratio for products like “Pure Mould” – Translucent Liquid Silicone Rubber for Mould Making. Mix thoroughly to ensure an even cure.
Mix your resin accurately and safely to ensure a consistent, strong cure in your project.
Step 3: Pour Resin into the Mould
Slowly pour the mixed resin into the lowest part of the silicone mould to prevent air entrapment and promote even distribution. Pouring in a thin stream helps reduce bubbles, particularly in intricate designs. If layering colours or embedding items (such as dried flowers), pour resin in stages, allowing partial curing between layers as required by your design.
Gently tap the mould on your work surface to release trapped bubbles. If bubbles rise to the surface, use a heat gun or torch briefly held above the resin (avoid direct contact) to pop them.
Pour resin slowly to minimise bubbles and achieve a glass-like finish.
Step 4: Cure and Demould Your Casting
Cover your filled mould to protect from dust. Let the resin cure undisturbed according to the manufacturer’s recommendations, paying attention to room temperature and humidity. Do not move or flex the mould during this period. Once fully cured (this could take from several hours to overnight), gently unmould your piece by peeling or flexing the silicone away from the resin.
Take care not to force the mould to avoid tears or stretching, extending the life of reusable silicone options like the “Silicone Circle Mould” – For Creating with Epoxy Resin, Ø 20cm. Allow resin to cure fully before demoulding for the best results.
Tips, Common Mistakes, and Troubleshooting
Always ensure your measurements are precise—under or overcuring leads to soft or tacky results. Protect your workspace and skin from resin spills, as epoxy can bond strongly to surfaces. Do not use harsh solvents on your moulds; warm, soapy water is usually sufficient.
Keep moulds clean and store flat between uses to avoid deformation. If your castings have bubbles or rough surfaces, check your mixing and pouring technique. For persistent issues, experiment with warming the resin or mould slightly before use to aid flow and air release.

Resin Casting Inspiration and Finishing Ideas
Experiment with embedding keepsakes, dried flowers, or metallic powders in your resin moulds. After curing, add finishing touches by sanding edges, polishing surfaces, or mounting your creations for display. Flexible silicone moulds allow you to repeatedly create professional-quality personalised pieces, limited only by your imagination.

- "Pure Mould" – Translucent Liquid Silicone Rubber for Mould MakingPrice range: £23.95 through £166.95"Pure Mould" is a translucent liquid silicone rubber, suitable for cast moulds with resins and compatible materials, designed for easy use with molds.
- "Silicone Hexagons Mould" – For Creating with Epoxy Resin – 24x21cmOriginal price was: £13.95.£11.85Current price is: £11.85.Flexible silicone mould designed for creating coasters and decorative resin objects, suitable for artistic use in home or office.
- "Silicone Circle Mould" – For Creating with Epoxy Resin, Ø 20cmOriginal price was: £13.95.£11.85Current price is: £11.85."Silicone Circle Mould" is suitable for making decorative objects and artistic creations with epoxy resin.
 "Silicone Heart Mould" – For Creating with Epoxy Resin, 19.5 x 16.5cmOriginal price was: £13.95.£11.85Current price is: £11.85.A flexible silicone mould designed for creating decorative epoxy resin objects such as coasters and keepsakes.
Frequently Asked Questions
What if my resin piece comes out sticky or soft?
Sticky or soft resin often means incorrect mixing ratios or under-curing. Measure carefully and allow full curing time as per instructions.
How can I minimise or remove bubbles in resin casting?
Pour resin slowly, stir gently, and use a heat gun briefly over the surface to help bubbles rise and pop.
How do I clean my silicone moulds after use?
Wash with warm, soapy water and avoid harsh solvents for best mould longevity and repeated use.
How long does resin take to cure in silicone moulds?
Curing times vary by resin; typically between a few hours and overnight. Always check your resin's product guide.
What decorative objects can I create with silicone resin moulds?
Common creations include coasters, keepsakes, ornaments, and custom decor pieces.
Can silicone moulds be reused for multiple resin castings?
Yes, quality silicone moulds can be reused many times when cleaned and handled with care.