Free shipping on orders over £29,85
HOW TO MAKE A RESIN AND WOOD RIVER TABLE AND COUNTERTOP (LIVE EDGE)
Are you looking for the materials and the instructions to create your wood and resin table?
In this article, you will discover the step-by-step procedure and tips to avoid mistakes and get wonderful result!
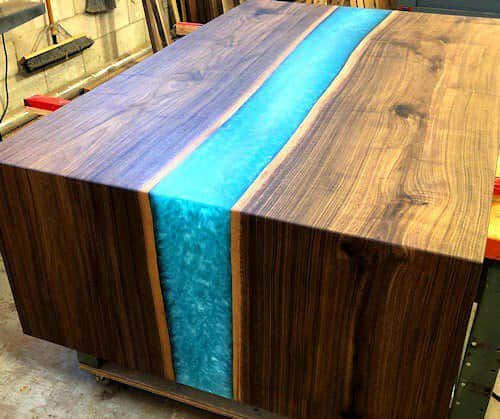
Let’s start from the beginning: what exactly is a resin and wood “river ” table? River tables are wooden tables with a strip of coloured or crystal clear epoxy resin in the centre.
The edges instead are made of rough wooden planks and are therefore irregular. This is what renders them beautiful!
These resin and wood tables are often very expensive in store, but luckily you can easily create them yourself with our products!
What do you need to create a Wood and Resin Table or Countertop?
- A rough wooden plank (i.e. a “slab” of tree, planed and at least 2-3 cm [0,78”-1,18”] thick);
- “Shiny Shield” release film;
- RESINPRO Crystal clear epoxy resin;
- Coloured pigments (optional);
- Two buckets for mixing;
- A disposable brush;
- Sandpaper;
- Polishing kit and a polishing cloth;
- Heat gun
Epoxy resin and wood table: here are the steps.

Step 1: Choose the right wood!
This step is the easiest, but it takes time…
You have endless choices when picking the type of wood to create a “river” table. From solid and regular to sinuous with many knots to a very narrow piece of wood.
Any defects or irregularities will be filled with Transparent Crystal Clear Epoxy resin! You can find these “slabs” of tree from any carpenter or wood dealer!
If you have chosen the wood for your river table, it is time to prepare the piece. As a general rule, a slab of the trunk is then cut in half and the two pieces are separated creating a hole in the middle which will be filled with epoxy resin. This creates the “river”. Often the edges of the wood have to be cut correctly to achieve the right dimensions.
If you want, you can remove irregularities with a sander. You can remove (or keep) the bark as well: depends on the style! Take your time to do it for a perfect final result. Of course, the wood has to be totally dried.
Step 2: Create a mould for Epoxy Resin
Now it is time to create a mould, where the pieces of wood will be positioned and crystal clear epoxy resin will be poured.
The simplest thing to do is to build a laminated chipboard container. It is easy to saw it and is available in larger sizes. If you don’t have the tools, ask a carpenter!
Afterwards, coat the inner surface with the easy-to-apply SHINY SHILED release film, which leaves the surface smooth and polished and does not let the resin stick.
(Here is the link to learn more: http://resin-pro.co.uk/product/release-film-glossy-shiny-shield-32cm-to-create-the-table/)
Next, seal the joints with silicone rubber or sealant, then remove the excesses.


Step 3: Wood preparation
Before carrying out the casting on the river table, it is important to previously apply a generous epoxy coat with a brush or a roller on the pieces of wood (at least the part in contact with the resin). This guarantees that no air bubble escapes during the catalysis stage of the resin. Let the epoxy resin harden, sand lightly with a 120-grit sandpaper, then apply another coat of epoxy resin. These layers prevent air escaping from the wood and remaining trapped in the casting. It is suggested to apply a lot of epoxy resin during this step.


Step 4: Epoxy Resin Casting
If the wood is well coated and hardened, it can be fixed in the mould. Glue it to the bottom by pouring 1-2 mm [0,03”-0,07”] of transparent epoxy resin, otherwise there’s the risk it may float up to the surface!
Use RESINPRO transparent epoxy resin, then pour layers up to 2-3 cm [0,78”-1,18”] thickness. If you want to pour thicker layers, you can use EPOXYTABLE Epoxy Resin
You can also colour the resin with Fluo pigments, Colour Fun colouring pastes or SAHARA Metal Pigments first.
Pay your attention to the proportions! THE PROPORTIONS ARE USUALLY PRINTED ON THE TANKS, PLEASE CHECK IT BEFORE USING.
Being a two-component resin, you have 2 bottles at your disposal, one containing resin “A” and the other containing hardener “B”. You will need some electronic scales to weigh grams and a mixing container where you can combine the liquids.
How to calculate, how much hardener do you need? Take your proportions –JUST AN EXAMPLE – 100:60. Then take the weigh of component A and multiply on B, (if 100:60 – A*0.60; if 100:70 – A*0.70; if 100:87 – A*0.87).
So! If you have component A 5kg, and proportions 100:60, your calculation –
5*0.6=3kg of component B.
Please, use some electronic scales and weigh in grams to get the best results.
Mix resin and hardener thoroughly (especially by sides, because epoxy and hardener have a different density) and add the pigments you prefer (no more 5% from the mix).
Stir gently for at least 5 minutes.
Pour the resin into the central line and after 5-10 minutes move a heat gun over the surface to remove the air bubbles.
After polymerization, the table is ready for further processing. Once hardened, the epoxy resin can be cut, sanded and milled like normal wood.
Step 5: Apply the table legs
It’s time to prepare the legs of your wood and epoxy resin table. You can use either metal or wood. A small amount of epoxy resin in the hole guarantees that screws or bolts won’t come off.


Step 6: Polishing
If you have carefully followed all the steps to build a wood and epoxy resin “river” table, now you just need to polish the parts that got scratched in sanding or cutting procedures.
To polish epoxy resin, use sandpaper up to 3000 grit first and then use a specific polishing paste for resins. You can find a full resin-polishing kit on the website – http://resin-pro.co.uk/product/resin-polishing-kit-2/.
Now you have your own resin and wood river table! Super cool, it will always make a good topic for conversation with your guests! Want to know more or need further tips? Contact us!
The photos in this article represent objects created by our customers with the use of RESINPRO products.
+ use this discount code at 5% – “cheers” for your first purchase!