 Free shipping on orders over £29.85


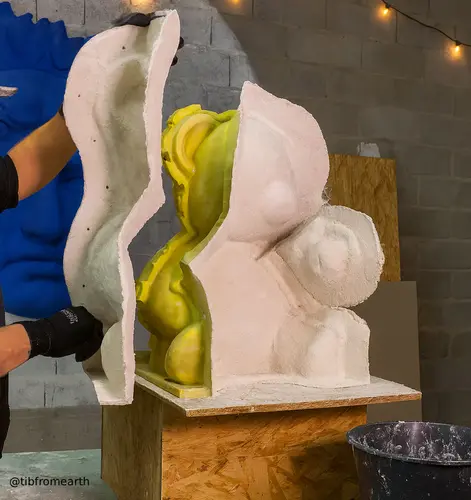
What Is the Outer Shell (and Why You Need It)
The outer shell (also called the mother mold or support shell) is a rigid casing that supports the soft silicone mold.
Without it, the silicone may deform, causing the final casting to come out warped or uneven in thickness.
Two Main Methods — Which One to Choose?
1) Resin + Fiberglass (recommended)
- Pros: lightweight, very strong, durable, highly precise.
- Cons: a bit more expensive, requires ventilation and protective gear.
2) Plaster + Gauze (budget-friendly)
- Pros: inexpensive, easy to find, simple to use.
- Cons: heavier and fragile, absorbs water, less accurate in fine details.
In short: For professional or large projects → use resin + fiberglass. For quick tests or small molds → use plaster + gauze.

What You’ll Need
Common to both methods
- Your finished silicone mold
- Release agent (Vaseline, PVA spray, or diluted neutral soap completely dried)
- Marker or pencil
- Masking tape
- Scissors or hobby knife
- Gloves, respirator mask, safety glasses
- Plastic sheet to protect your work surface
For the resin + fiberglass method
- Resin (polyester or epoxy)
- Hardener/catalyst (follow manufacturer’s ratio)
- Fiberglass mat or fabric (225–300 g/m²)
- Cheap brushes or spatulas (to discard after use)
For the plaster + gauze method
- Plaster (for molds)
- Gauze strips or bandages
- Mixing bowl and room-temperature water
Before You Start: Plan the Mold Division
A rigid shell is almost always made in two or more parts so it can open easily and won’t trap the silicone inside.
- Examine your mold and identify a parting line (like an equator).
- For symmetrical shapes (bust, vase), two halves — front and back — are enough.
- For complex shapes with undercuts, plan three or more parts.
- Draw the parting line on the silicone with a marker.
- Build a flange:
- Create a small “wall” along the line using masking tape, cardboard, or modeling clay.
- Recommended height: 1.5–2 cm.
- This flange will form the joining edge between shell parts.
- Make registration keys (for perfect alignment):
- Press small dimples every 6–10 cm along the flange using a finger or brush handle — one side only.
- When you build the opposite side, these dimples will act as alignment buttons.
Golden rule: Build one side first, let it fully cure, remove the flange, then make the opposite side using the keys for alignment.
Pro tip: You can embed small metal plates between the layers of gauze or fiberglass while building the shell.
This greatly increases rigidity and helps the structure keep its shape during heavy or large resin pours.

Method A — Resin + Fiberglass Shell (Step-by-Step)
1) Protect and isolate
- Cover your table with plastic.
- Brush a thin, even layer of release agent over the entire silicone surface and flange.
2) Prepare the resin
- Mix resin and hardener exactly as directed by the manufacturer.
- Stir slowly for 1–2 minutes to avoid bubbles.
3) First half of the shell
- Brush a thin coat of resin over the silicone.
- Lay pre-cut fiberglass strips and wet them thoroughly with more resin.
- Apply 2–3 total layers, alternating fiber direction.
- Reinforce the edges and flange with extra strips.
- Final thickness for side 1: about 2–3 mm (4 mm for large pieces).
4) Curing
- Let it cure until hard to the touch (30–90 min for polyester, longer for epoxy).
5) Second half preparation
- Remove the flange. The registration dimples remain impressed in side 1.
- Apply release agent to all contact surfaces (side 1 and silicone).
6) Second half build
- Repeat the same process on the opposite side, overlapping onto the first edge.
- The registration keys will ensure perfect alignment.
- Maintain the same thickness and number of layers.
7) Finishing
- Once fully cured, trim any sharp edges with scissors or a mini-saw.
- Mark with a pen: arrows, numbers, and labels (“Side A”, “Side B”, “Top”, “Bottom”).
Material estimate: For about 1 m² of total surface area, use 0.6–1 kg of resin and 1–2 m² of fiberglass (2–3 layers).
Method B — Plaster + Gauze Shell (Step-by-Step)

1) Protect and isolate
- Cover your work area.
- Apply release agent to the silicone and flange.
2) Prepare the strips
- Cut gauze into 20–30 cm strips.
- Mix plaster in a bowl to a thick-yogurt consistency (no lumps).
3) First half of the shell
- Dip the gauze strips into plaster and lightly squeeze.
- Apply overlapping strips.
- Make 3–5 layers, denser along edges and flange.
- Smooth with wet fingers to compact.
4) Drying
- Allow to dry completely — at least 6–12 hours (24 h for thicker shells).
5) Second half
- Remove the flange.
- Apply release agent to the joint areas between both sides.
- Repeat step 3 on the opposite side, using registration keys (create small bumps or recesses in the first side before it fully hardens).
6) Finishing
- Round sharp edges and label the sides as above.
- Keep the shell in a dry place — plaster is sensitive to humidity.
How to Open and Close the Shell (Safely)
- Once both halves are cured, insert a thin spatula along the seam.
- Never pry from one spot — work gradually all around the perimeter.
- To close, align the registration keys — the parts will “click” into place naturally.
- Use clamps or plastic straps to hold the shell closed during casting.
Simple Tips to Avoid Mistakes
- Always apply release agent between silicone and shell, and between the two shell halves.
- Keep the flange smooth — no holes or uneven ridges where the sides meet.
- Maintain uniform thickness — better 2–3 neat layers than one thick, air-filled layer.
- Regular keys — one dimple every 6–10 cm is enough.
- Orientation marks — arrows and text (“Top”, “Front”, “A/B”) prevent assembly mistakes.
- Safety first — gloves, mask, good ventilation (especially with resin).
- Do a “dry test” — open/close the shell once before pouring resin to check alignment.
Quick FAQs
Which resin should I use?
- Polyester: cheaper, faster curing.
- Epoxy: lower odor, longer working time, more expensive. Both work well.
How many fiberglass layers?
- Usually 2–3 layers (up to 4 in stress areas).
Can I make a three-piece shell?
- Yes — for complex shapes, plan two parting lines and separate flanges for each junction.
Can I mix the two methods?
- Absolutely — for instance, make a plaster base (to fill volume) and finish with a resin + fiberglass layer for reinforcement.
A Little Secret from @tibfromearth 🎬
“Today I’ll show you how to create parting walls for your sculpture. They divide the shell and make demolding easier. I use plastic guides like Placoplat (available at Leroy Merlin). I cut and join them, then pour silicone inside to form bands. The thicker they are, the stiffer they become — and the stiffer they are, the shorter each segment should be to follow curves. To fix them, I use thixotropic silicone — it doesn’t run, adheres well, and spreads like mayonnaise!”
Reinforcing the Mold
Before making the rigid shell, many professionals add silicone ribs along the mold.
These ribs strengthen soft walls, preserve shape, and help close the outer shell perfectly.
They’re easy to make: pour or sculpt 1–2 cm thick silicone cords along wide areas or edges while the silicone is still slightly tacky.
Once cured, the ribs become a stable support structure that prevents deformation during resin casting.
This small trick makes a big difference for complex or large projects!
© All rights reserved. No part of this article may be reproduced or shared without written permission from the author.