 Free shipping on orders over £29,85

How to make scuff resin?
Creating a robust, scuff-resistant resin finish is essential for projects that face frequent use or contact – think coasters, badges, table surfaces, or decorative art pieces. This guide will take you through every step of making scuff resin, from selecting the right resin to perfecting the final glossy, abrasion-resistant look. Whether you’re an artist, crafter, or DIY enthusiast, these methods help ensure your resin creations stay pristine for years to come.
Achieve a tough, abrasion-resistant and glossy resin surface


What You’ll Need
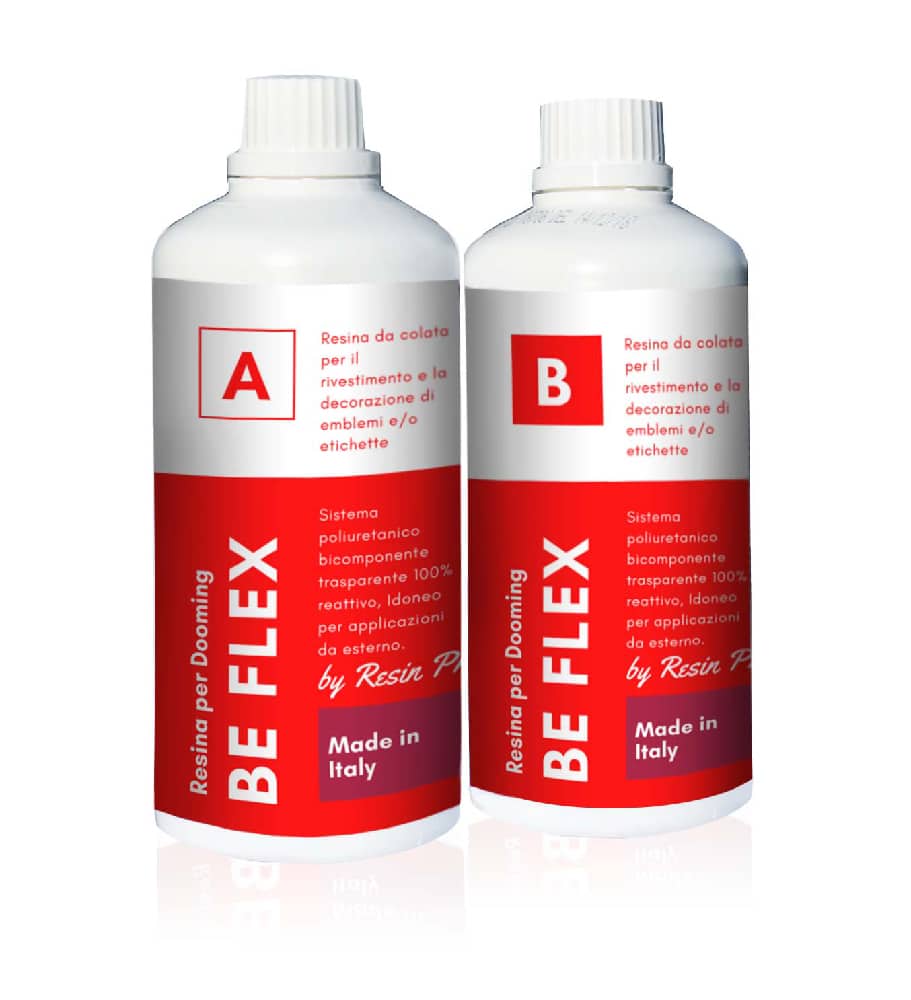
- “Be Flex” – Transparent Polyurethane Doming Resin – Scratch-Resistant: A flexible, transparent resin ideal for doming and self-healing finishes.
- “Art Pro” – Clear Epoxy Resin for Artists and Surface Coating: Provides high-gloss, clear protection for decorative surfaces.
- “Trasparente” – Multipurpose Clear Epoxy Resin for Casting – Up to 2cm: Perfect for small tabletops and art requiring a brilliant, durable surface.
- “Epoxy Polish” – Epoxy Resin Polishing System: For polishing and removing micro-scratches after curing.
- Mixing cups, stir sticks, disposable gloves, clean workspace, and protective apron
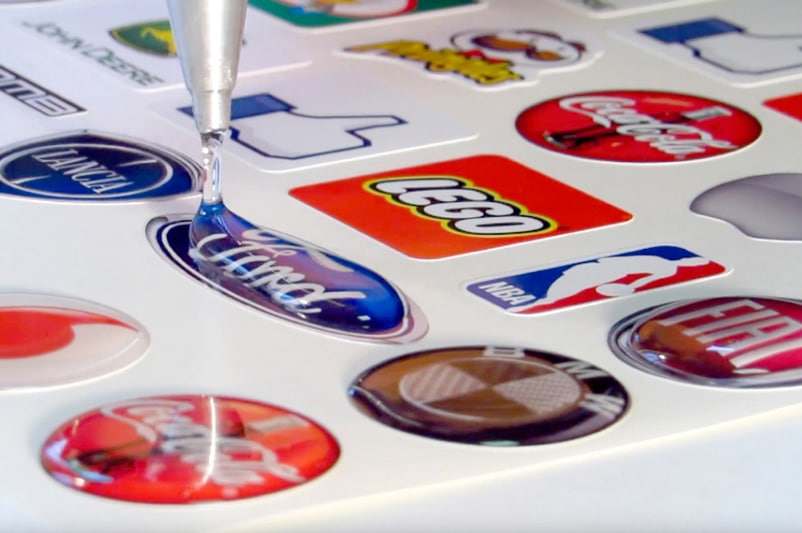
See Essential Tools and Scuff Resin in Action
Get a closer look at the key resins and tools used to create resilient, scratch-resistant surfaces.
Notice how the right resin choice and careful application deliver superior results for lasting clarity and abrasion defence.
Step 1: Choose a Resin Suited for Scuff Resistance
Start by matching your resin type to your project’s requirements. For domed and curved surfaces, select a flexible resin that offers excellent abrasion resistance. For flat surfaces such as coasters or art pieces, a hard-setting epoxy will give you the best defence against daily bumps and scrapes.
If you need a flexible, self-healing coating for stickers or badges, “Be Flex” – Transparent Polyurethane Doming Resin – Scratch-Resistant is designed to absorb impact and repair minor scratches, making it ideal for high-contact uses. For hard, glossy finishes on tabletops or decorative art, “Art Pro” – Clear Epoxy Resin or “Trasparente” – Multipurpose Clear Epoxy Resin are preferred for their clarity and scratch resistance.
Step 2: Apply the Resin Correctly and Evenly
Prepare a dust-free workspace and make sure all surfaces are clean and dry. Mix your chosen resin thoroughly according to the manufacturer’s instructions – pay close attention to the recommended ratios and mixing times to avoid defects or weakness.
Pour or spread the resin evenly using a stir stick, spatula or by gently tilting your object. For doming projects, allow the resin to gently mound at the edges for a pronounced, protective layer. Flat surface applications should be self-levelling, but always check for drips or bubbles and remove them promptly for a flawless finish.
Step 3: Allow Proper Curing for Maximum Hardness
Do not rush the curing process. Follow the resin’s recommended timings exactly, as interrupting curing can leave the surface susceptible to scuffing or cloudiness. Let the piece cure in a dust-free, dry area at the specified temperature, usually between 20–25°C. Keep the surface covered to avoid accidental marks.
The longer you allow a resin to cure undisturbed, the harder and more scuff-resistant the finish becomes. Most epoxies reach full mechanical strength in 24–72 hours.

Step 4: Polish the Surface for Additional Clarity and Strength
Once the resin is fully cured, polishing dramatically improves clarity and makes the surface even more resistant to fine scratches. For best results, use “Epoxy Polish” – Epoxy Resin Polishing System with a polishing pad or soft cloth applying moderate pressure in circular motions. Remove residue with a clean lint-free cloth.
This step revives gloss, eliminates micro-abrasions and prepares your resin object to withstand daily wear-and-tear while looking its absolute best.

Tips and Troubleshooting for the Perfect Scuff Resin
Always use gloves and keep your workspace ventilated, even with solvent-free resins. Avoid humidity and temperature fluctuations during curing as these can cause cloudiness. If surface imperfections appear, gentle sanding followed by polishing can restore gloss. If your project will be exposed outdoors, choose resins with UV resistance to prevent yellowing over time.
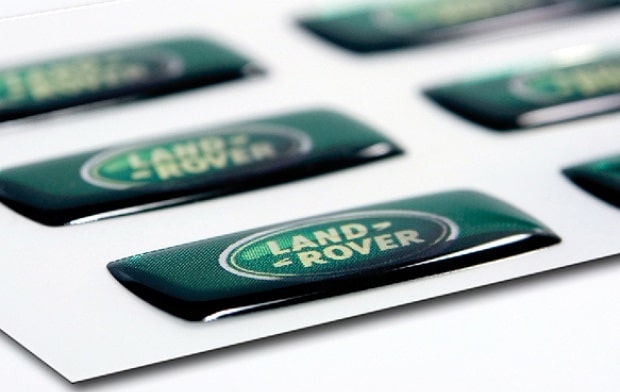
Real-World Finishing and Surface Maintenance Examples
Explore before-and-after finishes, learn polishing technique details, and see how scuff-resistant resin looks in everyday use projects.
These examples highlight what proper preparation and finishing can achieve for both hobbyists and professionals.
- "Be Flex" – Transparent Polyurethane Doming Resin – Scratch-ResistantPrice range: £21.85 through £77.85BE FLEX is a transparent polyurethane doming resin designed for stickers and badges with a flexible, scratch-resistant finish.
- "Art Pro" – Clear Epoxy Resin for Artists and Surface CoatingPrice range: £31.15 through £388.85"Art Pro" clear epoxy resin is suitable for artists and crafters seeking durable, glass-like finishes with UV protection.
 "Trasparente" – Multipurpose Clear Epoxy Resin for Casting – Up to 2cmPrice range: £8.45 through £948.85"Trasparente" offers an ultra-clear, self-levelling epoxy suitable for projects up to 2cm thick in the context of scuff resin making.
 "Epoxy Polish" – Epoxy Resin Polishing SystemPrice range: £17.85 through £44.85"Epoxy Polish" is a resin polishing system designed for professionals and hobbyists to restore a mirror-like finish on resin projects.
Frequently Asked Questions
What is the best resin type for scuff resistance?
Polyurethane doming resins and hard-setting epoxy resins both provide excellent scuff and scratch resistance when applied and cured correctly.
How long does resin cure for scuff resistance?
Most resins require 24–72 hours to reach full durability. Wait until the resin feels hard and cool before using or polishing.
Can I polish scuff resin for more shine?
Yes, polishing with a dedicated resin polish restores gloss and can remove fine scratches, improving both appearance and resilience.
How do I apply scuff resin to curved or uneven surfaces?
Use a flexible resin for doming applications, and apply in thin layers, letting each set before adding more to avoid drips or sagging.
How can I prevent bubbles and cloudiness?
Mix resin gently, use a torch or heat gun to remove bubbles, and keep the workspace dust-free and at a stable temperature during curing.
Is scuff resin suitable for outdoor use?
Choose resins with integrated UV protection for outdoor exposure. These resist yellowing and maintain clarity in sunlight.
What should I do if resin stays soft?
Allow more curing time or move to a warmer area. If still tacky after 72 hours, mixing ratios or temperatures may need adjustment.