 Free shipping on orders over £29,85


How to make resin stamps
A detailed beginner’s guide to unique stamp crafting


Creating resin stamps opens doors to endless personalisation for crafting, scrapbooking, and decorative projects. With the right approach and a bit of patience, you can create professional-quality stamps at home, giving your custom prints a dimensional and durable finish.
What You’ll Need
- “Fairy Wings” – UV Resin for Volumetric Reliefs, Dual Colour, 30ml – for fast, high-detail, UV-cured stamps
- “Evershine Collection” – Artisan Jewellery Epoxy Resin Kit with 100+ Accessories – ideal for standard epoxy pours and added creative options
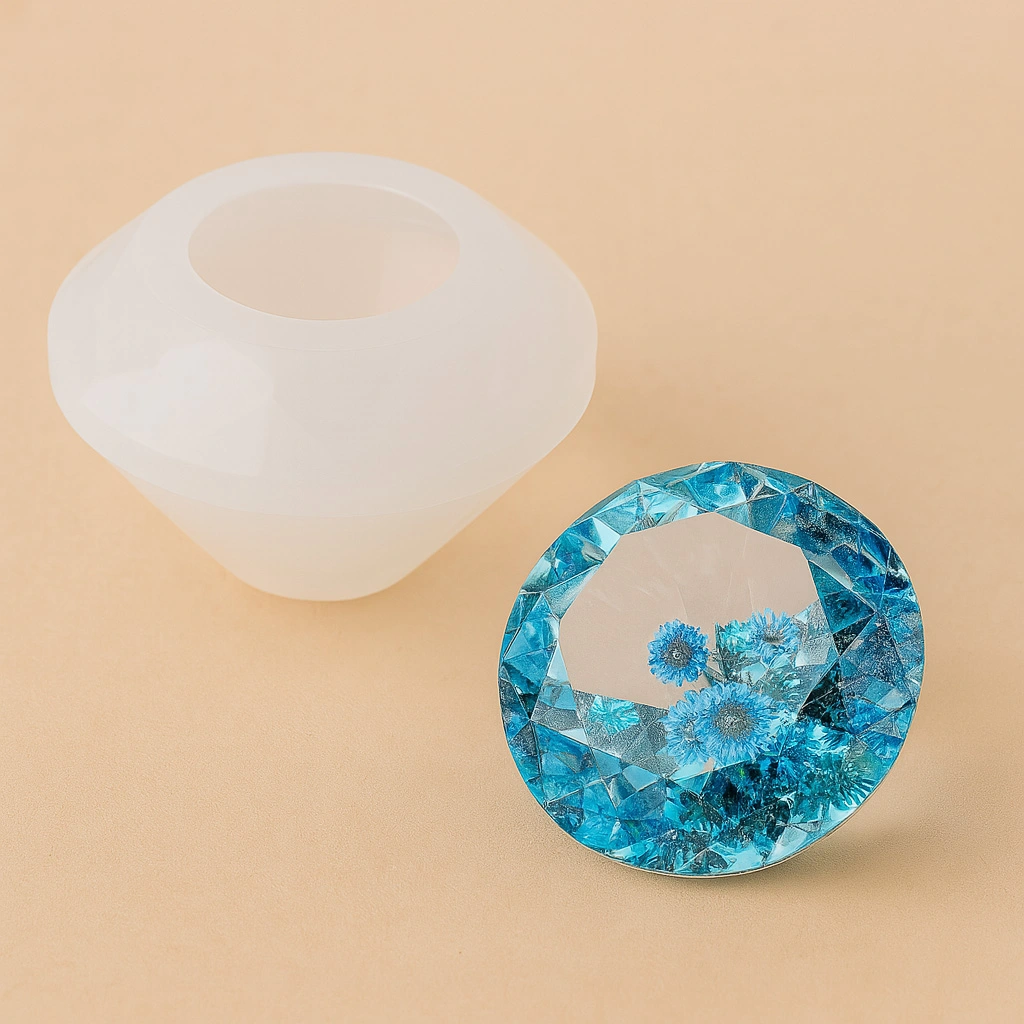
- “Diamond” – Crystal Shaped Silicone Mould 5×3.5cm – a reusable, non-stick mould for shaping your resin stamps
- Stamp design template or object (optional for customisation)
- UV lamp (for UV resin) or reliable workspace (for epoxy resin)
- Mixing containers and stirrers
- Protective gloves and dust mask

Resin Stamping Essentials in Action
See how the combination of fine UV resin and shaped silicone moulds produces remarkable stamp reliefs on both clay and paper applications. Layering and timing make each impression crisp and one-of-a-kind—perfect for gifts or personal crafting projects.
Step 1: Plan your design with clear detail
Before you start mixing resin or preparing moulds, sketch or print the stamp design you wish to create. Ensure the lines and shapes in your pattern are well defined, as fine detail translates beautifully into resin but can easily be lost if too small or faint. For beginners, simple geometric or botanical shapes work well. Think about the function: stamps for ink, embossing, or clay printing may each require different relief depths.

Step 2: Mix your resin according to the instructions
Put on your gloves and work in a ventilated area. If you are using UV-curing products for highly detailed or fast-setting stamps, such as the “Fairy Wings” – UV Resin for Volumetric Reliefs, simply dispense the resin into your mixing cup. For classic clear stamps, a versatile kit like the “Evershine Collection” – Artisan Jewellery Epoxy Resin Kit offers a straightforward 1:1 mix ratio—combine equal parts of resin and hardener, then stir thoroughly for a few minutes to ensure an even consistency. Take care not to whip in too much air, as bubbles can blur fine lines on your finished stamp.
Step 3: Pour and cure in the mould
Select your silicone mould, such as the “Diamond” – Crystal Shaped Silicone Mould 5×3.5cm. Pour the resin slowly and evenly, allowing it to flow into all corners to capture every bit of detail. For UV resin, apply in thin layers (up to 3mm) and cure under a UV lamp for 3–5 minutes per layer. For epoxy resin, follow the recommended curing time—typically 12–24 hours. Avoid overfilling, as excess can cause rounded edges rather than crisp stamp impressions.
Step 4: Demould and finish your stamp
Once the resin is completely cured, carefully flex the mould to release your stamp. If the surface feels tacky or flexible, allow more cure time. Inspect the relief—if needed, use fine sandpaper to smooth the base or edges. Wash your finished stamp in soapy water to remove release agents, then dry. The stamp is now ready for use with your choice of ink, paint, or medium.
Tips, Troubleshooting, and Common Mistakes
Work with patience: rushing pouring or demoulding can lead to trapped bubbles or breakage. If your stamp has blurring in detailed areas, check for unmixed resin or use a finer-tipped mould. Use a pipette or toothpick to guide resin into especially intricate cavities. Store unused resin sealed away from dust and direct sunlight to maintain its quality.
Finishing Touches and Creative Ideas
Add a touch of artistry by experimenting with metallic pigment or embedding botanicals into your resin stamps. Cleaning your moulds between uses will ensure each new stamp is as sharp as the last.

- "Fairy Wings" – UV Resin for Volumetric Reliefs, Dual Colour, 30mlOriginal price was: £15.15.£2.85Current price is: £2.85."Fairy Wings" UV Resin supports detailed 3D patterns with fast UV curing and dual colours for creative effects.
- "Evershine Collection" – Artisan Jewellery Epoxy Resin Kit with 100+ Accessories£20.85This kit offers a 1:1 epoxy resin and over 100 accessories, designed for jewellery makers and crafters within the theme of How to make resin stamps.
- "Diamond" – Crystal Shaped Silicone Mould 5×3.5cmOriginal price was: £4.90.£4.85Current price is: £4.85."Diamond" shaped silicone mould designed for crafting decorative items, fitting the theme of how to make resin stamps.
 Free Step-by-Step Lesson "Kiwi Coasters" by Natalia NatirumOriginal price was: £99.00.£0.00Current price is: £0.00.Free video tutorial provides guidance for creating resin trays and coasters with a kiwi design.
Frequently Asked Questions
Which type of resin is best for making fine, detailed resin stamps?
UV resin such as "Fairy Wings" is ideal for fine reliefs and quick curing, while epoxy resin kits offer versatility and great clarity.
Can I create resin stamps using regular silicone moulds or do I need special ones?
Most quality silicone moulds, like the diamond shape, will suffice as long as they capture your desired texture and pattern.
How long should I allow resin stamps to cure before demoulding?
UV resin cures in minutes under UV light, whereas epoxy resins often require 12–24 hours for a complete cure.
Can I use ink or paint with resin stamps after they’re cured?
Yes—once fully cured and washed, resin stamps work with most standard inks, acrylics, and embossing powders.
What should I do if my cured resin stamp is still soft or tacky?
Give the stamp more curing time, and ensure your resin is thoroughly mixed and cured according to instructions.
Is it possible to add pigment or embed objects in my resin stamp for extra effect?
Yes, you can colour resin or embed small objects, but keep the stamp base flat for crisp stamping results.