 Free shipping on orders over £29,85


How do you create bubbles in resin?
A creative guide to intentional bubble and cell effects in epoxy resin

Creating bubbles in resin is not always an accident—when done intentionally, it brings dynamic visual interest and unique cell effects to your artwork. Whether you’re a resin artist aiming for ocean-inspired waves or a crafter seeking eye-catching patterns, mastering intentional bubble creation can elevate your pieces. This guide explains how to create bubbles and cell effects in resin art safely and creatively, helping you transform ordinary pours into mesmerising works.
What You’ll Need
- “Resi-Blast” – Cell Effect Additive for Resin Art, 25ml – Ideal additive for achieving controlled bubbles and intricate cell effects.
- Pure Isopropyl Alcohol 99.9% – 1000ml Bottle for Epoxy Resin Projects & DIY – Helps shape, disperse, and manage bubble clusters and surface effects.
- Mixing cups and sticks (plastic or silicone)
- Disposable gloves and protective gear
- Resin-safe workspace covering

Creative Materials for Resin Bubble Effects
Resin art opens up endless possibilities for texture and dimension—especially when using specialist additives. Whether you prefer controlled cell effects or natural bubble clusters, reliable materials like “Resi-Blast” and isopropyl alcohol help you unlock professional-level detail with ease. Experiment to discover your signature look while keeping safety in mind.
Step 1: Prepare Your Space and Tools
Start by setting up a clean, organised workspace to avoid unwanted dust or debris in your resin pour. Ensure the area is well-ventilated and your surface is covered for protection. Use clean, dry tools to minimise contamination that could affect bubble formation. Put on disposable gloves and safety glasses to protect your skin and eyes from resin splashes and additives.
Step 2: Mix the Resin Thoroughly
Measure your resin and hardener according to manufacturer’s instructions. Pour the two components together and mix thoroughly for 2–3 minutes, scraping the sides and bottom of your mixing container. Intentionally agitate the mixture a bit more than usual to incorporate air, which helps form visible bubbles.
For even more creative effects, consider add bubbles and cell effects intentionally by increasing the mixing speed or switching directions quickly to boost air inclusion for an energetic pattern.


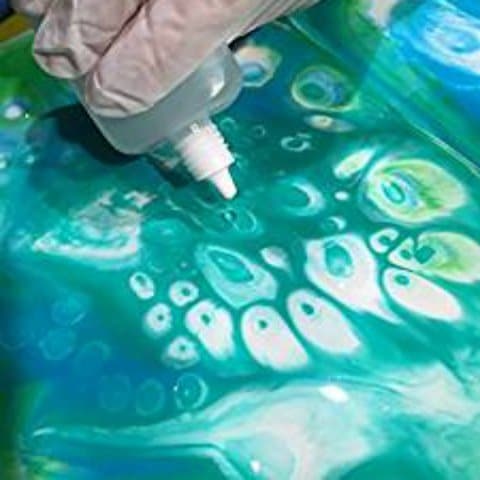
Step 3: Apply Additives for Cell and Bubble Effects
Pour your mixed resin into the mould or onto your surface. If you want well-defined cells or clustered bubbles, add a few drops of “Resi-Blast” – Cell Effect Additive for Resin Art, 25ml onto the resin while it’s still fluid. The drops will interact with the resin, creating blooming or expanding bubble effects that gradually evolve. Do not overuse additives—a few drops are often sufficient for remarkable patterns.
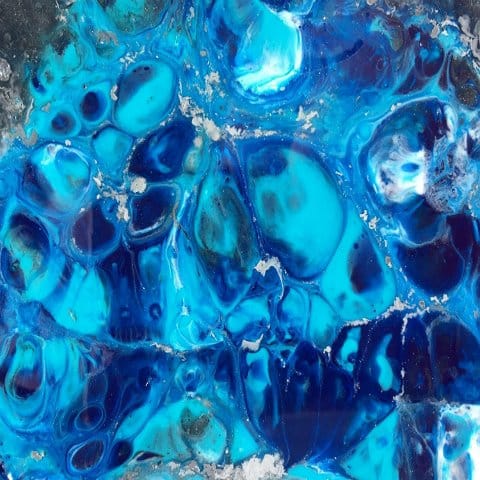
For wispy, organic cell textures, lightly mist or drip Pure Isopropyl Alcohol 99.9% – 1000ml Bottle for Epoxy Resin Projects & DIY onto the resin surface. This helps disperse colours and form lacy cell structures with a foamy or ocean-like appearance.
Step 4: Manipulate the Resin for Custom Effects
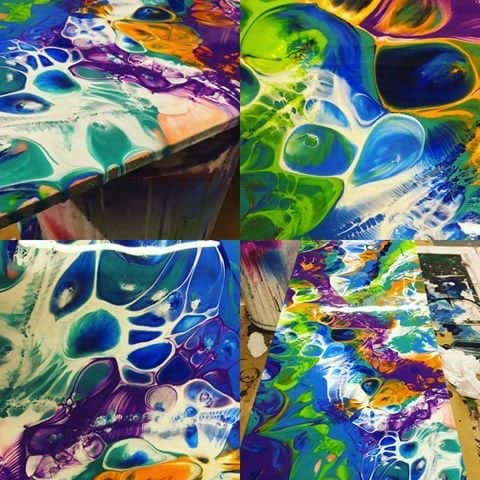
After applying additives, tilt or rotate the substrate gently to allow the resin to flow and interact naturally—this distributes bubbles and enhances cell formation. Layer for dramatic effects by pouring coloured resin batches and treating select areas only, adding further dimension as desired.
Observe the reaction for several minutes; new cells or bubbles may appear as chemical reactions progress. Avoid excessive handling, as this could break up formed bubbles or flatten the design.


Step 5: Monitor and Cure
Allow the resin to settle. Watch for any changes as the chemical and physical reactions continue. Timing is crucial—most effects develop within the first 30–60 minutes. Once satisfied, cover the project to prevent dust settlement and leave it to cure fully according to resin type and ambient conditions. Handle cured items carefully to avoid marring your bubble designs.
Tips, Common Mistakes, and Troubleshooting
To achieve the most striking cell and bubble patterns, practice restraint with additives—overloading can cause muddiness or inhibit proper curing. Handle additives with care, following safety instructions and working in a ventilated area. If bubbles appear too large, gently pop undesired bubbles with a stick before curing, or adjust your mixing speed next time. Experiment on test pieces to find your preferred balance of bubble size, density, and cell formation. Always allow isopropyl alcohol to evaporate fully before applying heat, as it is flammable.
Achieving and Enhancing Resin Cell Patterns
Layering, timing, and subtle handling are key to creating captivating resin cells and bubbles. Artists often combine techniques—misting alcohol and strategically placing additives—to develop unique, one-of-a-kind surface effects. Take notes as you experiment; finding your ideal combination can turn an ordinary pour into a showpiece.
- "Resi-Blast" – Cell Effect Additive for Resin Art, 25ml£21.95"Resi-Blast" provides an additive for epoxy resin art designed to create cell effects simply and safely.
- "Sea" – Resin Kit for Creating Ocean Art, 1.7kg Epoxy, Pigments & Canvas£47.45"Sea" resin kit includes thick epoxy, pigments and wave additive suitable for ocean art in line with the theme 'How do you create bubbles in resin?'
- Resin Class – 3D Effects Coasters Masterclass, 120 MinutesThis course covers working with resin to create functional art pieces such as coasters and bowls, suited for learners interested in resin craft.
 Pure Isopropyl Alcohol 99.9% – 1000ml Bottle for Epoxy Resin Projects & DIYPrice range: £10.45 through £20.95Pure Isopropyl Alcohol 99.9% in a 1000ml bottle aids epoxy resin projects by removing bubbles and supporting creative resin art effects.
Frequently Asked Questions
What additives work best for bubbles and cell effects in resin?
Specialist products like Resi-Blast or high-purity isopropyl alcohol are ideal for creating pronounced bubbles and cell patterns in resin art.
Can I avoid bubbles entirely during resin casting?
Yes, using slow mixing and gentle pouring helps, but intentional bubbles are achieved by mixing more vigorously or adding specific additives.
How do I safely use isopropyl alcohol with resin?
Always ensure good ventilation, wear gloves, and never apply heat until alcohol has fully evaporated as it is flammable.
Do cell and bubble effects stay after resin cures?
Yes, properly formed bubbles and cells remain visible in cured resin, adding texture and depth to the finished piece.
How can I test bubble effects before my main artwork?
Experiment on a small test board or offcut to fine-tune techniques and additive amounts before attempting a larger project.