 Free shipping on orders over £29,85

How to reproduce moldings in resin?
A step-by-step guide for detailed resin moulding results


Whether restoring ornate architectural details or creating stunning decorative features, reproducing mouldings in resin allows you to achieve crisp details, multiple copies and robust results. This guide walks you through the essential steps—from preparing your original piece to casting flawless resin mouldings—so you can achieve professional outcomes at home or in your workshop.

What You’ll Need
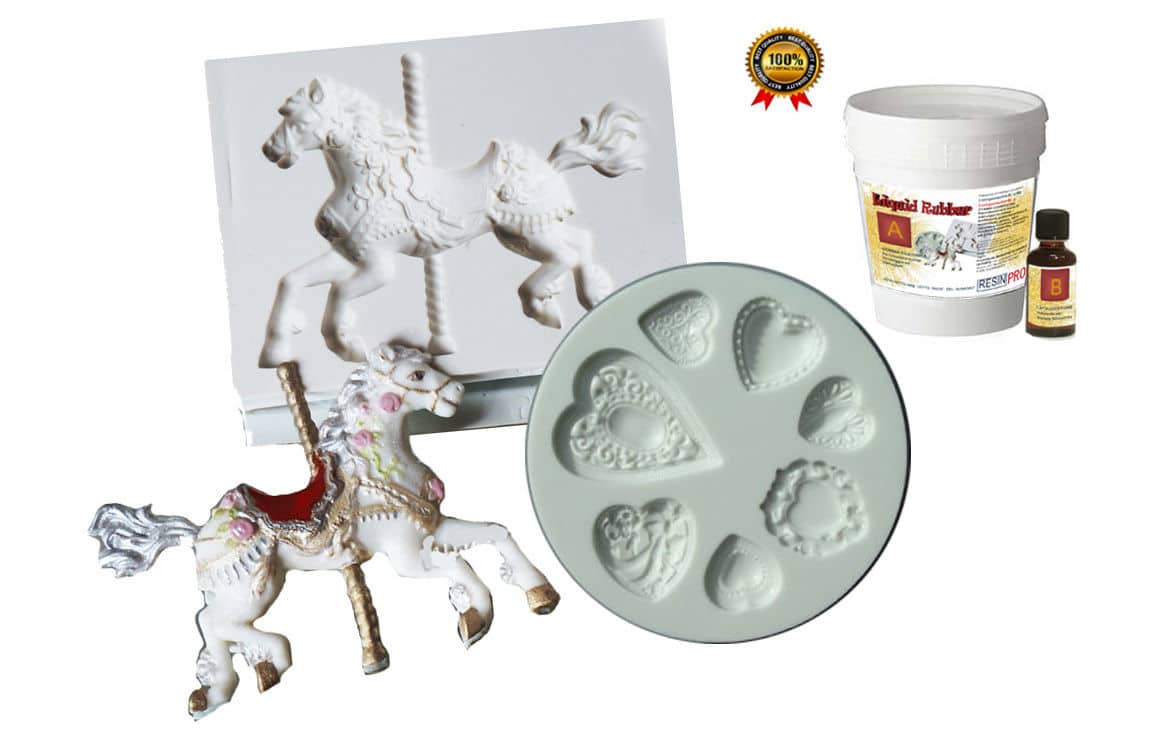
- “Pure Mould” – Translucent Liquid Silicone Rubber for Mould Making: For making accurate negative moulds from your original piece.
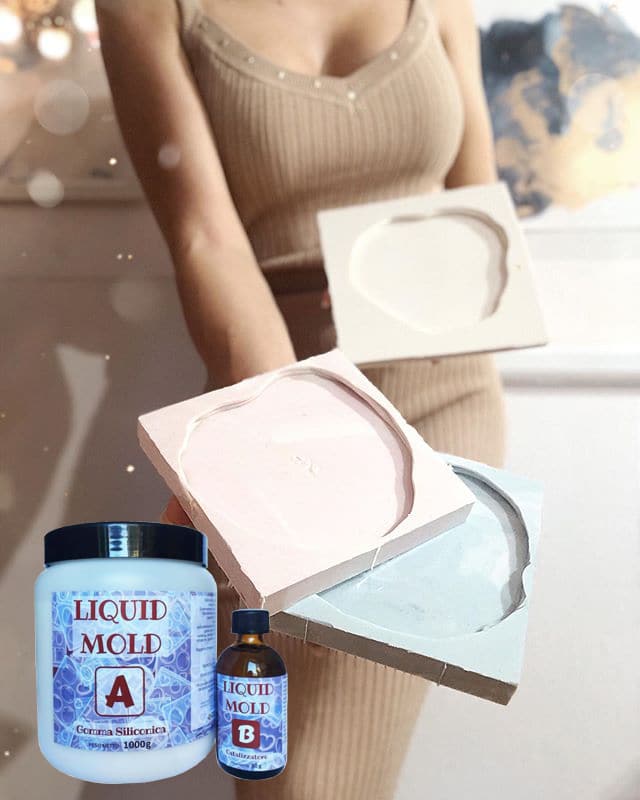
- “Liquid Mould” – Casting Liquid Silicone Rubber, 5-40 Shores, Bi-Component A+B: Works well for objects with fine surface details and undercuts.
- “Trasparente” Epoxy Resin Kit 800g + Mica Powder 10g – 10 Colour Variations: Ideal for casting the moulded resin component once your mould is complete.
- Protective gloves, mixing stirrers, clean containers, release agent (if needed), level workspace and your master object for moulding.

Explore Mouldings in Progress
See how different types of silicone and resin can be used to capture even the most intricate ornamental details. Observe the glass-like clarity and faithful reproduction achieved with careful mould making and casting techniques.
Step 1: Prepare the Master and Workspace
Ensure your master is free of dust, dirt and debris before starting. Any imperfection will transfer to your silicone mould and ultimately to the resin replica. Work on a stable, level surface and protect the area to contain spills. If your original has nooks or fine details, consider applying a mould release agent to help the silicone peel away cleanly.
Set up your master object securely in a mould box or container, leaving room around all sides for the silicone to flow easily. The box should be sealed tight to prevent leakage and sized generously to avoid mould distortion. At this stage, make sure your workspace is well-ventilated and you have all tools ready to hand.


Step 2: Mix and Pour the Silicone Mould Material
Choose your silicone rubber based on your project’s detail and flexibility requirements. Both “Pure Mould” – Translucent Liquid Silicone Rubber for Mould Making and “Liquid Mould” – Casting Liquid Silicone Rubber, 5-40 Shores, Bi-Component A+B are tailored for capturing intricate details and undercuts.
Carefully measure and mix the silicone parts to the manufacturer’s recommended ratio. This is typically a 1:1 ratio for “Pure Mould”, while “Liquid Mould” requires precise catalyst addition. Stir slowly to minimise air bubbles. Pour the silicone slowly in one spot for best detail reproduction, allowing it to rise naturally and flow into fine features. Avoid pouring directly onto the most detailed parts to reduce trapped air.
Tap the mould box gently or use a thin tool to tease out any visible bubbles for especially detailed moulds. Cover the assembly and let the silicone cure undisturbed. Allow the silicone to cure fully before demoulding, which may take between 3–12 hours depending on your specific product.
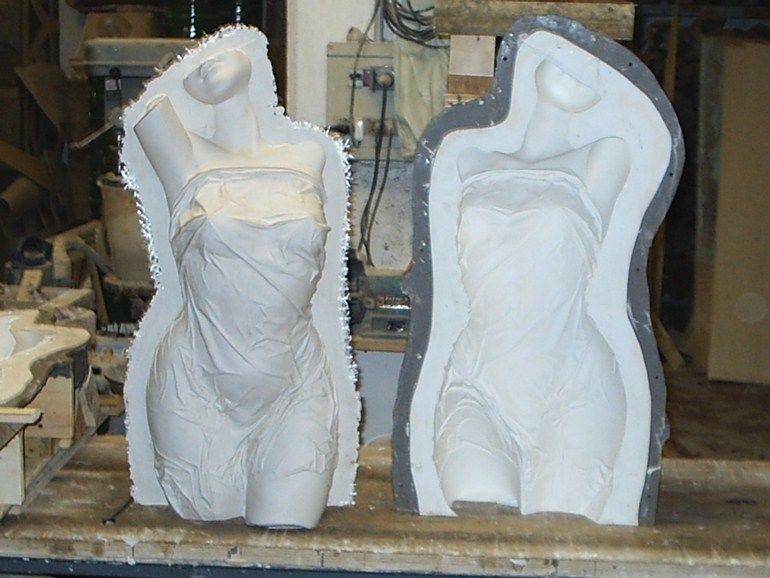
Step 3: Demould and Check the Silicone Mould
Once set, gently remove the mould box and release the silicone from your original. Take care around delicate sections to avoid tears or stretching. Inspect the silicone surface for accuracy; a translucent mould like “Pure Mould” helps you check for air pockets or imperfections. Clean up any flash or excess silicone before moving to casting.
If you need more flexibility or plan to produce multiple reproductions, select a silicone with the appropriate Shore hardness for your application—softer for intricate or undercut-laden pieces, firmer for larger or simpler moulds.
Step 4: Mix and Pour Resin into Your Mould
With your silicone mould complete, prepare your resin for casting. Follow resin mixing instructions closely, as ratios and mixing quality are key to achieving a clear, strong result. Suitable options like “Trasparente” Epoxy Resin Kit 800g + Mica Powder 10g – 10 Colour Variations offer excellent clarity and flow for detailed projects.
Mix in pigments, such as mica powder, if you want a coloured or metallic finish. Pour steadily to avoid air pockets, starting from the lowest section and filling slowly. For best results, vibrate the mould gently or tap to release any bubbles rising to the surface.
Allow proper curing times for resilience and clarity—rushing might lead to surface imperfections or flexibility issues. Once cured, demould your new resin reproduction and trim any excess as needed.
Tips, Common Mistakes and Troubleshooting
Patience is essential for detail work. Avoid shortcuts with curing times—both for silicone and resin—as premature handling can distort fine shapes. Always mix components gently to avoid introducing bubbles, which can mar the mould or final cast. If you’re casting multi-part or complex shapes, consider building up in thin layers or using a vacuum/pressure chamber for degassing.
Common pitfalls include inaccurate mixing ratios, poor sealing of the mould box, and haste during demoulding. Address these for consistent success and longer-lasting moulds. If difficulties arise, review your process setup or consider experimenting on smaller, less important pieces before tackling intricate originals.
Resin Moulding Examples and Finishing Touches
Finished resin mouldings can be left clear, tinted, or painted for bespoke designs. Review examples of crisp detail and learn how polishing or sanding can further enhance your work.

- "Pure Mould" – Translucent Liquid Silicone Rubber for Mould MakingPrice range: £23.95 through £166.95"Pure Mould" is a translucent, fast casting liquid silicone rubber suitable for mould making with various materials including resins and plaster.
- "Liquid Mould" – Casting Liquid Silicone Rubber, 5-40 Shores, Bi-Component A+BPrice range: £14.45 through £387.45"Liquid Mould" casting liquid silicone rubber is suitable for moulds with fine details and undercuts, compatible with resin and soaps.
 "Trasparente" Epoxy Resin Kit 800g + Mica Powder 10g – 10 Colour Variations£20.95"Trasparente" kit includes ultra clear epoxy resin and mica powder, suited for multipurpose casting and table making projects.
- "Liquid Mould" – Casting Liquid Silicone Rubber, 15 Shores 20.8 kg£348.85This silicone rubber is designed for making detailed moulds suitable for resin, soap and polymer pastes under a theme on reproducing moldings in…
Frequently Asked Questions
Can I use silicone for intricate moulding details?
Yes, select a high-quality silicone rubber with low viscosity and good flexibility to pick up fine features and undercuts.
Do I need a release agent for silicone moulds?
Generally, release agents are not needed for non-porous masters but are useful for textured or complex originals.
How long does silicone take to cure?
Curing times vary by product, usually from 3 to 12 hours. Always check your product’s instructions for guidance.
What is the best resin for mould casting?
High-clarity, self-levelling epoxy resins are ideal for capturing detail, especially when paired with the right silicone mould.
How can I avoid air bubbles in resin casts?
Mix slowly, pour in thin streams, and tap the filled mould gently to release trapped air.
Can I make repeated casts from the same silicone mould?
Yes, high-quality silicones can be reused many times, especially if cared for and stored properly.
Can I use pigments and fillers in resin casts?
Absolutely. Mica powders and suitable pigments allow for unlimited colour and effect customisation.