 Free shipping on orders over £29,85

How do you make resin-coated labels?
Step-by-step guide for glossy, professional labels at home


Creating resin-coated labels allows you to add a stunning glossy finish and robust, scratch-resistant protection to stickers, logos, badges, and custom designs. Whether you’re an artisan looking to add value to your crafts or a business aiming for high-quality branding, this guide reveals how to master the process for flawless, long-lasting results.
What You’ll Need for Resin-Coated Labels
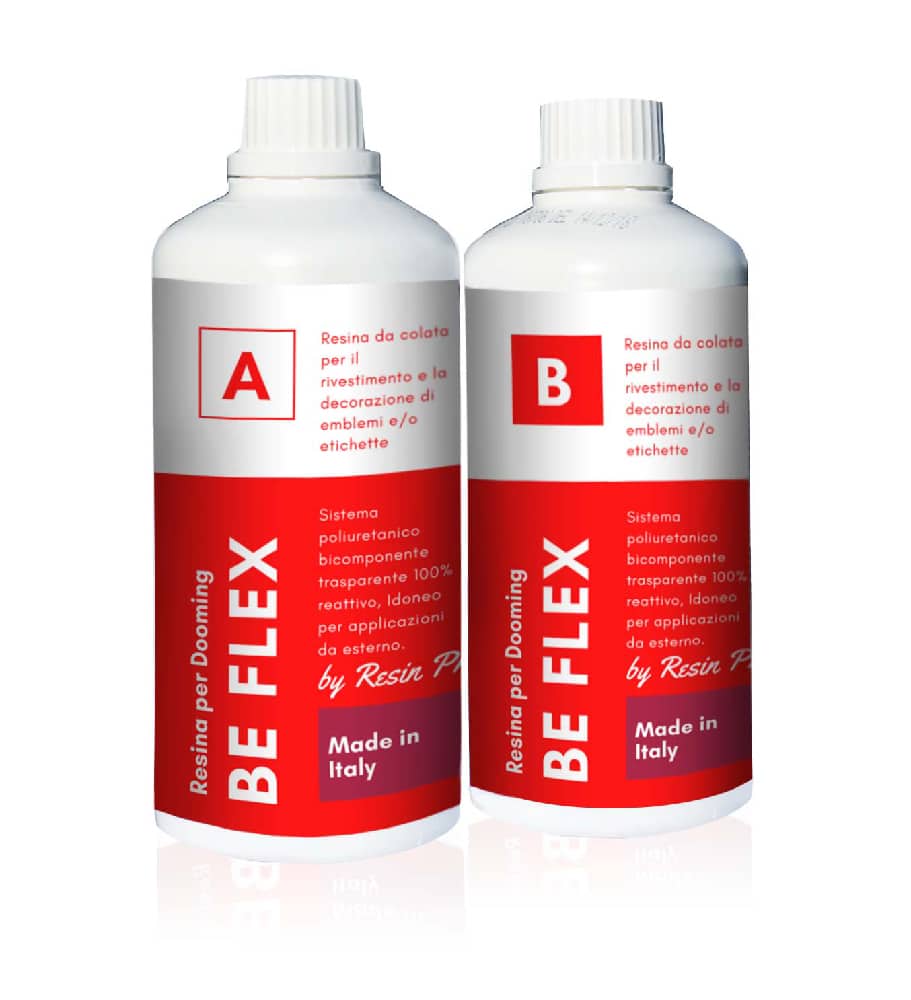
- “Be Flex” – Transparent Polyurethane Doming Resin – Scratch-Resistant: For flexible, clear doming and optimal outdoor resistance.
- “Fairy Wings” – UV Resin for Volumetric Reliefs, Dual Colour, 30ml: Excellent for detailed, raised mini-labels with quick UV curing.
- “One-2-One” – Epoxy Resin for Handcraft, 1:1 Mixing Ratio: Suitable for traditional, super-gloss finishes on flat or gently curved surfaces.
- Printable label paper or vinyl sticker sheets
- Mixing tools (if required)
- Gloves, mask, and protective surface
- UV lamp (if using UV resin)
- Clean tweezers or a silicone spatula
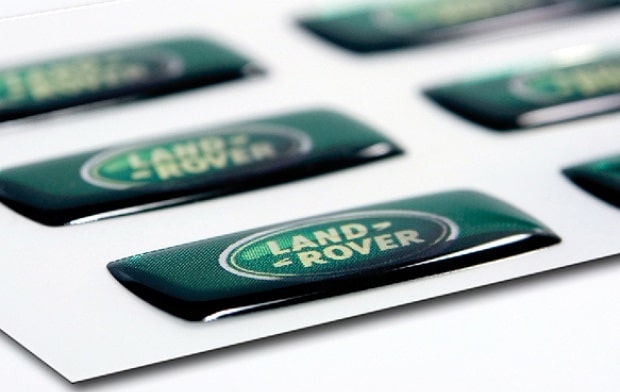
See how crystal-clear domed resins transform ordinary stickers and badges into standout, tactile branding elements. Experiment with sizes, shapes, and colours to achieve unique, professional finishes matching your vision. These techniques suit creative and commercial uses alike.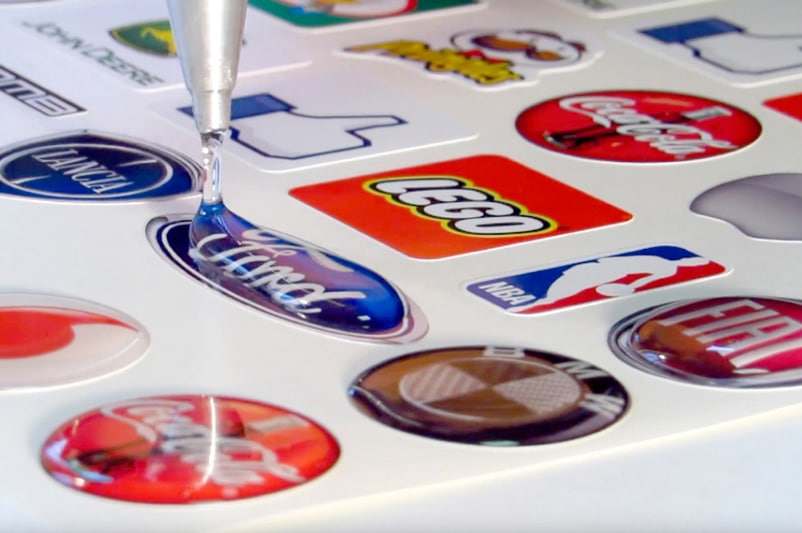
Visual Inspiration: Resin Domed Labels in Action
Step 1: Print and Prepare Your Labels
Start by designing and printing your labels using quality printable label paper or vinyl that is compatible with your printer. Ensure the surface is clean, dry, and free from dust or fingerprints. For best results, allow the printed sheets to cure for a minimum of 24 hours before applying resin to avoid ink bleed.
Carefully cut out each label to its final shape and arrange them flat on a level, non-stick surface such as a silicone mat or parchment paper. Make sure there’s enough spacing between each to avoid accidental contact with resin drips.


Step 2: Mix and Apply the Resin Coating
Choose the resin based on your label needs. If you require a flexible, scratch-resistant doming effect that bends with surfaces, “Be Flex” – Transparent Polyurethane Doming Resin – Scratch-Resistant is ideal. For flat labels and intricate detail, you may prefer “One-2-One” – Epoxy Resin for Handcraft, 1:1 Mixing Ratio. Always follow the manufacturer’s mixing instructions, measuring precisely to ensure a flawless finish. Mix gently to minimise air bubbles.
Using a dropper or spatula, carefully deposit a small amount of resin at the centre of each label. Let the resin naturally flow outward, coaxing it towards the edges without spilling over. Surface tension will help keep the resin neatly domed. Work slowly, checking for drips or overflow, and use a pin to pop any visible bubbles. Do not touch the resin once applied.
Step 3: Curing and Handling the Finished Labels
Allow the resin to cure as directed by the product guidelines. For “Be Flex” doming resin and One-2-One epoxy, room temperature curing typically requires 12–24 hours for an initial set, with full cure in around 48 hours. Do not move or bend labels until resin is fully hardened and clear. If using “Fairy Wings” UV Resin, place the labels beneath a UV lamp and cure for 3–5 minutes per layer. For thicker coatings, apply in multiple thin layers, curing each before the next.
Once cured, gently peel or lift each label from the work surface. Inspect for clarity and surface finish—any sticky or soft spots indicate inadequate curing time or a mixing issue. Resin domed labels are now ready to apply directly or mount onto packaging, crafts, or merchandise.


Tips and Common Mistakes for Resin-Coated Labels
- Handle resin in a well-ventilated area and wear appropriate protective gear to avoid skin and fume exposure.
- Avoid rushing—allow each layer to cure fully before touching or stacking labels to prevent smudges or fingerprints.
- If air bubbles persist, use a pin or a quick pass of warm (not hot) air to release them.
- Test on a small sample before starting bulk production to ensure your process and materials are compatible.
- Always check the label’s ink compatibility with resin to prevent unwanted bleeding or blurring during coating.
Layering techniques and material choice can elevate your results—try alternating UV and polyurethane resins for multi-effect labels. Adapt resin selection to your project’s flexibility and finish needs for truly custom effects.Expert Guidance for Advanced Doming Projects
- "Be Flex" – Transparent Polyurethane Doming Resin – Scratch-ResistantPrice range: £45.00 through £81.95Be Flex polyurethane resin provides a flexible, scratch-resistant finish suitable for creating resin-coated labels with clarity and durability.
- "Fairy Wings" – UV Resin for Volumetric Reliefs, Dual Colour, 30mlOriginal price was: £15.15.£2.85Current price is: £2.85."Fairy Wings" UV Resin provides a ready-to-use acrylic gel for detailed 3D decorative effects with fast UV curing.
- "One-2-One" – Epoxy Resin for Handcraft, 1:1 Mixing RatioPrice range: £15.95 through £59.95"One-2-One" epoxy resin offers a medium viscosity suitable for beginners and experienced crafters seeking a clear, glossy finish.
Frequently Asked Questions
What resin should I use for coating labels?
For flexibility and outdoor durability, a polyurethane doming resin like Be Flex is recommended. Epoxy is suitable for flat, rigid labels.
How can I avoid bubbles in my resin labels?
Mix resin gently and let it rest briefly before pouring. Pop bubbles with a pin or a quick pass of warm air before curing.
How long does resin take to cure on labels?
Epoxy and polyurethane resins generally cure in 12-24 hours. UV resins cure in minutes when exposed to a UV lamp.
How should I print and prep labels for resin?
Use waterproof inks or allow printed labels to dry for 24 hours. Ensure surfaces are clean and free of dust before coating.
Will resin-coated labels crack if bent?
Labels coated with flexible polyurethane resin remain bendable and resist cracking, ideal for curved surfaces or flexible stickers.
Are resin-coated labels suitable for outdoor use?
Yes. Polyurethane doming resins offer UV resistance and non-yellowing durability, making them suitable for outdoor applications.