 Free shipping on orders over £29,85

How is enamel repair done with resin?
Step-by-step guide to effective resin enamel repairs at home

Enamel damage on ceramics, tiles, and household items is a common nuisance, but repairs with resin can restore strength and achieve a flawless or decorative finish. Whether you’re looking to revive a treasured plate, repair a bathroom tile, or celebrate ‘wabi-sabi’ cracks with a metallic accent, this comprehensive guide walks you through the key steps to successful enamel restoration using modern epoxy resins.

What You’ll Need
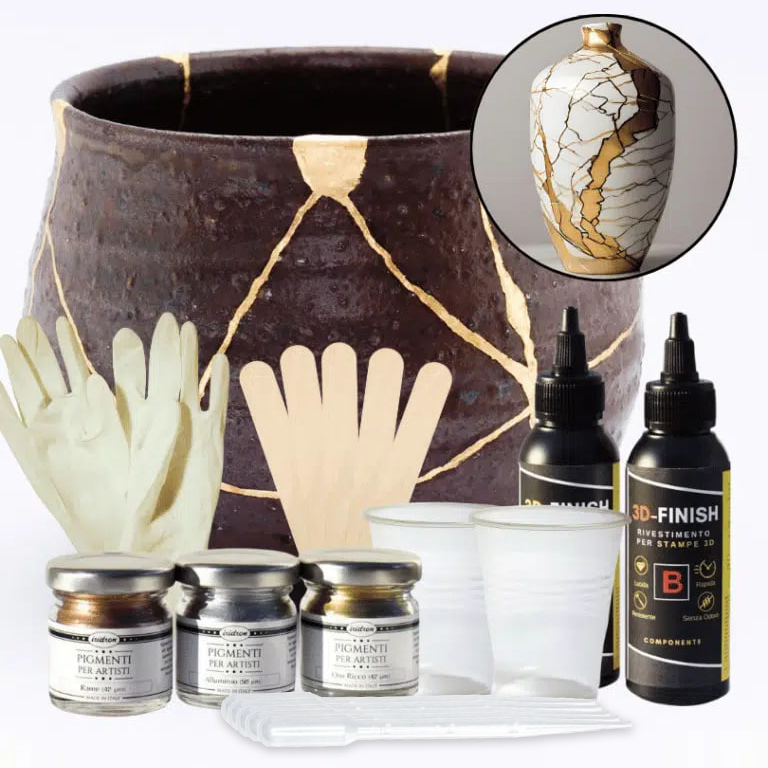
- “Kintsugi” – Ceramic Repair Kit with Gold, Silver, or Copper Metallic Pigments: For visible, decorative repairs on ceramics
- “FixExpress” – Two-Component Epoxy Glue 500g: For fast, strong bonding of enamel chips and breaks
- “EpoxyFood” – Certified Clear Food Contact Epoxy Resin for Coating: Food-safe coatings for kitchenware
- “Icrystal” – Clear Epoxy Resin – Odourless Formula – Up to 1.5cm: For transparent coatings and hobby repairs
- Isopropyl alcohol or mild detergent
- Soft cloths or paper towels
- Gloves, mixing sticks, disposable cups (if not included in kit)

Essential Enamel Repair Tools and Materials
Gathering the right materials is essential. Always keep your resin, gloves, mixing tools, and cleaning materials ready before starting. A precise setup streamlines the entire repair process for best results.
Step 1: Clean and Prepare the Damaged Enamel
Start by carefully examining the enamelled piece for cracks, chips, or missing fragments. Ensure the piece is thoroughly cleaned and fully dry; any dust, grease, or remnants will prevent proper adhesion. Clean with isopropyl alcohol or a mild detergent, then allow to dry completely. For chipped surfaces, gently sand the area with fine abrasive paper to give the resin a better grip, but avoid scratching the undamaged enamel.


Step 2: Align Chips or Fragments Precisely
If there are enamel chips or broken ceramic segments, dry-fit them to practise the alignment before gluing. Avoid rushing the alignment process, as any misplacement will be visible after repair. Plan for minimal gap and check that each piece nests cleanly in place for a seamless finish.
Step 3: Apply Resin for Bonding or Filling
Prepare your chosen resin adhesive according to the instructions. For rapid repairs where bonding strength is key, “FixExpress” – Two-Component Epoxy Glue 500g delivers a strong set in five minutes—mix in equal parts and apply a thin layer to the surfaces to be joined. Press together firmly and hold in place until set. For decorative crack-filling or to embrace the Kintsugi approach, use the “Kintsugi” – Ceramic Repair Kit with Gold, Silver, or Copper Metallic Pigments—this high-viscosity resin won’t drip, making it ideal for precisely painting lines or filling missing segments with a metallic highlight.


Step 4: Finish with Protective or Decorative Coating
Once the bond has cured, you can retouch with a glaze-like finish for a smooth, durable surface. For kitchenware or surfaces in contact with food, use “EpoxyFood” – Certified Clear Food Contact Epoxy Resin for Coating, which is independently certified for this use—ensure correct mixing and full curing. For decorative repair or hobby crafts, “Icrystal” – Clear Epoxy Resin – Odourless Formula – Up to 1.5cm is ideal for adding a glossy, clear coat. Use smooth, even strokes with a brush or pour, keeping the layer thin and even. Remove drips before the resin sets. Cure as directed for mechanical durability.
Tips and Common Mistakes in Enamel Resin Repair
Wear gloves and ensure adequate ventilation when handling epoxy to prevent skin irritation. Work with precise component ratios for proper curing, and do not exceed recommended layer thickness for resins to avoid incomplete setting. Test on a small area before a final repair to ensure adhesion and result quality. Patience during curing ensures the best finish; resist the urge to handle or move items before fully set. If pigments or dyes are being used for aesthetic effect, check that they are compatible and will not inhibit food safety if contact with food is intended.

Expert Tip: Decorative vs. Invisible Repairs
Decorative repairs like the Kintsugi style use visible resins with pigments, embracing the history of the object. Invisible repairs focus on seamlessness using clear resins and careful application. Choose your approach to match the piece’s value and usage.

- "Kintsugi" – Ceramic Repair Kit with Gold, Silver, or Copper Metallic PigmentsPrice range: £17.45 through £20.95The Kintsugi Ceramic Repair Kit features high-viscosity resin and metallic pigments for ceramic restoration, suitable for careful enamel repair.
- "FixExpress" – Two-Component Epoxy Glue 500g£26.95FixExpress two-component epoxy glue provides rapid repairs with strong adhesion, suitable for repairs involving various materials.
- "EpoxyFood" – Certified Clear Food Contact Epoxy Resin for CoatingPrice range: £20.95 through £146.95"EpoxyFood" is a food-safe transparent resin suitable for coating kitchenware with a clear, gloss finish.
 "Icrystal" – Clear Epoxy Resin – Odourless Formula – Up to 1.5cmPrice range: £12.45 through £341.45"Icrystal" is a transparent epoxy resin designed for various crafts and coatings with easy use and clear finish.
Frequently Asked Questions
Is resin safe to use for home enamel repairs?
Epoxy resin is safe for home use with common sense precautions, such as wearing gloves and using ventilation.
How long does resin take to cure on ceramic?
Most epoxies cure enough for handling in a few hours, with full strength and clarity achieved after 24–48 hours.
Can I repair items used with food using epoxy?
Only food-safe certified resins, such as EpoxyFood, should be used for repairs on items that contact food.
Will the repair be visible with clear resin?
Clear epoxy provides a near-invisible repair if applied carefully and thinly, but cracks or gaps may remain slightly noticeable.
How do I clean and maintain resin-repaired enamel?
Hand wash gently with soft cloths. Avoid harsh abrasives or dishwashers to preserve the repair’s finish.
Can pigments or dyes be used in enamel repairs?
Yes, provided they are compatible with the resin and not intended for food-contact surfaces unless food-safe dyes are used.