 Free shipping on orders over £29,85

How to apply polyurethane resins?
Step-by-step techniques for coatings, castings, and binders.


Polyurethane resins offer durable, fast-setting solutions for coatings, casting, and outdoor surfacing projects. Correct application ensures longevity and professional results, whether you are sealing a garage floor, casting models, or creating a decorative stone path. This guide will take you through the essential techniques and considerations for applying polyurethane resins safely and effectively, no matter your project type.

What You’ll Need
- “Prolux” – PU coating for tiles, concrete, plastic and metal – suitable for driveable surfaces: A robust choice for tough, abrasion-resistant, and waterproof coatings on concrete, tiles, plastic, and metal surfaces.
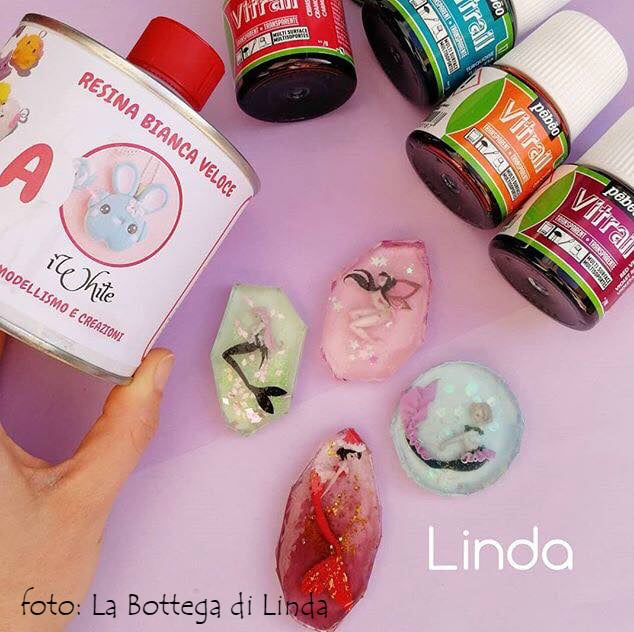
- “IWhite” – Polyurethane Casting Resin – White, Fast-Curing Two-Part System: Perfect for fast prototyping, model making, and jobs requiring rapid demoulding and detail.
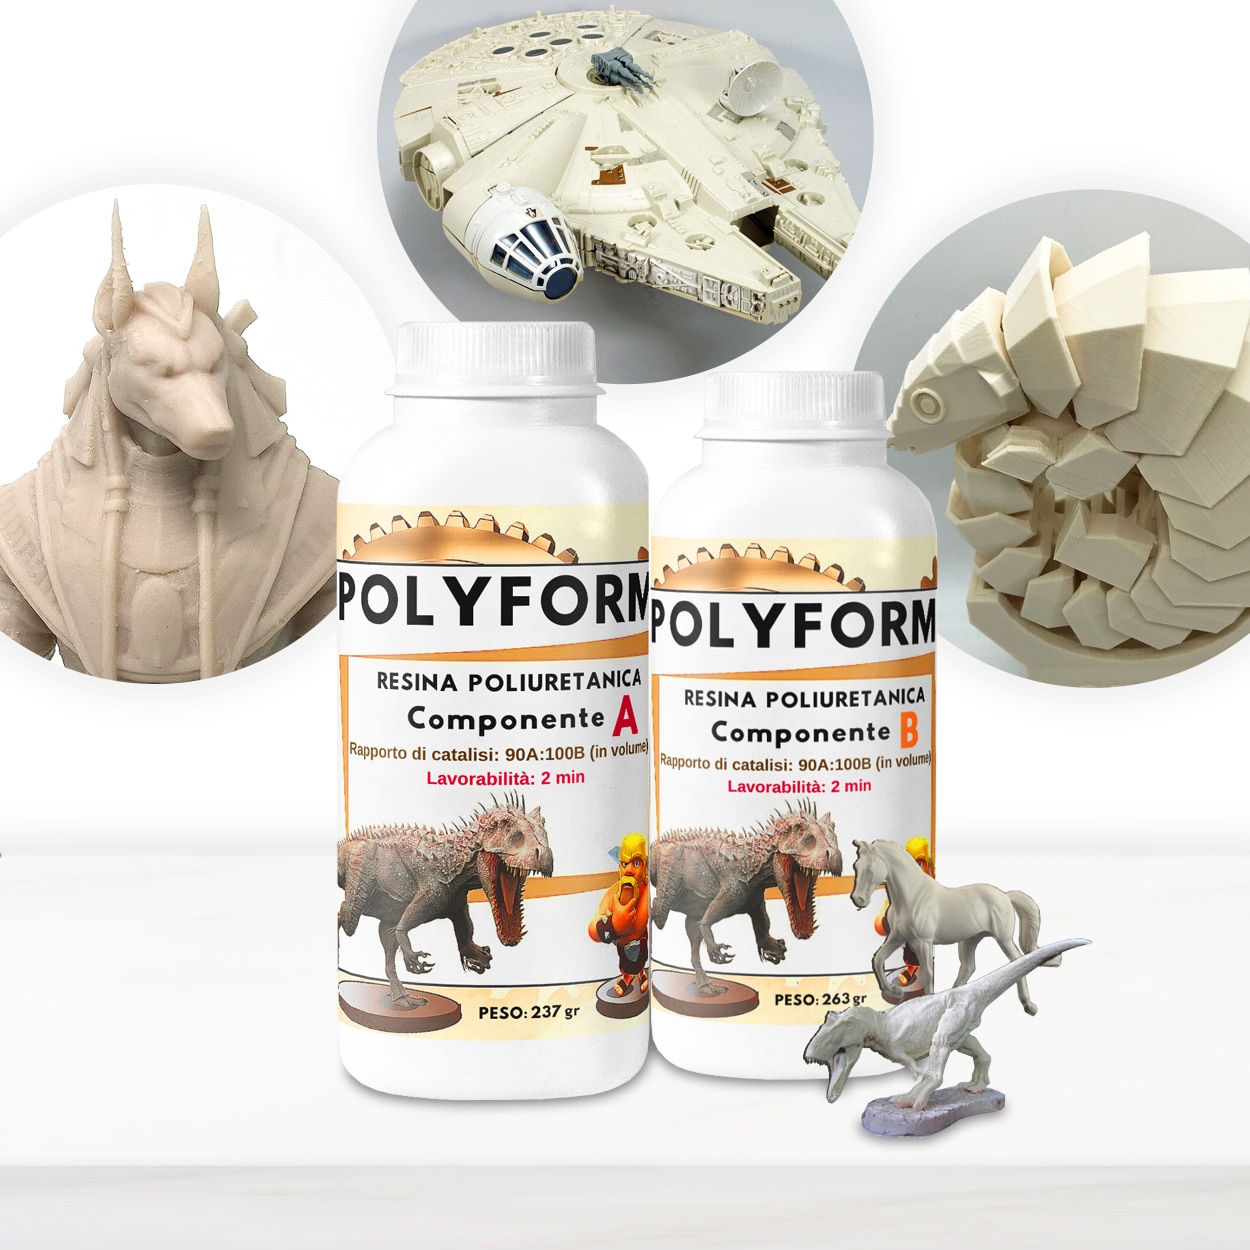
- “Polyform” – Polyurethane Casting Resin, Beige, Fast-Setting for Prototyping: For detailed castings, small batch production, and projects demanding speedy results.
- “Polirock” – Polyurethane Binder for White Stones, 2kg Two-Component Kit: Ideal for permeable decorative stone surfacing outdoors and anti-slip finishes.
- Protective gloves, safety glasses, and appropriate respirator (for handling uncured resin)
- Mixing containers and accurate digital scales
- Application tools (roller, brush, trowel, or moulds depending on your task)

Polyurethane Application Essentials
The right preparation leads to a quality result. Select your polyurethane resin based on your project’s needs—coatings, castings, or aggregate binding require different working times and techniques. Set up a clean, well-ventilated workspace, gather your tools, and review the manufacturer’s guidelines before beginning.
Step 1: Prepare the Surface or Mould
Successful polyurethane applications depend on a clean, dry, and suitably prepared base. For coatings, fully clean the floor, tile, or metal surface to remove dust, oil, or previous treatments. If casting, use a dust-free, dry silicone mould to ensure optimal detail transfer. Outdoors, be certain the substrate for stone binding is free of debris and stable. Pay particular attention to any areas prone to moisture; for best results, allow surfaces to acclimatise to room temperature.
Surface preparation is key: Overlooking this step may cause adhesion or curing issues down the line.


Step 2: Measure and Mix the Polyurethane Resin
Each polyurethane resin is supplied as a two-component kit (Parts A and B). Carefully weigh the correct ratio for your chosen product using digital scales. Pour both components into a clean container and mix slowly yet thoroughly to avoid incorporating air bubbles. Take care to scrape the sides and bottom to ensure a fully homogeneous mixture. Incorrect ratios or under-mixing will impact performance and longevity.
If casting intricate shapes or models, “IWhite” – Polyurethane Casting Resin provides high fluidity for intricate detail, while “Polyform” – Polyurethane Casting Resin is a great fit for rapid, small-batch production.
Mix thoroughly with precision to activate the chemical reaction for proper curing.
Step 3: Apply or Pour the Resin
Once mixed, the resin must be applied promptly—working times can be short. For coatings, pour out the mixture and spread evenly using a roller or brush, maintaining an even thickness. For casting, gently pour the mixture into the mould, letting the liquid flow naturally to reduce trapped air. In the case of decorative stone projects, combine your selected stones with “Polirock” – Polyurethane Binder and mix until thoroughly coated, then trowel onto the intended surface.
Work efficiently, as many polyurethane resins (like Polyform) can set within 5 to 30 minutes. Avoid overworking the resin to maintain a uniform appearance and prevent defects.
Do not rush application or curing—let the resin distribute evenly for a high-quality finish.

Step 4: Allow Resin to Cure and Finish the Job
Leave the applied resin undisturbed for the full cure time specified by the manufacturer, which may range from 30 minutes (for fast-cure casting resins) to 24 hours or more for thick coatings. Ensure the application area is well-ventilated and avoid touching until completely set. Once cured, remove items from their moulds, or, for coatings, lightly sand or add further coats if necessary to achieve the desired finish or protection level.
For surfaces such as driveways or garages, “Prolux” – PU coating for tiles, concrete, plastic and metal – suitable for driveable surfaces provides UV resistance, durability, and an optional anti-slip texture.
Always ensure safety measures—even after curing, dispose of waste responsibly and ventilate the area if there are any lingering fumes.
Tips, Troubleshooting and Common Mistakes
Always check temperatures before pouring, as low temperatures can slow curing and alter the finish. Never try to speed up curing with excess heat, as this can cause defects. If bubbles appear, reduce mixing speed or tap your mould gently. Ensure every tool and container is dry—moisture can cause foaming or incomplete curing. Lastly, wear appropriate protective gear when handling uncured resins to prevent skin or respiratory irritation.
Avoid common pitfalls: Ignore shortcuts—follow instructions closely for every new resin or surface type. When in doubt, test a small area before committing to the whole project.
Expert Tips for a Perfect Polyurethane Finish
Control temperature and humidity for each application. When working with rapid-setting resins, lay out your workflow so every step is ready in advance. If you are new to polyurethane resins, practise with small samples to get familiar with setting times and mixing.

- "Prolux" – PU coating for tiles, concrete, plastic and metal – suitable for driveable surfacesPrice range: £44.85 through £494.85"Prolux" is a polyurethane coating designed for surfaces including tiles and concrete, suitable for driveable areas with a tough, durable finish.
- “IWhite” – Polyurethane Casting Resin – White, Fast-Curing Two-Part SystemPrice range: £24.00 through £36.95IWHITE is a fast-curing, white polyurethane resin designed for precise moulding and prototyping with detailed, durable results.
- “Polyform” – Polyurethane Casting Resin, Beige, Fast-Setting for PrototypingPrice range: £15.95 through £141.95Polyform is a beige polyurethane casting resin suited for prototyping, offering fast setting and detailed results.
 "Polirock" – Polyurethane Binder for White Stones, 2kg Two-Component Kit£61.95A two-component polyurethane binder suitable for creating decorative, permeable outdoor stone surfaces with good adhesion and weather resistance.
Frequently Asked Questions
Can polyurethane resins be applied to cold surfaces?
Curing is significantly slower and finish may be negatively affected. Ideally, apply at room temperature for best results.
Do I need to wear gloves or a respirator when using polyurethane resin?
Yes, protective clothing, gloves, and an appropriate respirator are highly recommended, especially when handling uncured resin.
How do I prevent bubbles when casting polyurethane resin?
Mix slowly to avoid air, tap the mould gently after pouring, and ensure all components and tools are free from moisture.
Is it possible to colour polyurethane coating or casting resins?
Some casting resins like IWhite can be tinted, but others such as Polyform beige or Polirock are not suitable for colouring.
How should I prepare surfaces before applying polyurethane coatings?
All surfaces must be clean, dry, and free from dust or grease for proper adhesion and finish durability.
What is the usual curing time for polyurethane resin?
Curing times vary from 5 to 30 minutes for rapid-cure casting, and up to 24 hours or more for thick coatings.