 Free shipping on orders over £29,85


How do you make a small table with phosphorescent resin?
Step-by-step guide for durable and glowing DIY furniture

Creating a small table with a glowing, phosphorescent resin finish is an excellent way to add a touch of the extraordinary to your interiors. Whether you’re looking to design unique furniture for your own home or take on a rewarding DIY project, this guide will walk you through each stage of making a sturdy, eye-catching table that glows brightly in the dark.
What You’ll Need
- “EpoxyTable 5-Five” – Deep Pour Epoxy Resin for Tables and Large Projects – Up to 5cm (for layers up to 5cm thick and optimal clarity)
- “Epoxytable 10-Ten” – Deep Pour Epoxy Resin for Tables, Up to 10cm Casting (if you plan a thicker pour, up to 10cm in a single layer)
- Phosphorescent Pigment – Glow-in-the-Dark Additive for Resin, Paint, and Varnish (for vivid glow effects in your table design)
- “River-Table” – Complete Kit for Creating Your First Epoxy Resin Table (ideal for beginners, complete with resin, sealant, pigment, and polishing materials)
- Protective gloves, safety goggles, and dust mask
- Mixing containers and stir sticks
- Table mould or formwork of your chosen size
- Scales (for accurate resin measurement)
- Sandpaper or polishing pads (for finishing)
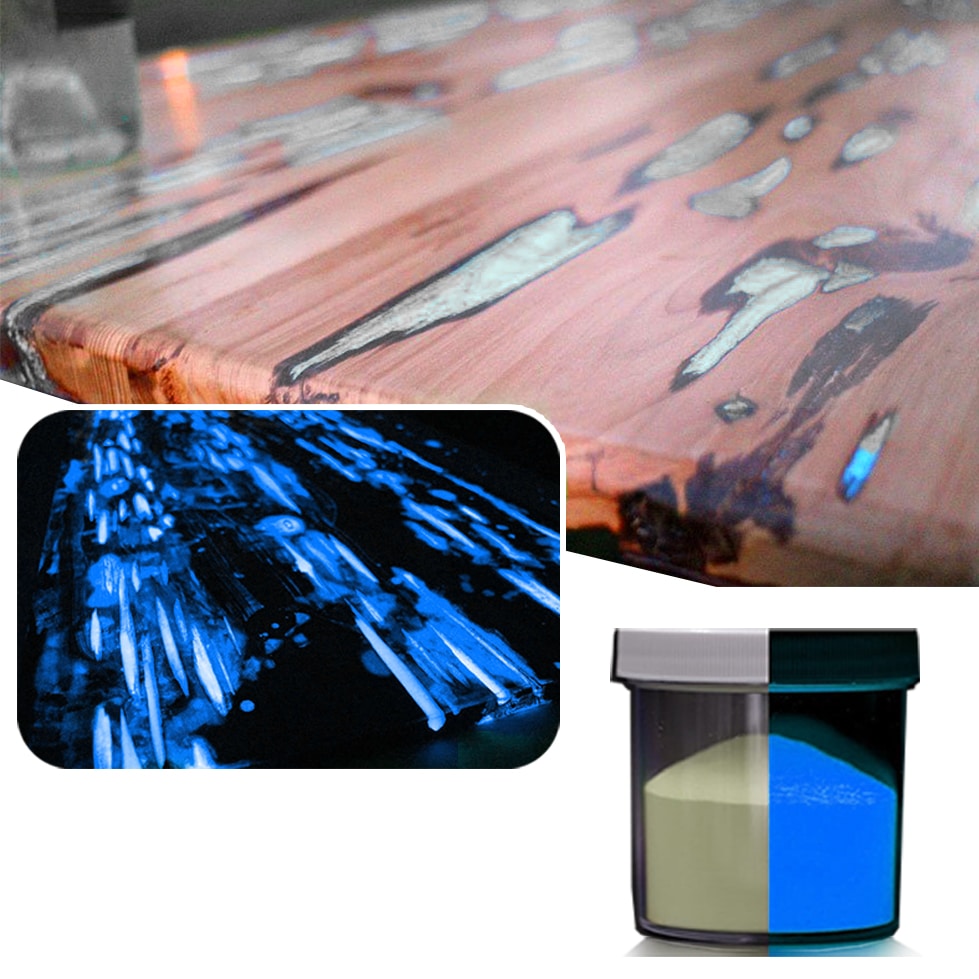
Behind the Glow: Table Inspiration and Resin in Action
Explore a curated collection of glowing resin tables and work-in-progress photos to ignite your creativity. Notice how phosphorescent effects are achieved by careful pigment placement and resin layering. From artistic river tables to minimalist designs, the right resin and additives make all the difference.

Step 1: Prepare the Workspace and Mould
Begin by clearing and cleaning your work area to prevent dust and debris from contaminating the resin. Ensure safety with PPE and good ventilation throughout your project, as resins can give off fumes. Lay out all the materials and familiarise yourself with the instructions if you’re using a kit. If working on a workbench or table, cover it with a plastic sheet for easy clean-up.
Prepare your table mould or formwork. Most small table designs use silicone, melamine board, or a pre-made mould. Make sure it is well-sealed with silicone paste or specialised sealant—this avoids leaks during pouring. For beginners, the “River-Table” – Complete Kit for Creating Your First Epoxy Resin Table includes a sealing solution for reliable results.
Step 2: Mix the Resin and Phosphorescent Pigment
Consult your chosen resin’s guide for the correct mixing ratio—this is critical to achieving a flawless finish. Using your scales, measure both resin and hardener precisely. Transfer them to a clean container and mix slowly to avoid introducing bubbles.
Once properly blended, add in the Phosphorescent Pigment – Glow-in-the-Dark Additive for Resin, Paint, and Varnish. Stir gently but thoroughly to achieve even dispersion. The more pigment added, the stronger the glow, but avoid over-saturating as this can affect clarity. Mix resin and pigment thoroughly for uniform luminosity.
Step 3: Casting the Resin
Once your mix is ready, carefully pour it into the prepared mould. Pour gradually to control depth; for thick projects (over 5cm), consider using a deep-pour resin such as “Epoxytable 10-Ten” – Deep Pour Epoxy Resin, which is designed to prevent excessive heating and bubbles. For layers under 5cm, “EpoxyTable 5-Five” provides optimal finish.
Use a spatula to spread the mixture if needed. Remove bubbles by gently passing a heat gun or torch over the surface. For complex designs, you can pour in stages, allowing each layer to partially cure before adding the next. Keep your workspace vibration-free while the resin sets.

Step 4: Curing and Demoulding
Curing times vary depending on resin type and temperature (refer to your product’s datasheet). Avoid disturbing the mould during the curing period, which may be several hours to a few days for deep pours. Allow complete cure before demoulding to prevent marks or deformation.
Once the resin is firm and fully set, carefully remove the table from the mould. If necessary, use a plastic wedge or a soft mallet to ease it out without damaging the edges.

Step 5: Finishing and Polishing
After demoulding, assess for any imperfections or sharp edges. Sand the table surface and sides as needed using progressively finer grits. For a glossy, professional look, a polishing kit such as that in the “River-Table” – Complete Kit offers special pads and polishing compound tailored to resin projects.
Ensure the surface is free from dust before polishing. Work evenly and steadily for the best results. Once finished, your phosphorescent resin table is ready to shine both in daylight and after dark!
Tips, Common Mistakes, and Troubleshooting
- Work in moderate temperatures—extremes can affect resin curing.
- Don’t rush mixing or pouring; air bubbles could spoil the clarity.
- If using a multi-layer pour, wait until the previous layer gels (not fully hardens) before pouring the next.
- Always double-check pigment compatibility and measure resin ingredients precisely.
- If the glow is too faint, increase pigment slightly or expose your table to bright light before dark use.
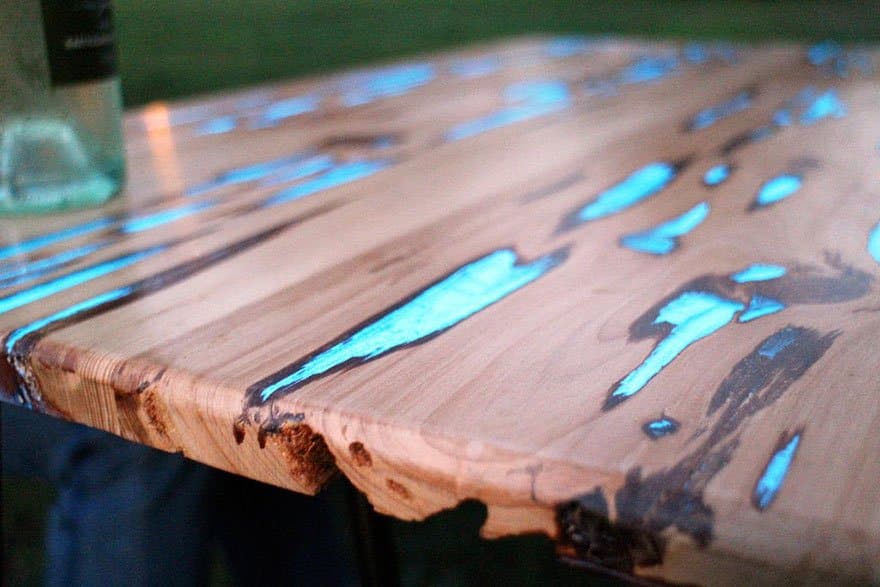
Finishing Touches: Achieving a Professional Look
See real-life examples of polished, luminous tables made using epoxy resin and phosphorescent pigments. Pay close attention to the final sanding and polishing details which enhance glow and clarity for a truly striking finish.

- Phosphorescent Pigment – Glow-in-the-Dark Additive for Resin, Paint, and VarnishPrice range: £8.45 through £13.95Phosphorescent Pigment adds glow to resin and paint, suitable for decoration and DIY projects with a subtle phosphorescent effect.
- "EpoxyTable 5-Five" – Deep Pour Epoxy Resin for Tables and Large Projects – Up to 5cmPrice range: £17.95 through £1,154.95"EpoxyTable 5-Five" is a deep pour epoxy resin designed for tables and large projects, suitable for layers up to 5cm thickness.
 "River-Table" – Complete Kit for Creating Your First Epoxy Resin TablePrice range: £198.45 through £467.45"River-Table" Complete Kit offers materials and instructions to create a wood and resin table within this creative theme.
 “Epoxytable 10-Ten” – Deep Pour Epoxy Resin for Tables, Up to 10cm CastingPrice range: £35.95 through £351.95Epoxytable 10-Ten is designed for deep pours up to 10cm, suitable for table projects requiring a clear, non-yellowing resin.
Frequently Asked Questions
What type of resin should I use for a phosphorescent table project?
Use a deep-pour epoxy resin for thickness above 2cm, such as 'EpoxyTable 5-Five' or 'Epoxytable 10-Ten', for the best clarity and depth of glow.
Does adding phosphorescent pigment affect resin curing or final strength?
When used within recommended proportions, phosphorescent pigment won't impact curing or resin strength. Always avoid over-saturating.
What tips can help get a brighter glow from my resin table?
Mix pigment thoroughly and use a high ratio within guidelines. Expose your table to bright light before viewing in the dark for maximal glow.
What can I do to prevent or remove bubbles during resin pouring?
Mix slowly, pour in stages if needed, and use a heat gun briefly over the surface after pouring to remove air bubbles.
What safety advice is important when working with epoxy resin?
Always wear gloves, goggles, and work in a ventilated area. Follow the product's safety instructions closely.
What is the best way to finish and polish my resin table?
Sand from coarser to fine grits, clean thoroughly, and use a quality polishing compound for a transparent, glossy surface.