 Free shipping on orders over £29,85


How do you repair a sink with epoxy resin?
Step-by-step guide for fixing cracks and chips in sinks

Restoring a damaged sink doesn’t have to require expensive replacements or professional intervention. With the right technique, you can use epoxy resin to achieve a durable, water-resistant repair that restores both appearance and functionality. This guide is for homeowners and DIY enthusiasts looking to safely fix cracks, chips, or broken sections in ceramic, stone, or composite sinks. Below, you’ll find detailed steps to ensure a smooth and long-lasting result.
What You’ll Need
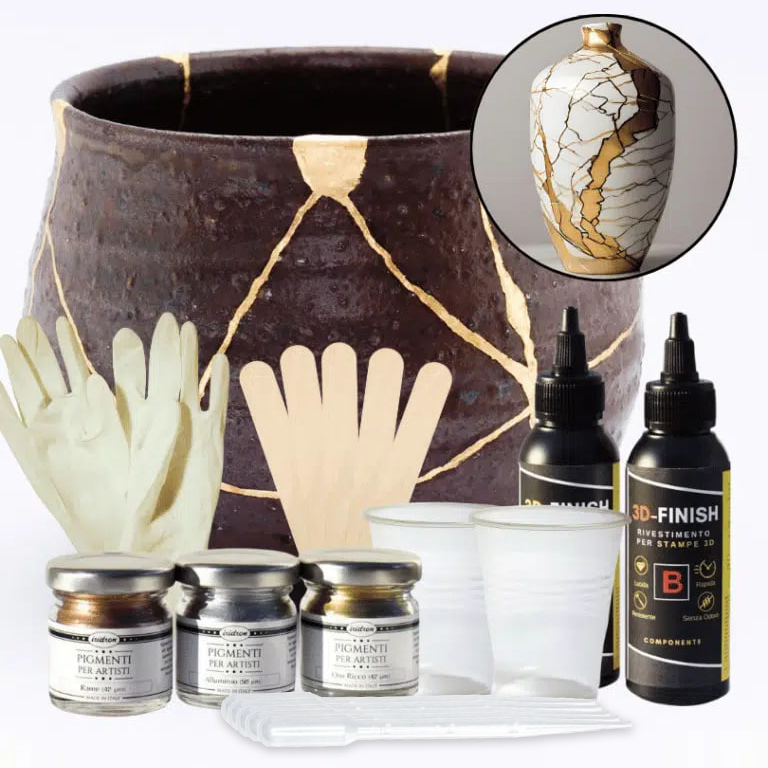
- “Kintsugi” – Ceramic Repair Kit with Gold, Silver, or Copper Metallic Pigments – for decorative repairs on ceramic or porcelain sinks
- “Magelstick” – Epoxy Mastic for Stone, Metal, and Cement Bonding and Grouting – ideal for stone, marble, or cement-based sinks
- “Klebfix” – Two-Component Fast Epoxy Glue 2K, 25g Syringe – for quick, targeted repairs on plastic, metal, or composite surfaces
- “FixExpress” – Two-Component Epoxy Glue 500g – suitable for larger or multi-material jobs
- Protective gloves and mask
- Fine sandpaper (preferably 600–1200 grit)
- Lint-free cloth
- Mixing cup and spatula (if not included with kit)

Essential Tools for Sink Repair
Gathering all materials before starting can save time and reduce stress. Protective gloves, a mask, and a proper mixing cup help ensure both safety and accuracy. Choose your epoxy product based on the sink material, and always have sandpaper ready for final surface blending.

Step 1: Prepare the Surface
Thorough preparation is key to a successful sink repair. Begin by cleaning the damaged area with a gentle cleaning agent to remove any grease, soap residue, or loose debris. Rinse the spot well and dry it completely with a soft cloth. For chips or cracks, use fine sandpaper to gently smooth any sharp edges and to create a slightly roughened surface, which will help the epoxy adhere securely. Always ensure that all dust is wiped away before proceeding.
Wear protective gloves and mask to prevent skin irritation and inhalation of fine particles during the sanding and cleaning process.
Step 2: Mix the Epoxy Resin
Select the appropriate epoxy resin for your sink’s material and follow the manufacturer’s instructions closely. For stone or cement sinks, “Magelstick” – Epoxy Mastic is ideal due to its thixotropic, drip-free formula. For ceramics or porcelain, a decorative repair with the “Kintsugi” kit can restore both strength and appearance.
Carefully mix the two epoxy components in the correct ratio: most products require a strict 1:1 or specified proportion, ensuring an even texture. Combine thoroughly to activate the hardening properties without introducing air bubbles.
Follow mix ratios precisely for best results and structural integrity.
Step 3: Apply the Epoxy to the Damaged Area
Using a spatula, toothpick, or the application tool provided, gently spread the mixed epoxy over the chipped or cracked area. Work the resin into the defect, slightly overfilling to allow for sanding flush once cured. For fine cracks or missing fragments, the “Kintsugi” – Ceramic Repair Kit enables artistic restoration with a decorative gold, silver, or copper finish, while “Klebfix” is suitable for discreet, fast-setting repairs on non-ceramic surfaces.
Ensure a thin and even coverage to optimally blend the repair with the sink’s surface and to reduce the need for excessive sanding later.

Step 4: Allow the Epoxy to Cure
Leave the applied resin undisturbed for the full curing period specified on the product packaging—usually several hours to overnight for complete hardening. Avoid contact with water or cleaning agents during this time, as premature use can compromise the repair. Once set, lightly sand the restored area with fine sandpaper to smooth out any unevenness and, if required, polish to match the sink’s original finish.
Allow full curing before returning the sink to everyday use or exposure to moisture.
Tips, Common Mistakes, and Troubleshooting
Always work in a well-ventilated environment and avoid using excessive amounts of epoxy, as this can lead to prolonged curing times and visible excess after drying. If mixing ratios are off, the resin may remain tacky or never fully cure—double-check all measurements. For best colour matching, use a kit that includes tints or pigments compatible with your sink’s material. Clean tools immediately after use to prevent hardening residue.
Visual Results of Epoxy Sink Repair
When properly applied, epoxy resin repairs blend into the sink’s surface, creating a finish that is strong and resistant to water ingress. Decorative kits like “Kintsugi” let you turn cracks into unique accents, while industrial-grade mastics deliver robust, nearly invisible restorations.

- "Kintsugi" – Ceramic Repair Kit with Gold, Silver, or Copper Metallic PigmentsPrice range: £17.45 through £20.95The "Kintsugi" kit uses high-viscosity resin and metallic pigments for precise ceramic repairs, fitting the theme of repairing sinks with epoxy resin.
 "Magelstick" – Epoxy Mastic for Stone, Metal, and Cement Bonding and Grouting"Magelstick" Epoxy Mastic is designed for precise bonding and grouting of stone, metal, and cement surfaces in repair and restoration.
 "Klebfix" – Two-Component Fast Epoxy Glue 2K, 25g Syringe£24.00"Klebfix" is a fast-setting, transparent two-component epoxy glue designed for strong bonding on various materials.
 "FixExpress" – Two-Component Epoxy Glue 500g£26.95"FixExpress" is suitable for quick repairs requiring strong adhesion on various materials, fitting the theme of epoxy resin sink repair.
Frequently Asked Questions
Is epoxy resin repair food safe for sinks?
Most general-purpose resins are not certified as food safe. If using on food-contact surfaces, look for a specifically food-safe epoxy.
How long should I wait before using my sink again?
Wait until the epoxy is fully cured, generally 12 to 24 hours, for the strongest and most water-resistant result.
Which types of sinks can be repaired with epoxy resin?
Epoxy repairs are suitable for ceramic, stone, composite, and some metal sinks. Always check compatibility before starting.
How should I clean my sink before applying epoxy resin?
Clean thoroughly with a degreasing cleaner and let it dry completely. Avoid harsh abrasives that may damage the surface further.
Is epoxy resin suitable for hairline cracks and larger chips?
Epoxy works for both, but larger chips may require gap-filling mastics or decorative repair kits for best results.
How can I remove surplus epoxy after repair?
While still soft, gently wipe away extra resin. Once cured, sand the area carefully with fine sandpaper for a smooth finish.