 Free shipping on orders over £29,85

How do you repair a resin prosthetic appliance?
A step-by-step guide for lasting, seamless repairs


When a resin prosthetic appliance becomes damaged, prompt and careful repair is essential for both aesthetics and functionality. Whether restoring a small fracture, rebuilding an edge, or mending a decorative piece, following the correct process ensures the best fit, comfort, and longevity. This practical guide walks you through each stage so you can achieve an almost invisible repair and extend the lifespan of your resin prosthetic appliance.

What You’ll Need
- “FixExpress” – Two-Component Epoxy Glue 500g: A two-component epoxy glue suitable for quick repairs and strong adhesion on a wide range of materials.
- “Liquidissima” – Epoxy Resin For Creations & Jewellery: A clear, two-component epoxy resin designed for detailed repairs or rebuilding intricate sections of your appliance.
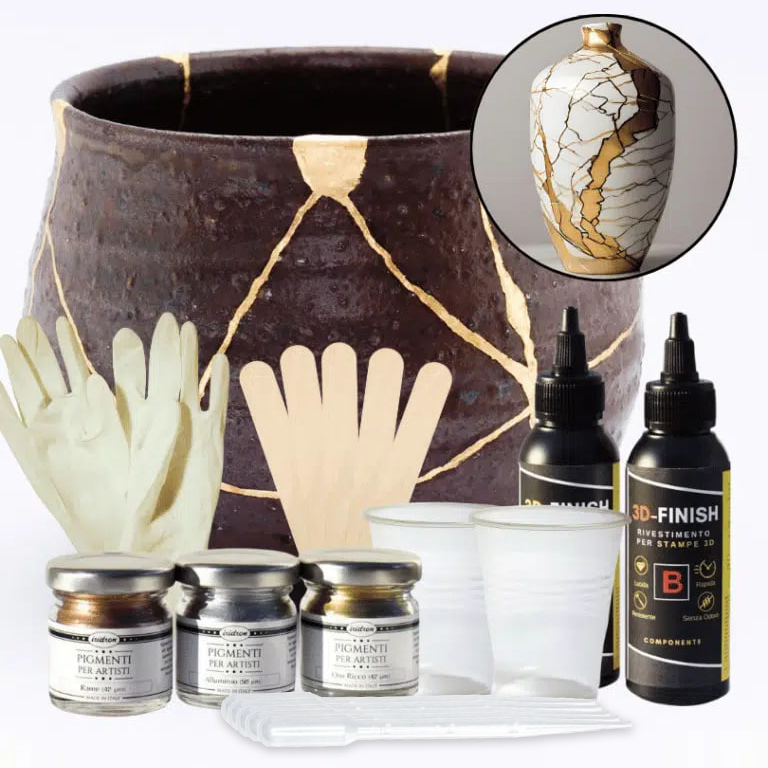
- “Kintsugi” – Ceramic Repair Kit with Gold, Silver, or Copper Metallic Pigments: Useful for aesthetic restoration or when you want to highlight and stabilise cracks with decorative metallic finishing.
- “ICreation” – Fast Epoxy Resin, 6h Demoulding, Transparent Gloss Finish: For quick-setting repairs requiring a crystal-clear, gloss finish.
- Protective gloves and mask
- Fine sandpaper or emery board (various grits)
- Cotton swabs and lint-free cloth
- Mixing sticks and disposable cups
- Clear tape (for holding broken parts)

Examples of Resin Prosthetic Repairs
View close-up images of resin prosthetic appliances before and after repair. See how cracks, chips, and cast-off fragments are restored to a seamless finish using professional-grade resins and glues. These examples illustrate the effectiveness of transparent resins for invisible, long-lasting repairs, as well as creative approaches like metallic Kintsugi accents for unique and beautiful results.
Step 1: Assess and Prepare the Appliance
Begin by examining the prosthetic appliance thoroughly under good light. Identify all cracks, chips, and damaged areas, noting any missing fragments. Gently clean the surface around the break using a lint-free cloth and a mild cleaning agent to remove dirt, oils, or debris. Dry completely before proceeding. Proper cleaning ensures that any adhesive or resin bonds effectively.
If any edges are rough or raised, lightly sand them with fine emery paper to create a smooth, flush surface. For best results, avoid over-sanding the area, which can affect fit or further weaken the material.


Step 2: Secure and Align Broken Parts
If your appliance has snapped or a section has broken away, carefully realign the pieces so they fit together perfectly. Use small amounts of clear tape to hold the sections in place without applying excessive pressure. This step is essential to avoid creating gaps or unevenness once adhesive is applied.
Ensure you are wearing gloves to prevent contamination. Double-check alignment before moving on to the bonding stage.
Step 3: Bond and Repair Fractures
Prepare your adhesive according to the product instructions. For strong, durable repairs, “FixExpress” – Two-Component Epoxy Glue 500g is ideal for quickly bonding resin prosthetic materials. Mix in a 1:1 ratio, and use a disposable stick to apply an even line of glue along the fracture, gently pressing the pieces together. The ultra-fast setting formula means you should work swiftly but precisely.
Remove any overflow with a cotton swab before it sets. Hold in place until the epoxy begins to harden—usually just a few minutes. Do not disturb the join until fully cured, as per the product guidance, to achieve maximum mechanical strength.


Step 4: Rebuild and Fill Missing Details
If small sections or decorative features are lost, mix a clear resin such as “Liquidissima” – Epoxy Resin For Creations & Jewellery, which has a long working time for careful sculpting and minimal air bubbles. Fill gaps or rebuild contours, using a fine spatula or stick for accuracy. Work slowly to shape the resin, blending into the original form as closely as possible.
Let the repair cure completely before handling. Transparent resins are particularly helpful in matching clear or high-detail sections where colour matching is important.
Step 5: Finishing Touches and Surface Restoration
Once the repaired area is fully cured, gently sand with very fine-grit sandpaper to smooth any unevenness or ridges. Wipe away dust and inspect your work. For a seamless glossy finish, you can overcoat the area using “ICreation” – Fast Epoxy Resin. This resin allows for demoulding in 6 hours and will leave the appliance looking polished and clear.
If you desire a creative or decorative touch, employ the “Kintsugi” – Ceramic Repair Kit to highlight joins with metallic pigments, celebrating repairs in line with the wabi-sabi philosophy. This is particularly useful if cracks remain visible and you wish to transform them into an intentional design element.

Tips, Troubleshooting, and Common Mistakes
Ultra-fast setting epoxy glues leave little time for adjustment, so set up your materials before mixing. Always check product compatibility with your appliance material. Avoid overfilling cracks; excess resin can create prominent ridges that require substantial sanding. Allow each layer or repair phase to cure fully before moving to the next to prevent internal stress fractures. If bubbles form in the resin, gently waft a warm air source (like a hairdryer) at a distance to help them rise and disappear.
If the appliance is for medical use or food contact, confirm that your selected adhesive or resin is suitable and fully cured as required for safety. Avoid shortcuts, especially with cure times, to ensure the repair lasts and blends seamlessly.
Expert Hints for Flawless Prosthetic Restoration
Preparation and patience are key: set up all materials, work in a clean, dust-free area, and take time to align parts properly. Use low-viscosity, bubble-reducing resins for a crystal-clear, smooth appearance, especially for aesthetic sections. Avoid handling or wearing the appliance until bonds are fully cured for optimal strength and finish.

- "FixExpress" – Two-Component Epoxy Glue 500g£26.95"FixExpress" is designed for rapid and strong adhesive bonding across various materials with a setting time of just 5 minutes.
- "Liquidissima" – Epoxy Resin For Creations & JewelleryPrice range: £12.85 through £31.85"Liquidissima" – Epoxy Resin For Creations & Jewellery offers high transparency and a self-levelling finish suitable for intricate moulds and…
- "Kintsugi" – Ceramic Repair Kit with Gold, Silver, or Copper Metallic PigmentsPrice range: £17.45 through £20.95The Kintsugi Ceramic Repair Kit uses high-viscosity resin and metallic pigments for durable, decorative repair of ceramics, suited to this theme.
 "ICreation" – Fast Epoxy Resin, 6h Demoulding, Transparent Gloss FinishPrice range: £15.95 through £55.95ICREATION fast epoxy resin offers a crystal-clear, glossy finish with 6-hour demoulding, suitable for artists and crafters under the theme of…
Frequently Asked Questions
What adhesive works best for repairing resin prosthetic appliances?
A two-component epoxy glue offers the strongest and fastest repair for most resin-based prosthetic devices.
Can I reconstruct or fill missing areas of a prosthetic appliance?
Yes—use a clear epoxy resin to carefully rebuild or fill missing features and sand smooth once cured.
How long should I wait before using the repaired prosthetic?
Wait until the adhesive or resin is fully cured—follow product guidelines, typically several hours to 24 hours.
How can I match the colour of the repair with the original prosthetic?
Use tintable resins or pigments to blend the repair with the existing colour, working in thin, buildable layers.
How can I keep air bubbles from forming in clear resin repairs?
Mix slowly, apply in thin layers, and use a gentle heat source to help release trapped bubbles during curing.
Is it possible to use a Kintsugi repair kit for prosthetic appliances?
Yes—for decorative repairs or stabilising cracks, a Kintsugi kit adds both strength and a unique design accent.
Are resin repairs on prosthetic appliances food safe immediately after curing?
Only if using food-safe certified resins and once completely cured as per manufacturer’s instructions.