 Free shipping on orders over £29,85


how to make resin wedding favours
Create unique, lasting keepsakes for your wedding guests with resin.


Handmade resin wedding favours are a memorable way to thank your guests, capturing the essence of your celebration in bespoke keepsakes. This guide takes you through the essentials of designing and crafting resin favours—from floral tokens to mini memory boxes—making the process accessible for any skill level. With care and planning, you’ll create gifts that last long after the big day.
What You’ll Need
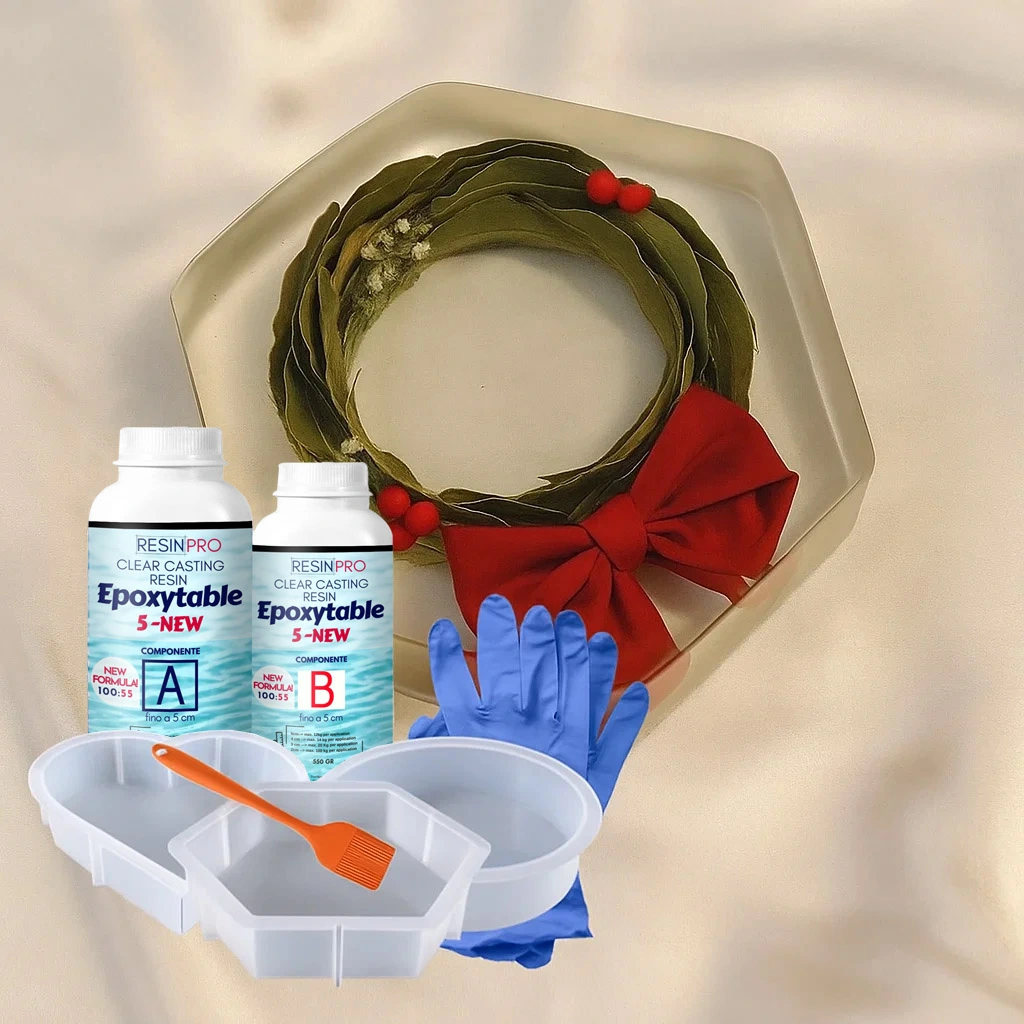
- “Evershine Collection” – Artisan Jewellery Epoxy Resin Kit with 100+ Accessories
- Resin Memory Box Complete Epoxy Resin Kit with Silicone Moulds – 3kg
- Natural Dried Flowers for Art Projects and Epoxy Resin Casting
- “UV–Creation” – Fast Acrylic Resin, 3 Minute UV Cure (for small, detailed pieces)
- Protective gloves, mixing cups, stirrers, and silicone moulds
- UV lamp (for UV resin projects)
- Decorative accents such as pigment powders, glitters, or personalised tags

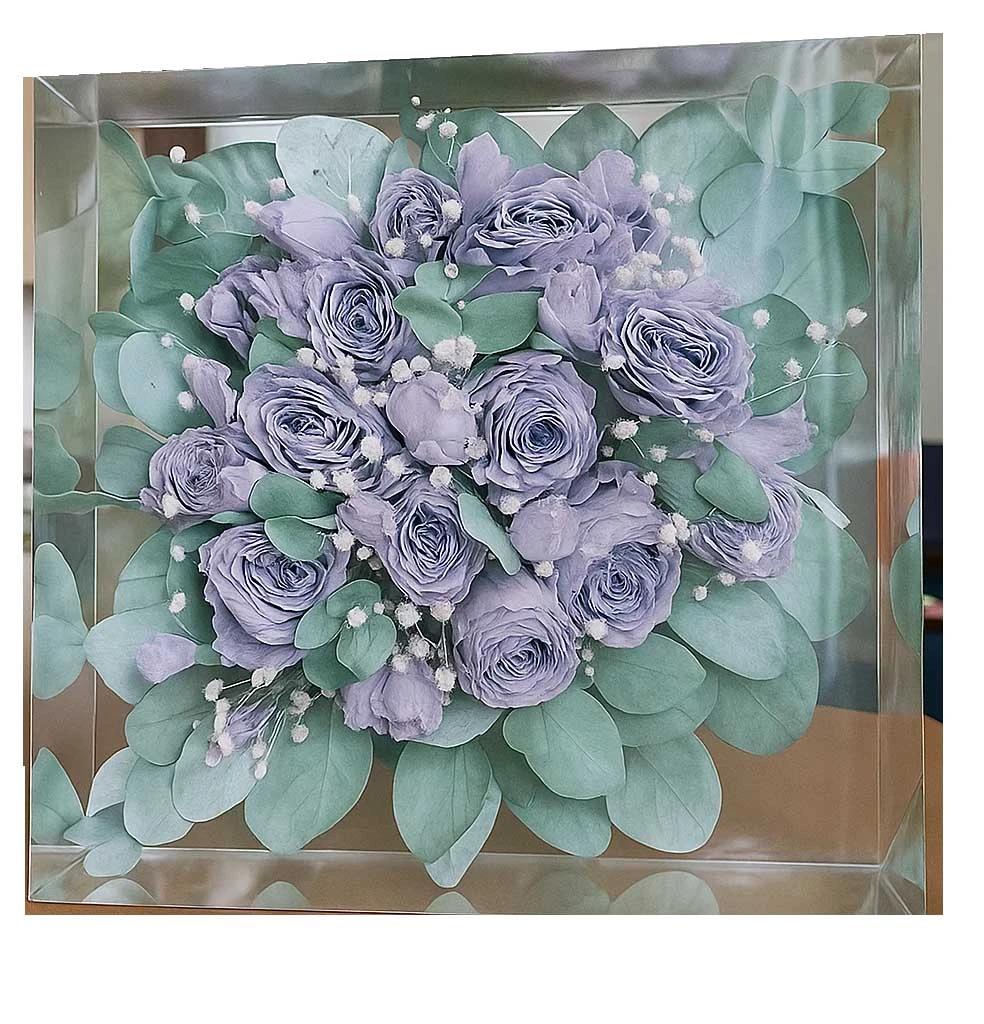
Inspiration for Resin Wedding Favours
Explore a gallery of resin keepsakes featuring floral arrangements and personalised tokens. Notice the shimmer, clarity, and personal accents that transform simple moulds into cherished mementos for guests.
Step 1: Prepare Your Workspace and Materials
Begin by setting up a clean, well-ventilated workspace away from direct sunlight and dust. Lay down a protective cover on your surface, and wear gloves to safeguard your skin. Organise all tools and materials—such as moulds, dried flowers, and any decorative elements—before handling the resin. This preparation prevents mishaps and ensures a smooth crafting experience from start to finish.
Protect your workspace and yourself by keeping surfaces covered and using personal protective gear throughout your project.
Step 2: Measure and Mix Your Resin
Accurate measurement is crucial for resin success. Most epoxy resin kits require mixing two components in a specified ratio; for example, the “Evershine Collection” – Artisan Jewellery Epoxy Resin Kit with 100+ Accessories simplifies this with a 1:1 ratio, helping beginners achieve excellent results. Pour equal parts of resin and hardener into a mixing cup, then stir slowly and thoroughly for 2–3 minutes until fully blended. Avoid over-mixing, as this can introduce air bubbles.
For small embellishments or fast projects, consider “UV–Creation” – Fast Acrylic Resin, 3 Minute UV Cure, which is ready-to-use and requires no mixing—simply dispense straight from the bottle.
Measure and mix your resin precisely to guarantee consistent curing and a flawless, glass-like finish.
Step 3: Add Embellishments and Pour into Moulds
Arrange your dried flowers or decorative elements in the clean silicone mould, ensuring they fit the shape naturally. If using Natural Dried Flowers for Art Projects and Epoxy Resin Casting, trim stems for a perfect fit and pre-position details before pouring to avoid rushing. Slowly pour resin over the arranged elements, filling the mould just to the top. Pour steadily to minimise bubble formation and avoid overfilling.
If bubbles rise to the surface, gently pop them with a toothpick or use a heat gun held at a distance. Eliminate bubbles before pouring for professional clarity in your finished pieces.
Step 4: Curing and Demoulding
Allow your resin favours to cure fully. Epoxy resin usually requires 24–48 hours, while UV resin cures in just a few minutes under a UV lamp. Consult your kit’s instructions and avoid touching or moving the mould during curing to keep the finish pristine. Once fully hardened, gently release favours from the mould, flexing the silicone rather than pulling the piece.
Plan for curing and finishing by scheduling enough time and ensuring stable environmental conditions, such as moderate temperature and low humidity.

Step 5: Finishing Touches
Check for any rough edges or marks and sand them gently if required. Attach findings—for example, add keyrings from the accessories in the “Evershine Collection” – Artisan Jewellery Epoxy Resin Kit with 100+ Accessories—or thread ribbons and personalised tags for wedding-ready presentation. Clean each piece with a soft, dry cloth to achieve a crystal-clear shine.
Tips and Troubleshooting
The key to beautiful resin wedding favours is patience. Work steadily, ensuring all materials are completely dry before embedding to prevent unwanted cloudiness. Avoid rushing the cure, as this can cause tackiness or deformation. If you encounter bubbles, lightly use a heat gun or torch, but do not overheat. Store finished favours away from direct sunlight to maintain clarity over time.
Avoid moisture and rushed curing to keep your creations smooth and clear. Embrace creative touches and patience for results that wow your guests.
Common Mistakes and How to Prevent Them
Avoid trapping moisture by ensuring all florals are thoroughly dried. Work in a dust-free space to keep your favours pristine. Finishing details, like sanding and attaching findings, can elevate the final piece for a professional look.
- "Evershine Collection" – Artisan Jewellery Epoxy Resin Kit with 100+ Accessories£20.85Artisan epoxy resin kit with 500g crystal-clear resin and over 100 accessories, suitable for jewellery making and crafts.
- Resin Memory Box Complete Epoxy Resin Kit with Silicone Moulds – 3kg£62.45The Resin Memory Box Kit includes epoxy resin and reusable moulds, suitable for making resin wedding favours preserving dried flowers.
 Natural Dried Flowers for Art Projects and Epoxy Resin CastingPrice range: £5.45 through £7.85Natural dried flowers prepared for immediate use, suitable for resin and craft projects with a natural aesthetic.
 "UV–Creation" – Fast Acrylic Resin, 3 Minute UV CurePrice range: £7.85 through £59.85"UV–Creation" Fast Acrylic Resin cures quickly with UV light, suitable for jewellery makers seeking a clear, glossy finish using an easy…
Frequently Asked Questions
Can you use fresh flowers in resin wedding favours?
Fresh flowers are not recommended as they contain moisture, which can lead to cloudiness or improper curing. Always use fully dried or pressed florals.
Which mould shapes are best for resin favours?
Common choices include hearts, rounds, and geometric shapes, but any silicone mould that fits your theme and accessory hardware can work well.
How long do resin wedding favours take to cure?
Epoxy resin usually requires 24–48 hours for a full cure, while UV resin hardens in minutes under a UV lamp. Always check your specific product's instructions.
How can I prevent bubbles in resin wedding favours?
Stir the resin slowly, pour carefully, and use a heat gun or torch sparingly to remove surface bubbles prior to curing.
What if my resin favours feel sticky after curing?
Sticky resin usually means the mix ratio was incorrect or conditions were humid. Allow more time or remake with precise measuring for best results.
Do I need to seal dried flowers before using in resin?
For best clarity, use fully dried flowers. Sealing can help reduce air bubbles, but many commercial dried flowers are ready for resin as is.