
💥 About Discover Vertical Glass epoxy resin wall coating—designed for creative interior enhancements and robust decorative protection. This solvent-free, odourless formula allows professionals and DIY enthusiasts to easily transform tiles, cement, wood, or brick into vibrant, waterproof surfaces. Ideal for customising walls, artistic murals, or even furniture, it offers both high-performance sealing and exceptional creative control. Featuring a slight milky, translucent base, it is also suitable for application on sloping surfaces and sanitary ware, expanding its versatility. 💡 Key Benefits Versatile application: Apply to vertical surfaces like tiles, bricks, wood, or cement with a spatula 🎨 Moisture and water resistance: Reliable protection in humid areas such as kitchens, bathrooms, and sanitaryware 💧 Customisable and tintable: Add any pigment, including metallics, for a tailored gloss or matte effect ✨ Durable, sandable finish: Achieve a vitrified look with thin coats or increased resilience with thicker layers. Sand after 48 hours for satin results 🖌️ ☝🏽 Useful Information Does not self-level: Maintains the integrity of applied designs, lines, or patterns, preventing unwanted smoothing and preserving sharp details—a critical feature for precise decorative work. UV-resistant: Protects against fading, retaining vibrancy over time Solvent-free & odourless: Safe for indoor use and comfortable application Slightly milky translucent base: Important for correct visual expectations during application Suitable for sloping surfaces and sanitary ware: Extends usability beyond purely vertical planes, making it ideal for diverse projects 🎯 Who It’s For – Home decorators and DIY enthusiasts – Professionals seeking high-quality decorative coatings – Creators and artists elevating vertical interiors Transform your vertical spaces with the lasting, customisable protection of Vertical Glass epoxy resin wall coating, confidently applying it where precision and durability are paramount.
£79.95
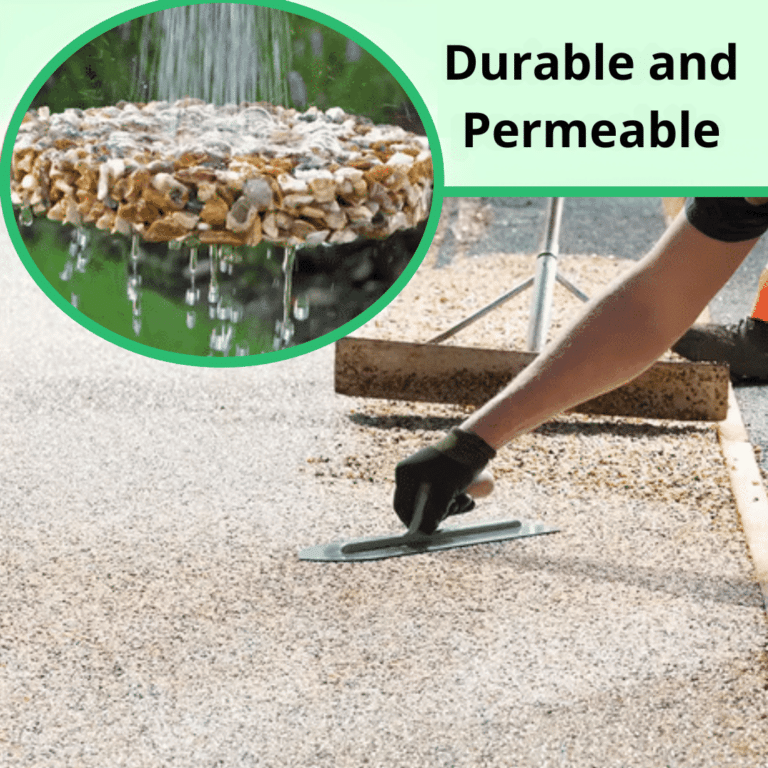
An innovative, easy and long-lasting solution for your outdoor spaces? Renew your space with Granule & Resin Flooring! Thanks to our simple and detailed instructions, transforming any surface becomes child’s play: application is very easy and – above all – affordable, within everyone’s reach. (Installation and transport services are not included in the price) Download the complete brochure https://youtube.com/shorts/Mi4CfAvJGb0?si=66TLwL-EONNmxsVO Here’s how to apply it https://youtu.be/SlPqh0_wESo?si=VpkQVlO1vDhTnTpn Applications: Our Colours: Carrara White Botticino Beige Pernice Pink Verona Red Mori Yellow Bardiglio Grey Occhialino Grey Ebony Black Main Features: Contacts Technical Support: We are always available to guide you in choosing the right products and to help you throughout the process. Phone: +44 7596 850968 Email:
[email protected] Stones & Binder Calculator Area (m²): Thickness (cm)*: Calculate Stones: 0.00 kg Resin binder: 0.00 kg *Recommended minimum thickness for driveway: 2 cm; other areas: 1.5 cm. Our ResinPro binder is the ideal solution for creating continuous, draining, and drivable surfaces enriched with marble pebbles and fine gravel. Available Binders Epoxy Binder: Offers exceptional strength and a glossy finish, ideal for surfaces that need to withstand heavy loads and intense traffic. NOT SUITABLE FOR WHITE CARRARA GRAVEL. Polyurethane Binder: Ensures flexibility and durability, perfect for outdoor applications and surfaces subject to temperature variations. Suitable for all available gravel types. Applications: Creation of continuous, decorative, draining, non-slip, and drivable surfaces. Gravel effect flooring for a wide range of urban environments, including pool edges, bike paths, walkways, small roads, squares, balconies, terraces, common condominium areas, courtyards, and parking lots. Flooring for shopping centers and equipped public areas. Application procedure for a perfect surface WARNING: Based on the choice of stone/pebble colouring, you must select the most suitable binder to avoid compromising the colouring of the stone over time: follow our instructions for optimal results. Remember: Epoxy binder should not be used with Bianco Carrara Pebble/Gravel. Procedure: Choose Your Colouring: Select your preferred colouring from those available. Consider approximately 20-25 kg/sqm for optimal application; you will find everything you need in the ready-to-use ResinPro kits. Gravel Preparation: Our gravel is washed and dried, ready to use. The ResinPro gravel grain size is 4-8 mm: the most universal among those available. The minimal Substrate Preparation: Ensure the substrate is adequately prepared, clean, and free of impurities. Optional: For added safety, you can apply a coat of Transparent Epoxy Resin as a primer with a roller. Consider a consumption of 200 gr/sqm for this use. Dust the surface with quartz powder as soon as the resin is applied. Once the primer has fully cured, remove the excess quartz. Wait: If applying the primer, wait at least 8 hours before applying the gravel and resin layer; this time may vary depending on environmental conditions, especially temperature. If the substrate did not require primer, we are ready! Create Your Mix: Carefully weigh the chosen binder to add to the gravel; this phase is very important! For Epoxy Resin with Colored Gravel: 4-8 mm diameter – for 25 kg of gravel, add 750 gr of Transparent Epoxy Resin. For Polyurethane Resin with White/Clear Gravel: 4-8 mm diameter – for 25 kg of gravel, add 820 gr of Polyurethane Resin. Note: For the polyurethane binder, it is important to be precise in mixing the necessary amount before application, as excess binder can cause swelling and foaming. The correct amount of binder is just enough to wet the surface of the gravel without dripping. If you have any doubts, contact our support team! Mix Thoroughly: Mix until the blend is “wet.” Application of the Mixture: Use a straightedge, rake, or recommended tool to evenly apply the mixture onto the surface to be decorated and coated, ensuring total coverage. Compaction of the Mixture: After application, compact the mixture layer with a trowel or a dedicated compactor, ensuring it is even and well-leveled. Surface Reinforcement: For greater surface strength, consider applying a coat of binder with a short-pile roller once the mixture is walkable (approximately 100-150 gr/sqm). By following this procedure, you will ensure a decorative and durable surface, ready to be used and appreciated for a long time. If you have any doubts, contact our technical support: Contacts Why Choose ResinPro: Technical Support: Our team of experts is available to guide you in product selection and provide assistance throughout the process. Guaranteed Quality: We use only high-quality materials to ensure excellent and lasting results. Choose the quality and reliability of ResinPro kits to transform outdoor spaces with beautiful and functional long-lasting flooring. Frequently Asked Questions General What types of resin do you offer for flooring? We offer resins for industrial cement-based floors, coloured self-levelling floors, garage floors, permeable pebble flooring and tile coatings. What are the advantages of resins compared to other flooring materials? Resins offer high wear resistance, easy maintenance, durability, waterproofing and a highly customisable aesthetic. Are specific weather conditions required for resin application? Yes, resin application requires specific climatic conditions to ensure proper adhesion and curing. It is advisable to avoid very low or very high temperatures and high humidity. Permeable Pebble Flooring What is a permeable floor? A permeable floor is a surface designed to allow rainwater to pass through it, preventing water stagnation and reducing the risk of flooding. It is made of a special mix of granules and resin, allowing optimal water dispersion into the subsoil. What are the advantages of a permeable floor? Attractive and customisable appearance Very low application costs Excellent water drainage Resistance to weather conditions and frost Anti-slip surface Low maintenance DIY installation possible Greater durability compared to traditional floors in areas with frequent rainfall Where is it recommended to install a permeable floor? Outdoor areas subject to frequent rain Car parks and driveways Gardens and courtyards Pedestrian and cycle paths Public spaces such as squares and parks Shared areas such as terraces and yards What materials are used to create a permeable floor? Selected, washed and dried granules Epoxy binder How long does a complete application take? Application is extremely fast: if applied in the morning (with at least 20°C), it will be walkable after around 12 hours for light foot traffic. Maximum hardness (suitable for vehicles) is achieved after approximately 36–48 hours (depending on ambient temperature). At higher temperatures, these times are significantly reduced, speeding up the curing process. A person with no experience can apply about 5 sqm per hour, including preparation. The more applicators involved, the shorter the overall working time. How is a permeable floor installed? Preparation of the existing solid substrate Laying of the permeable material (granule and resin mix) Compaction and levelling of the surface Sealing or surface treatment, if required What maintenance is required? Permeable flooring is very durable and does not require any special maintenance beyond that of a standard outdoor floor. How long does a permeable floor last? Its lifespan depends on the materials used and the maintenance carried out, but in general it can last for decades with proper care. Are permeable floors eco-friendly? Yes, they help manage rainwater more sustainably, reduce flood risk and can contribute to groundwater recharge. What are the costs associated with installing a permeable floor? Costs are generally very low and vary depending on the selected square metres and site conditions. The price for the ResinPro system starts from £42.85/sqm. Contact our technical support for a personalised quote. Are permeable floors suitable for cold climates? Yes, provided the installation is carried out correctly. Can I install a permeable floor myself? Absolutely. Application is simple and quick and does not require specific skills. For large surfaces, using a cement mixer is recommended to make mixing granules and resin easier. Are permeable floors suitable for high-traffic areas? Yes, granule and resin permeable floors are strong and suitable for pedestrian areas, driveways and car parks, provided appropriate materials and installation techniques are used. Can it also be applied on compacted soil? Yes, it is possible. For light traffic, a 2 cm layer is sufficient. For heavy vehicles, a concrete base of at least 7–8 cm is recommended, or the application of a grass-reinforcement grid with a thicker mix. Have doubts? Ask us how to do it! What is the best time to apply permeable flooring? The resin cures under a wide range of conditions. The recommended minimum temperature is 10°C and the maximum is 40°C. At higher temperatures, curing times are reduced. What happens if the floor cracks? If damage occurs, it is sufficient to apply a new resin roll or a fresh mix to restore the floor to like-new condition. What should I pay attention to during application? Correct resin dosage Dry surfaces, as humidity and wet substrates are the enemies of resin Can I use gravel or stones I already have at home? Yes, but they must be washed and dried to avoid curing issues and aesthetic defects. What will be delivered to my home after placing an order? Depending on the quantity ordered, you will receive a box or a small pallet with all materials ready to use. I’m afraid I won’t know how to apply the floor – what can I do? Don’t worry: ResinPro offers remote assistance and video support. Application is simple – you just need to mix the resin and granules thoroughly. Contacts How can I contact you for further information? You can contact us by email, phone or WhatsApp. All contact details are available on our contacts page.
£49.95

SPARTA line by ResinPro One of Europe's leading polyaspartic resins The perfect blend of design, strength, and durability QUARTZFORCE is a next-generation polyaspartic quartz flooring coating designed for the most demanding environments. Part of the professional SPARTA line by ResinPro, it combines high-purity coloured quartz with premium polyaspartic resin to deliver a seamless, ultra-durable floor with outstanding aesthetics. Thanks to its advanced formulation, QUARTZFORCE ensures exceptional wear resistance, excellent UV stability, and fast application, while enhancing spaces with an elegant and contemporary mineral finish. Available colours sesame white sky blue peach pink solvent ivory medium grey Why choose QUARTZFORCE? Extreme durability Withstands heavy traffic, high mechanical loads, and chemical exposure. Premium aesthetics Natural stone texture, deep colours, and elegant finishes for modern, bright spaces. Total protection Slip-resistant, waterproof, and UV stable with no yellowing. Perfect hygiene Seamless surface, easy to clean, preventing mould and bacteria growth. Easy application Pre-mixed, ready-to-use product with optimised working time on site. Solvent-free formulation Solvent-free and low in VOCs for safer handling on site and indoors. Application areas Airports and railway stations Shopping centres and exhibition halls Underground stations and public infrastructure Healthcare facilities Food industry Offices, hotels, and commercial buildings High-end residential buildings Key technical performance Hardness (Shore D – 7 days)≥ 80 Adhesion to substrate≥ 2 MPa Wear resistance≤ 0.03 g Impact resistance≥ 60 MPa Surface drying (25°C)≤ 4 h Full curing (25°C)≤ 24 h Application data Mixing ratio (by weight): A : B = 3 : 1 Consumption: 1.5 – 2 kg/m² Coverage: 10 – 13 m² Pot life: 20°C → 30 min | 25°C → 25 min | 30°C → 20 min Packaging: Part A 15 kg | Part B 5 kg A floor built to last With QUARTZFORCE, you are choosing more than just a flooring system: you are investing in a professional, reliable, and aesthetic solution designed to withstand time, heavy use, and modern demands.
£282.82

💥 About Pebbles for permeable floors 25 kg enable you to design durable, beautiful, and functional outdoor surfaces. Perfect for resin binder systems for permeable flooring, these pre-washed stone aggregates are specifically suited for garden paths, terraces, and walkways, providing both style and optimal drainage. Ideal for landscape designers, DIY enthusiasts, and gardeners aiming to craft lasting, visually appealing permeable flooring. 💡 Key Benefits Simple to Apply Just mix with resin binder systems for fast, straightforward installation. ⚡ Excellent Durability Creates robust floors that withstand time and weather. 💪 Superior Drainage Promotes water permeability for safer, drier surfaces. 💧 Design Flexibility Combine with marble, granite, or porphyry for unique looks. 🎨 ☝🏽 Useful Information Application Rate Use one 25 kg bag per square metre for ideal coverage. Granule Compatibility Mix with marble, granite, and porphyry. Pebble Size 4–8 mm diameter for optimal performance. 🎯 Who It’s For – Landscape designers and architects – DIY and home improvement enthusiasts – Gardeners seeking durable, attractive outdoor floors Upgrade your outdoor spaces with these premium pebbles—perfect for use with resin binder systems for permeable flooring to achieve functional and attractive surfaces.
£28.45
Resin Application on Walls
The application of resin on walls is a process that allows obtaining a resistant, waterproof, and visually impactful coating. After adequately preparing the surface, it is necessary to apply a primer to improve the resin's adhesion. Subsequently, a layer of epoxy resin mixed with a hardener is applied using a spatula or a roller. The process concludes with the resin curing and cooling, which may take several hours or even days depending on the product specifications.
Epoxy Resin for Walls
Epoxy resin for walls is an ideal solution for creating smooth, glossy, and durable surfaces. This material, known for its high adhesion, is particularly suitable for interior wall cladding, offering a high-quality finish that withstands the test of time. While its application requires some skill, with the right precautions, it can also be done as a DIY project. Always remember to adequately prepare the surface and respect the curing times.
Resin Decoration Techniques
Resin decoration techniques include embedding, mosaic, coating, and engraving. Embedding involves incorporating objects like gems, stones, or flowers within the resin. Mosaic is a technique that entails creating designs with small pieces of colored resin. Coating, on the other hand, involves applying a thin layer of resin on an object to protect and enhance its appearance. Finally, engraving allows for creating designs directly on the resin surface.
Resin Effect Paint for Walls
Resin effect paint for walls is an increasingly popular decorative solution to add a touch of modernity and originality to spaces. This special paint, once applied, creates a final effect very similar to resin, with a glossy and smooth appearance. This type of coating is wear-resistant and easy to clean, making it ideal for kitchens, bathrooms, or living areas. For optimal results, proper surface preparation and adherence to the manufacturer's instructions are crucial.
Resin Application on Bathroom Walls
Applying resin on bathroom walls can revolutionize the environment's appearance. This durable and waterproof material adapts perfectly to humid environments like bathrooms. The application involves an initial wall preparation phase, including cleaning and smoothing, followed by applying a primer. Once the primer is dry, the resin application begins, which may require multiple coats depending on the desired effect. Finally, a sealant is applied to ensure long-lasting durability.
Epoxy Resin for Bathroom Wall Coverings
Epoxy resin for bathroom wall coverings is an innovative and functional solution for a modern and moisture-resistant look. Known for its waterproof properties and mold resistance, this material offers a seamless, easy-to-clean finish. Proper surface preparation, resin mixing with hardener, and careful application following the manufacturer's instructions are necessary for a successful outcome.
Tutorial: Applying Resin on Bathroom Walls
Applying resin on bathroom walls can be done following precise steps. Surface preparation, primer application suitable for the resin type used, resin mixing with a hardener, careful application with a spatula, a second resin coat if needed, and protective coating are essential steps to achieve the best results. Remember to follow the manufacturer's instructions for optimal outcomes.
Best Resin Type for Bathroom Walls
The best type of resin for bathroom walls is epoxy resin. It is moisture-resistant, easy to clean, and provides a modern and smooth appearance. Available in a wide range of colors and finishes, epoxy resin suits various interior design styles. While its application requires meticulous surface preparation and specific tools, it offers a long-lasting and aesthetically impactful result.
Resin Application on Exterior Walls
Applying resin on exterior walls requires precision and expertise. The process involves surface cleaning, primer application for resin adhesion, and the resin application, whether epoxy or acrylic. It is essential to respect drying times between each phase. Resin application on exterior walls provides weather-resistant and durable coating over time.
Epoxy Resin for Exterior Coatings
Epoxy resin for exterior coatings is a versatile material offering a smooth, durable, and waterproof finish. Ideal for surfaces exposed to harsh weather conditions due to its high resistance to external agents like UV rays, moisture, and temperature variations. Easy to apply and requiring minimal maintenance, epoxy resin is a perfect DIY solution. However, following the manufacturer's instructions for proper preparation and application is crucial.
Epoxy Resin Techniques for Exterior Walls
Epoxy resin application techniques for exterior walls require precision and attention. Start with cleaning, drying, and smoothing the wall surface. Apply a primer to enhance resin adhesion, mix the epoxy resin following the manufacturer's instructions, and apply it with a roller or a spatula. It's important to apply resin in uniform layers, allowing drying between each layer. Properly followed techniques ensure a durable and long-lasting coating.
Tips for Applying Resin on Exterior Facades
Applying resin on exterior facades involves fundamental steps for optimal results. Begin by preparing the surface, removing dirt, dust, and debris. Apply a suitable primer for resin adhesion and proceed with applying resin in two or more coats, respecting drying times between each coat. Use specific exterior products resistant to weather conditions for the best outcomes.

💥 About Art Pro Deluxe is a specialist ultra-high viscosity epoxy resin crafted for artists who demand absolute control and clarity in their resin art projects. Thanks to its dense structure, it does not leak out from the working surface, slowly reaching the corners, allowing you to preserve your original design without distortion. Perfect for geode art, ocean pieces, coasters, trays, and fluid artworks, this professional-grade resin stays where you place it—ensuring sharp lines and vibrant design fidelity. 💡 Key Benefits Extremely high viscosity – Ideal for detailed resin art, geode, and ocean techniques. 🌊 Crystal clear & UV-resistant – Maintains perfect clarity for years; includes 10-year anti-yellowing warranty. 💎 Self-levelling & scratch-resistant – Makes stunning finish layers for coasters or trays. 🛡️ Non-toxic & solvent-free – Safe for use in studios, vegan-friendly, cruelty free. 🌱 Fast curing – Ready for unmoulding after 10–12 hours; full cure in 24–48 hours. ⏱️ Suitable for vertical applications – Can be applied by brush or roller, perfect for furniture and 3D panel coatings. ☝🏽 Useful Information Mix ratio: 100:70 by weight (Resin A : Hardener B) Compatible with: epoxy-safe dyes/pigments (max 5%), silicone, wood, fabric, glass, paper Layering: For castings over 1 cm, apply in multiple layers using a heat gun to prevent bubbles Not for water-based dyes: Avoid using on moist surfaces or with acrylic paints Short working time: Approximately 15–20 minutes; plan your design accordingly 🎯 Who It’s For – Resin artists and crafters – Hobbyists and DIY enthusiasts – Professional makers of art, coasters, trays, and furniture finishes Trusted by artists globally since 2015, Art Pro Deluxe epoxy resin is your go-to choice for precision crafting and lasting artistic brilliance. Bring your artistic vision to life with gallery-quality precision—order Art Pro Deluxe now!
£39.95

Why Choose TITANFIX? ✔️ Ultra-Fast Curing Significantly reduces repair time and allows surfaces to be returned to service quickly. ✔️ Semi-Rigid, High-Performance Formula Absorbs minor concrete movement while maintaining excellent mechanical strength. ✔️ Exceptional Adhesion Outstanding bonding performance on concrete substrates, including fine cracks. ✔️ Weather Resistant Does not foam in the presence of moisture and maintains long-term performance. ✔️ Clean and Controlled Application Low viscosity, homogeneous mixing, and precise injection thanks to the static mixing nozzle. ✔️ Professional-Grade Formulation Solvent-free, durable, and designed for technical and industrial environments. Applications TITANFIX is ideal for: Filling and repairing concrete cracks Surface preparation before coatings (resin floors, quartz systems, polyaspartic coatings) Industrial, commercial, and residential projects Key Technical Performance Hardness (Shore D – 7 days): 55–65 Concrete adhesion: 3 MPa Surface dry time: ~2 minutes Full cure: 7 days Excellent moisture stability: No foaming Application Data Mix ratio: A:B = 1:1 (by volume) Application temperature: –10°C to 40°C Relative humidity: < 85% Initial set time: Approximately 30 minutes Curing times may vary depending on ambient temperature and humidity conditions. Packaging 400 ml dual-cartridge system Automatic 1:1 mixing with static mixer nozzle The Essential Solution for Reliable Repairs With TITANFIX, you get a professional-grade repair filler that is fast-curing, durable, and highly resistant—perfectly suited for modern concrete repair requirements and high-performance coating systems.
£27.02

Stones & Binder Calculator Area (m²): Thickness (cm)*: Calculate Stones: 0.00 kg Resin binder: 0.00 kg *Recommended minimum thickness for driveway: 2 cm; other areas: 1.5 cm. Certified Non-Toxic Transparent Epoxy Binder This resin has been specifically formulated to ensure an impeccable result in various applications. Thanks to its high gloss and transparency, and low viscosity, it offers a flawless, clear, and bubble-free result for your colored pebbles or aggregates. It is also certified non-toxic for skin contact post-cure. High Resistance and Durability Excellent resistance for your permeable floor: this binder ensures outstanding mechanical performance once cured. It also cures very quickly, making the floor walkable and fully usable in just 24 hours. Guaranteed Yellowing Resistance The cycloaliphatic amine-based hardener, along with the use of UV filters, guarantees high resistance to yellowing. Key Features High transparency Excellent mechanical resistance Good chemical resistance and carbonation resistance High impregnation and structural reinforcement for permeable floors Long working time Glossy surface High UV resistance for long-lasting creations (low yellowing) High mechanical resistance for scratch protection Low viscosity that reduces air bubbles after curing and facilitates aggregate impregnation Odorless and solvent-free perfectly transparent and bubble-free thanks to the specific formula for natural stones and colored marbles Curing Time Complete curing is achieved in about 24 hours, but the product can be walked on after just 10 hours. Ideal Applications The ideal applications for "ultra-transparent" epoxy resin include colored or dark-colored pebbles and aggregates. Consider these indicative data for epoxy resin for colored aggregates: 1-2 mm - for 20-25 kg of aggregate, add 800g of epoxy resin 3-5 mm - for 20-25 kg of aggregate, add 600g of epoxy resin 6-10 mm - for 20-25 kg of aggregate, add 600g of epoxy resin 10-20 mm - for 20-25 kg of aggregate, add 400g of epoxy resin Main Technical Data (Click the "TDS" icon for the full technical data sheet) Pot-life (150g at 30°C): 1h20' Complete cure after 24h Film cure (1mm at 30°C): 6h Supplied in plastic cans Maximum casting thickness: 2 cm (7 kg at 20°C) Epoxy Resins Epoxy resins are thermosetting polymers derived from monomers containing the three-atom epoxy ring. They are widely used in the production of advanced composite materials, obtained by combining the resin with fibers. [xyz-ips snippet="TRUSTPILOT-WIDGET"]
£19.95

💥 About Сomplete Kit "RIVER-TABLE" - For Creating Your First Table: Resin Kit for Tables and Crafts - the perfect starter pack for resin enthusiasts of all levels. This comprehensive kit includes everything you need to create stunning resin tables, crafts, and more. With easy-to-follow instructions and high-quality materials, even beginners can achieve professional results. You will find everything you need to create the container, the resin and the final polish. Detailed instructions on how to create the formwork, and the tricks to cast the resin in few simple steps are also included. Dive into the world of resin artistry with our Beginner Resin Kit and unlock your creativity today! Resin Pro offers to chose between two epoxy types - -"Transparent" casting resin up to 2cm or -Deep pour "Epoxytable-5" up to 5cm. 💥What`s included: "BEGINNER" KIT - Have you always dreamed of owning a stunning, contemporary table crafted from wood and resin? Now, you can bring that dream to life without breaking the bank! Our BEGINNER kit offers an affordable solution, enabling you to effortlessly and swiftly create your very own wooden and resin table. • 9kg of deep pouring resin up to 5cm OR 8kg of casting resin up to 2cm. • Glossy "Shiny Shield" release film (32cm*2m) • 500gr Non-toxic silicone paste to seal your frame • Polishing KIT (polishing pads 6pcs + professional polishing paste 250ml) • 50ml colourants • Detailed instructions on how to create the formwork step by step and pour the resin. The kit is sufficient to create a table with an area of 0.5 m2 (e.g. 45 cm x 80 cm, thickness 2 cm) - These quantities are calculated by simulating a "classic" 2/3 wood and 1/3 resin table. For any queries or if you may need some advice, please contact the ResinPro technical team. "PRO" KIT - Ready to unleash your creativity with a sleek wood and resin table? Look no further! Our PRO kit offers everything you need to effortlessly and swiftly bring your vision to life. • 18kg of deep pouring resin up to 5cm OR 16kg of casting resin up to 2cm. • Glossy "Shiny Shield" release film (32cm*3m) • 500gr Non-toxic silicone paste to seal your frame • Polishing KIT (polishing pads 6pcs + professional polishing paste 250ml) • 100ml colourants • Detailed instructions on how to create the formwork step by step and pour the resin. The kit is sufficient to create a table with an area of 1 m2 (e.g. 70 cm x 100 cm, thickness 2 cm) - These quantities are calculated by simulating a "classic" 2/3 wood and 1/3 resin table. For any queries or if you may need some advice, please contact the ResinPro technical team. "MAESTRO" KIT - Are you a DIY enthusiast eager to craft a stunning, contemporary wood and resin table? This exclusive offer is tailored just for you! With the MAESTRO kit, you can effortlessly and promptly bring your wooden and resin table masterpiece to fruition. • 30kg of deep pouring resin up to 5cm OR 32kg of casting resin up to 2cm. • Glossy "Shiny Shield" release film (32cm*4m) • 500gr Non-toxic silicone paste to seal your frame • Polishing KIT (polishing pads 6pcs + professional polishing paste 250ml) • 150ml colourants • Detailed instructions on how to create the formwork step by step and pour the resin. The kit is sufficient to create a table with an area of 2 m2 (e.g. 90 cm x 150 cm, thickness 2 cm) - These quantities are calculated on a "classic" 2/3 wood and 1/3 resin table. For any queries or if you may need some advice, please contact the ResinPro technical team! If you have not enough experience, we insistly suggest to make a small test before working with large project. WARNINGS: During processing, use protective masks, gloves, and other protective clothing. In case of contact with eyes, immediately rinse with cold water for 15 minutes and immediately consult a doctor. Get inspired by creative works [pinterest_carousel gallery_id="776800704417739261"]
£198.45
 Free shipping on orders over £29,85
 Shipping Tracking!



 Google
 Facebook


