 Free shipping on orders over £29,85


How do you make a resin clock?
Step-by-step guide for unique resin wall clocks

Crafting a resin clock blends creativity, functionality, and craftsmanship into a statement piece for any room. Whether you enjoy resin art or want a bespoke wall clock tailored to your style, following a clear method will ensure a stunning result. This guide covers everything you need, from preparing your base to adding decorative touches and mounting the clock mechanism.
What You’ll Need
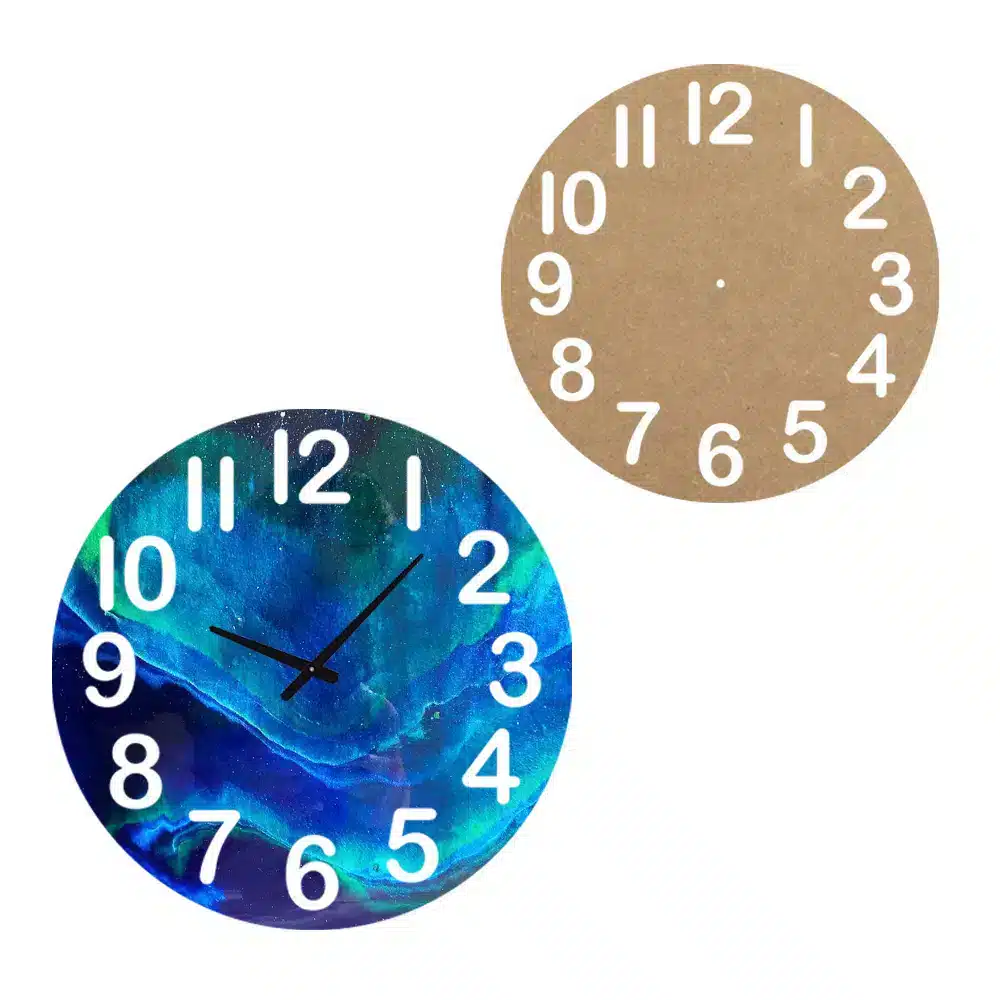
- “Wall Clocks” – Wooden Bases for Creating Custom Wall Clocks – Ideal as your clock face or base
- “Trasparente” – Multipurpose Clear Epoxy Resin for Casting – Up to 2cm – For the clear glossy coating and embedding decorative objects
- DIY Clock Mechanism with 3 Sets of Hands for Resin Art Clocks – Complete your clock with a reliable mechanism
- Natural Dried Flower Kit for Epoxy Resin Art and Décor Crafts (optional) – Add a decorative natural element
- Nitrile gloves, mixing sticks, level, and measuring scales

Essential Materials for Resin Clock Making
Quality materials help ensure a beautiful and lasting resin clock. Using purpose-made wooden bases and clear epoxy resin offers the best results. Dried flowers add a personal touch, while a trusted clock mechanism completes the look. Always gather everything before you begin for a smooth crafting experience.

Step 1: Prepare the Surface
Choose a smooth, stable base for your clock design. Wooden bases work particularly well as they provide structure and absorb minimal moisture. Before starting, make sure the base fits your desired size and has a pre-drilled centre hole if possible for the clock mechanism.
Ensure your surface is free from oil, dust, or moisture. Wipe down the base with a dry cloth and, if needed, lightly sand for improved resin adhesion. Mask off the back or edges if you want a perfectly crisp finish.
Step 2: Mix and Pour the Resin
Carefully measure your “Trasparente” – Multipurpose Clear Epoxy Resin for Casting – Up to 2cm by weight as per the instructions. Wear gloves and work in a dust-free, well-ventilated area. Mix the resin and hardener thoroughly in a clean container, scraping the sides and bottom for even clarity and cure.
Mix your resin thoroughly for even clarity and strength. Pour the resin slowly onto the base, letting it self-level. If you plan to add dried flowers or pigments, now is when to gently position them.
Step 3: Add Decorations and Layer Up
If you want a decorative clock, embed materials such as the Natural Dried Flower Kit for Epoxy Resin Art and Décor Crafts. For organic items, it’s best to pour the resin in layers, letting each cure before adding more—this prevents items from floating.
Pour resin in layers to avoid bubbles and floating inclusions. Allow the resin to partially cure before embedding heavier embellishments. Use a heat gun or blowtorch briefly to remove any surface bubbles for a glass-smooth finish.

Step 4: Curing and Finishing
Allow each resin layer to cure fully before proceeding. Cure times will depend on your resin and room conditions; avoid moving the project during this phase. Once set, gently sand the edges if needed for a smooth profile.
Drill a centre hole (if not pre-made) for the clock mechanism and wipe away any dust.

Step 5: Assemble the Clock Mechanism
Follow the instructions included with the DIY Clock Mechanism with 3 Sets of Hands for Resin Art Clocks to mount the movement and your choice of hands. Secure tightly but avoid over-tightening, which can affect smooth operation. Add the battery, set the time, and your custom resin clock is ready!
Tips and Common Mistakes
Avoid overmixing resin to reduce bubble formation. Always check your workspace is dust-free and level before pouring. Always use gloves and work in a well-ventilated space. If you notice tackiness, give it additional curing time. Take care drilling resin—use low speeds and support the clock to prevent cracks.
Expert Tips to Perfect Your Resin Clock
Take your time with layering and curing your resin. Rushing the process may trap air or leave inclusions floating. Pay attention to safety—resin should always be handled with gloves and good ventilation. Cleaning up droplets immediately and protecting the back of your clock makes for a truly professional result.

- DIY Clock Mechanism with 3 Sets of Hands for Resin Art ClocksOriginal price was: £12.90.£5.85Current price is: £5.85.This clock mechanism offers compatibility with various faces and customisable hands suitable for handmade resin clocks.
- Natural Dried Flower Kit for Epoxy Resin Art and Décor Crafts£8.15Natural Dried Flower Kit adds a natural aesthetic to epoxy resin arts and crafts, suitable for various decorative projects.
- "Wall Clocks" – Wooden Bases for Creating Custom Wall Clocks£19.85"Wall Clocks" wooden bases designed for creative projects including Resin Art and Fluid Art.
- "Trasparente" – Multipurpose Clear Epoxy Resin for Casting – Up to 2cmPrice range: £8.45 through £948.85"Trasparente" clear epoxy resin offers a self-levelling, glossy finish for casting up to 2cm layers, suited for woodworking and art projects.
Frequently Asked Questions
Which resin is best for creating resin wall clocks?
"Trasparente" Multipurpose Clear Epoxy Resin is ideal for up to 2cm thickness, offering a glossy and durable finish for clocks.
How do I reduce or remove bubbles when pouring resin for clocks?
Mix resin slowly and use a heat gun briefly after pouring to eliminate surface bubbles, ensuring a glass-smooth effect.
Can I add flowers or other items inside my resin clock?
You can add dried flowers, pigments, glitter, or other items, pouring the resin in layers to hold them in place without floating.
How do I fit a clock mechanism into my finished resin clock?
Drill a centre hole for the shaft and follow the mechanism kit instructions to mount and secure the movement and hands.
Are there specific bases recommended for resin clocks?
Smooth wooden bases are best as they provide a stable surface and absorb minimal moisture, optimising resin adhesion.
What safety precautions should I take when making a resin clock?
Wear gloves, use eye protection, and work in a ventilated area. Follow resin mixing directions and keep away from children during the process.