 Free shipping on orders over £29,85

How do you calculate the amount of resin to pour?
Practical advice and reliable tools for epoxy resin measurement


Planning an epoxy resin project begins with one vital step: determining how much resin to pour. Whether you are working on river tables, artistic castings, or resin art, accurate measurement guarantees professional results, cost efficiency, and a mess-free workspace. At ResinPro, we offer a comprehensive range of epoxy solutions and measuring tools to support both beginners and experts in making informed, stress-free decisions.
This guide takes you through product selection, tips for precise resin calculation, and introduces the essential tools and kits that make measuring, mixing, and pouring simple and effective. Explore our featured resins, accurate dosing solutions, and all-in-one starter packs designed for perfect pours every time.
Understanding Resin Pour Depths and Choosing Your Resin
Epoxy resins differ in their maximum recommended casting thickness, so an initial step is to identify your project’s depth and area. For clear, shallow pours and detailed objects (such as jewellery or small castings) up to 2cm deep, the “Trasparente” – Multipurpose Clear Epoxy Resin for Casting – Up to 2cm is an ideal choice. If your project requires medium layers, such as tables, furniture, or art castings up to 5cm thickness, opt for “EpoxyTable 5-Five” – Deep Pour Epoxy Resin for Tables and Large Projects – Up to 5cm. For even deeper pours, such as river tables or very large resin blocks up to 10cm in a single pour, “Epoxytable 10-Ten” – Deep Pour Epoxy Resin for Tables, Up to 10cm Casting stands out for its excellent low exothermic reaction, bubble-free finish, and UV resistance.
If you are new to epoxy tables, the all-inclusive “River-Table” – Complete Kit for Creating Your First Epoxy Resin Table gives you everything necessary for learning and doing, from resin, hardener, and pigment to reliable sealants and polishing pads—complete with precise instructions.
Products Comparison: Pouring Depths, Applications, and Tools
To select appropriately, here is an overview of featured products and their fit for your project:
- “Trasparente” – Multipurpose Clear Epoxy Resin for Casting – Up to 2cm: Ultra-clear and UV protected, perfect for jewellery, art, and restoration—maximum layer thickness 2cm.
- “EpoxyTable 5-Five” – Deep Pour Epoxy Resin for Tables and Large Projects – Up to 5cm: Designed for medium-thick projects like tables and countertops up to 5cm, with high mechanical resistance.
- “Epoxytable 10-Ten” – Deep Pour Epoxy Resin for Tables, Up to 10cm Casting: The top solution for extremely deep pours up to 10cm in a single layer, especially river tables and large blocks.
- “River-Table” – Complete Kit for Creating Your First Epoxy Resin Table: Beginner-friendly set featuring epoxy resin, sealing silicone, formwork materials, pigments, and a complete polishing kit.
- 2L Graduated Measuring Cup for Resin – Precise Epoxy Dosing Tool: Precise measurements from 100ml up to 2 litres; crucial for achieving correct ratios and avoiding costly waste.
- Mixing Buckets Kit for Epoxy Resin Art – Easy Clean Flexible Design: Flexible, durable, and simple to clean, these buckets assist in safely and accurately mixing all resin types and quantities.
Each selection supports an accurate calculation process, ensuring a high-quality finish and reducing expensive mistakes.

Visualising Your Project and Resin Calculation
Before you start, sketch your project and mark all relevant measurements: length, width, and planned depth. Seeing these figures visually helps you quickly estimate the total volume needed for resin. Remember, for mixed-material projects such as river tables, model your wood and resin sections separately to avoid waste. Reliable resin measurement and mixing tools strengthen your planning and overall results.
How to Calculate the Amount of Resin Needed
Step 1: Measure Surface and Desired Thickness
Begin by calculating the length, width, and intended depth of your pour in centimetres. For example, a table measuring 50cm by 70cm with a resin depth of 5cm equals a volume of 17,500cm³ (50 x 70 x 5). Since 1,000cm³ of liquid equals 1 litre, this equates to about 17.5 litres of resin required.
Step 2: Adjust for Project Layout or Ratios
For projects like river tables, generally only a portion of the volume (e.g., 1/3 resin, 2/3 wood) will be filled with resin. The “River-Table” – Complete Kit for Creating Your First Epoxy Resin Table guides you based on classic configurations, but adjust the calculation by simulating your own wood and resin ratio.
Step 3: Factor in Mixing Ratios and Multi-Layer Pours
Check each product’s suggested mixing ratio and maximum pour depth. For instance, EpoxyTable 5-Five requires 100 parts resin to 55 parts hardener by weight and supports layers up to 5cm thick. When working with Epoxytable 10-Ten, you can safely pour up to 10cm for single castings up to 8kg or adjust your depth accordingly, especially for very large surfaces.
Step 4: Use Reliable Measuring and Mixing Tools
Accurately measure resin volumes and ratios with the 2L Graduated Measuring Cup for Resin, and safely mix with the easy-clean Mixing Buckets Kit for Epoxy Resin Art to ensure an even blend and exact amounts. These tools help eliminate errors so results are both consistent and high-performing.
Tips for Perfect Results: Avoiding Common Pitfalls
Accurate measurement is the difference between a professional outcome and a disappointing one. Always check the specific application limits and ensure you do not exceed maximum pour thickness for each resin, as exceeding this could cause overheating or incomplete curing. For thin casts and embedded objects, use Trasparente for layers up to 2cm. For table or larger works, strictly follow recommended volumes for EpoxyTable 5-Five or Epoxytable 10-Ten, layering when necessary.
Using the right measurement tools ensures you achieve the correct resin-to-hardener ratio, essential for a flawless cure and crystal-clear finish. Accurate tools like the 2L Graduated Measuring Cup for Resin save money by reducing waste and preventing sticky, undercured mixes. Flexible, easy-clean mixing buckets further streamline your workflow, keeping projects neat and efficient.
Smart Tools for Accurate Resin Measurement
Professional outcomes begin with simple, efficient measurement. The 2L Graduated Measuring Cup for Resin and Mixing Buckets Kit for Epoxy Resin Art are designed for straightforward use—graduations are easily visible for precise dosing, and the flexible design of the buckets guarantees effortless cleaning after every pour. Integrating these tools into your workflow helps you replicate results with confidence for every project, large or small.

Essential Resin Tools and Kits for Every Project
To simplify every step of your resin journey, having the correct gear makes all the difference. For easy and reliable dosing, the 2L Graduated Measuring Cup for Resin – Precise Epoxy Dosing Tool is a must-have for every maker. Pair it with the Mixing Buckets Kit for Epoxy Resin Art – Easy Clean Flexible Design, which prevents resin residue build-up and makes for easy cleaning between pours.
For newcomers, the “River-Table” – Complete Kit for Creating Your First Epoxy Resin Table is ideal. It includes not only resin, but also all the necessary accessories to help even a beginner achieve a stunning, professional result—epoxy, pigments, formwork sealants, and polish, with clear instructions guiding the volume calculation and mixing process.
- "EpoxyTable 5-Five" – Deep Pour Epoxy Resin for Tables and Large Projects – Up to 5cmPrice range: £16.85 through £1,099.85"EpoxyTable 5-Five" is designed for deep pouring projects such as tables, with features supporting clarity, UV resistance, and scratch resistance.
 “Epoxytable 10-Ten” – Deep Pour Epoxy Resin for Tables, Up to 10cm CastingPrice range: £33.85 through £334.85“Epoxytable 10-Ten” is designed for deep pour applications, suitable for castings up to 10 cm, with low viscosity and anti-yellowing properties.
 2L Graduated Measuring Cup for Resin – Precise Epoxy Dosing Tool£3.85This 2L graduated cup is designed for precise dosing and easy cleaning during epoxy resin projects.
 "River-Table" – Complete Kit for Creating Your First Epoxy Resin TablePrice range: £188.85 through £444.85"River-Table" kit offers a complete set for creating epoxy resin and wood tables with detailed instructions and included polishing kit.
 "Trasparente" – Multipurpose Clear Epoxy Resin for Casting – Up to 2cmPrice range: £8.45 through £948.85"Trasparente" is an ultra-clear multipurpose casting epoxy resin delivering a glossy, self-levelling finish for projects up to 2cm thick.
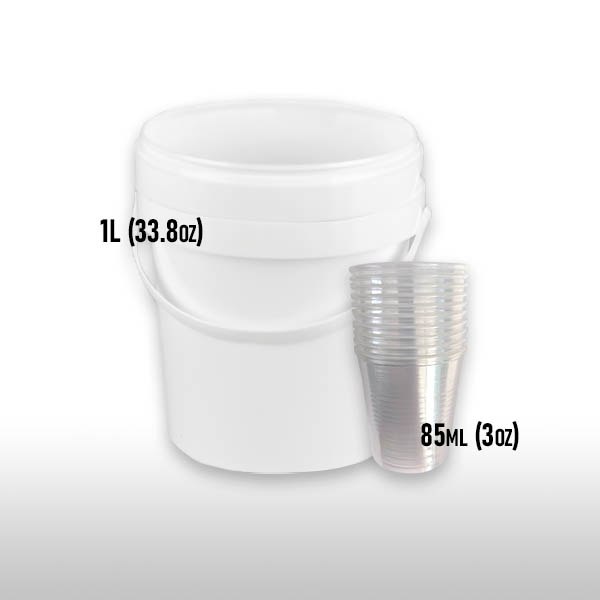 Mixing Buckets Kit for Epoxy Resin Art – Easy Clean Flexible DesignPrice range: £1.95 through £8.35Mixing Buckets Kit designed for resin artists to mix epoxy resin conveniently with a flexible, easy-clean design.
Frequently Asked Questions
Which resin should I use for casting at different thicknesses?
For layers up to 2cm, Trasparente is perfect—clear, safe, and easy to use. For 2–5cm pours, EpoxyTable Five works best. Choose Epoxytable Ten for pours up to 10cm, typical in large or river table applications.
How do I calculate the quantity of resin for my table?
Calculate the surface area (length x width) multiplied by the desired depth to get the volume. For tables with wood and resin combinations, use classic ratios (e.g. 1/3 resin, 2/3 wood) as found in our River-Table Complete Kit for an easy start.
What are the recommended mixing tools for accurate resin dosing?
The 2L Graduated Measuring Cup provides precise volumetric readings from 100ml to 2 litres, while the Mixing Buckets Kit supports clean, accurate mixing for all project sizes.
What pour depth does each resin allow?
Trasparente – up to 2cm; EpoxyTable 5-Five – up to 5cm; Epoxytable 10-Ten – up to 10cm single pour. Always check maximums to avoid overheating.
How can beginners ensure their calculations are correct?
The River-Table Complete Kit simplifies the process by providing instructions calculated for a standard 2/3 wood and 1/3 resin table blueprint. Precise measuring tools and clear formula guides included.
Why is it important to pour resin in the recommended layers?
Pours exceeding recommended thickness can trap bubbles and result in excessive heat, risking improper curing. Always work in layers aligned with the product’s maximum pour depth.
Do I need specialised mixing containers for epoxy resin?
Specialised containers like the flexible Mixing Buckets Kit and accurate Measuring Cup prevent residue build-up, ensure correct ratios, and make cleaning quick—recommended for best results and repeat use.