 Free shipping on orders over £29,85


How do you polish a tile with resin?
Step-by-step to a crystal-clear finish on your resin tile


Polishing a tile coated with resin transforms a simple surface into a stunning feature, reviving dull finishes and achieving professional-grade clarity. This guide walks you through the precise steps for restoring gloss and brilliance to resin tiles, perfect for both home renovators and creative hobbyists.
What You’ll Need
- “Ebonite Abralon” – Sanding Pads 360-4000 Grit for Resin and Wood – for smooth and controlled sanding through various grit levels
- Mirka Sanding Interface Pad 150mm x 10mm – For NET Sanding Discs – for softer sanding finish
- 1200W Polisher for Sanding and Buffing – Variable Speed, D-Handle (optional but highly recommended) – for faster buffing and a flawless high-gloss
- “Epoxy Polish” – Epoxy Resin Polishing System – for the final polishing pass to achieve maximum clarity
- Clean microfibre cloths, spray bottle with water (for wet sanding), gloves, dust mask

Essential Tools for Resin Tile Polishing
A combination of high-quality sanding pads, polishing compounds, and a variable speed polisher provides reliable results for both beginners and professionals. Choose supplies suited to resin finishing for optimal gloss and clarity.

Step 1: Clean and Inspect the Resin Tile
Ensure your tile is completely cured and free from dust, grease, or any loose debris. Wipe the surface gently with a microfibre cloth. For stubborn spots, use a mild soap solution, then rinse and let the tile dry thoroughly. Take a moment to inspect the tile for deep scratches or imperfections—these will guide your sanding sequence.
Step 2: Begin with Low-Grit Sanding
Select the lowest appropriate grit from your sanding pads, such as 360 or 500, if the surface is uneven or heavily scratched. Sand the surface gently in circular motions, keeping the pad flat and applying light, consistent pressure. If you choose wet sanding, lightly mist the surface with water to reduce dust and heat; this is especially helpful for resin surfaces.
Attach your chosen sanding pad to a pad holder or polisher for even results. The Mirka Sanding Interface Pad 150mm x 10mm – For NET Sanding Discs can be used for extra cushioning, reducing the risk of gouges or over-sanding risk on uneven tiles.
Step 3: Progress Through Finer Grits
After the initial sanding removes obvious imperfections, advance gradually through finer grits—moving from 800, 1000, up to 2000 or 4000, depending on the required gloss. Each step should remove the scratch pattern left by the previous grit. Always clean the tile thoroughly between sanding stages to prevent abrasive particles from causing swirl marks, and check that the surface becomes smoother with each pass.
“Ebonite Abralon” – Sanding Pads 360-4000 Grit for Resin and Wood are particularly effective for this, ensuring a controlled and predictable finish especially when used with a variable speed polisher.

Step 4: Buff and Polish to a High Gloss
Once you’re satisfied with the sanding, it’s time to bring out the shine. Apply a small amount of resin-specific polish and work it in using a clean microfibre cloth, or ideally, with a rotary polisher set to a low speed for even friction. A product like “Epoxy Polish” – Epoxy Resin Polishing System is designed to remove any micro-scratches and leave a dazzling, mirror-like gloss on resin-coated tiles.
If using a machine like the 1200W Polisher for Sanding and Buffing – Variable Speed, D-Handle, move methodically across the tile and avoid leaving the polisher in one area to prevent heat build-up. Work until the surface clarity and reflection are uniform and bright.

Step 5: Final Cleaning and Finishing Touches
Remove all polish residues using a clean, dry microfibre cloth, buffing gently in wide, overlapping circles. Now is the time to inspect the tile for any remaining dull spots or swirls; if needed, reapply polish or repeat with a fine grit pad. Always allow the surface to cool and settle before heavy handling or placing back into service.
Tips, Common Mistakes and Troubleshooting
- Gradual sanding is crucial for a high-gloss polish. Avoid skipping grit steps as this can leave visible scratch marks.
- Always opt for high-grit sanding pads in the final stages. This minimises swirls and prepares the tile for polishing.
- Do not rush; allow time for cleaning and inspection between steps to spot imperfections early.
- Avoid applying excessive pressure—let the tools and pads do the work for a consistent result.
- Keep the area clean and inspect between steps. Dust and debris can scratch or dull your resin finish if not removed promptly.
Expert Insight: Achieving a Mirror Finish
Mastering the sequence of grit progression and the right polishing compound ensures luminous results. Maintain patience and precision for truly striking, professional-grade resin tile surfaces.

- "Epoxy Polish" – Epoxy Resin Polishing SystemPrice range: £17.85 through £44.85"Epoxy Polish" is designed for polishing resin and similar surfaces to restore a gloss finish with ease.
- "Ebonite Abralon" – Sanding Pads 360-4000 Grit for Resin and Wood£3.95"Ebonite Abralon" Sanding Pads provide versatile grits from 360 to 4000 for consistent polishing of resin and wood surfaces.
 1200W Polisher for Sanding and Buffing – Variable Speed, D-Handle£85.95The 1200W Polisher offers variable speed and a sturdy D-handle, designed for sanding and buffing in epoxy resin projects.
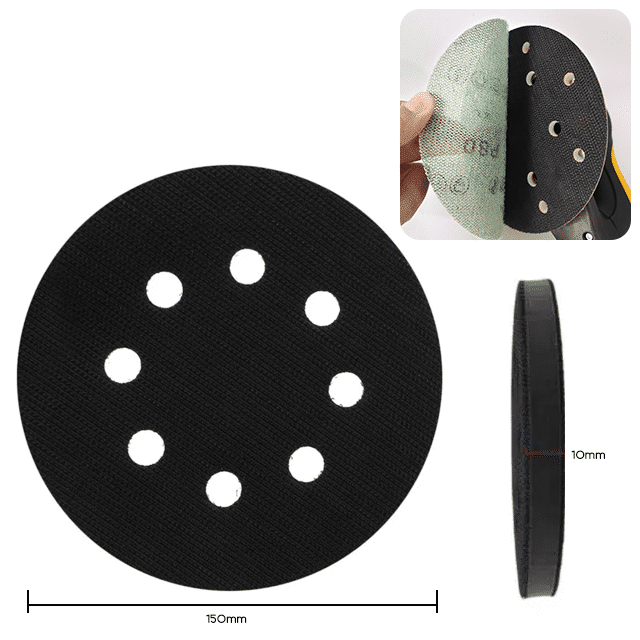 Mirka Sanding Interface Pad 150mm x 10mm – For NET Sanding Discs£5.85Mirka Sanding Interface Pad provides a softer sanding finish, designed for resin and other surfaces in polishing and sanding tasks.
Frequently Asked Questions
Which sanding grit should I start with for resin tiles?
Begin with 360 or 500 grit for rough surfaces, and start finer if the surface is already smooth. Always test on a small area first.
Is a machine polisher required for polishing resin tiles?
A machine polisher delivers faster, more uniform gloss but hand-polishing with pads is also effective for smaller projects.
Should I use wet or dry sanding on resin tiles?
Wet sanding is preferable as it reduces heat and dust, but always check your sanding pad's compatibility with water.
How can I remove scratches missed during polishing?
Step back to a coarser grit and repeat the sanding and polishing sequence until scratches disappear.
What is the difference between polishing and buffing resin tiles?
Buffing employs cloths or pads to smooth, while polishing uses compounds to create a final high-gloss shine.
Why does my resin tile look cloudy even after polishing?
Cloudiness is often due to incomplete buffing or missed fine sanding steps. Repeat the last fine-grit process and polish again.