 Free shipping on orders over £29,85

How to Use Silicone Rubber for Molds?
Step-by-step guide for detailed silicone mould making


Silicone rubber is an exceptional material for creating flexible, reusable moulds suitable for resin, wax, soap, and more. This guide will walk you through each essential stage, covering planning, preparation, working with various silicone types, and demoulding. Whether you are an aspiring artist, model maker or hobbyist, proper use of silicone rubber ensures your moulds are detailed and longer lasting.

What You’ll Need
- “Pure Mould” – Translucent Liquid Silicone Rubber for Mould Making: For clear observation and fine detail in resin, plaster, or cement moulds.
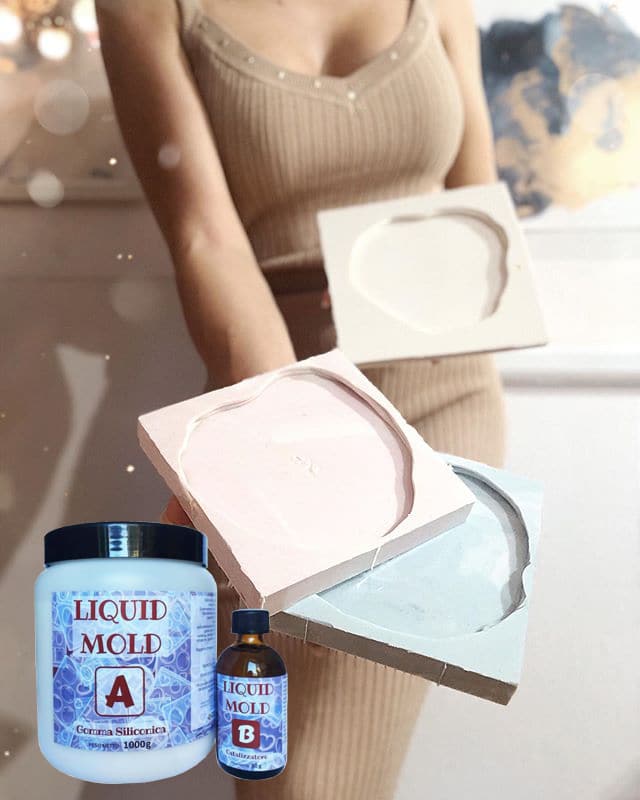
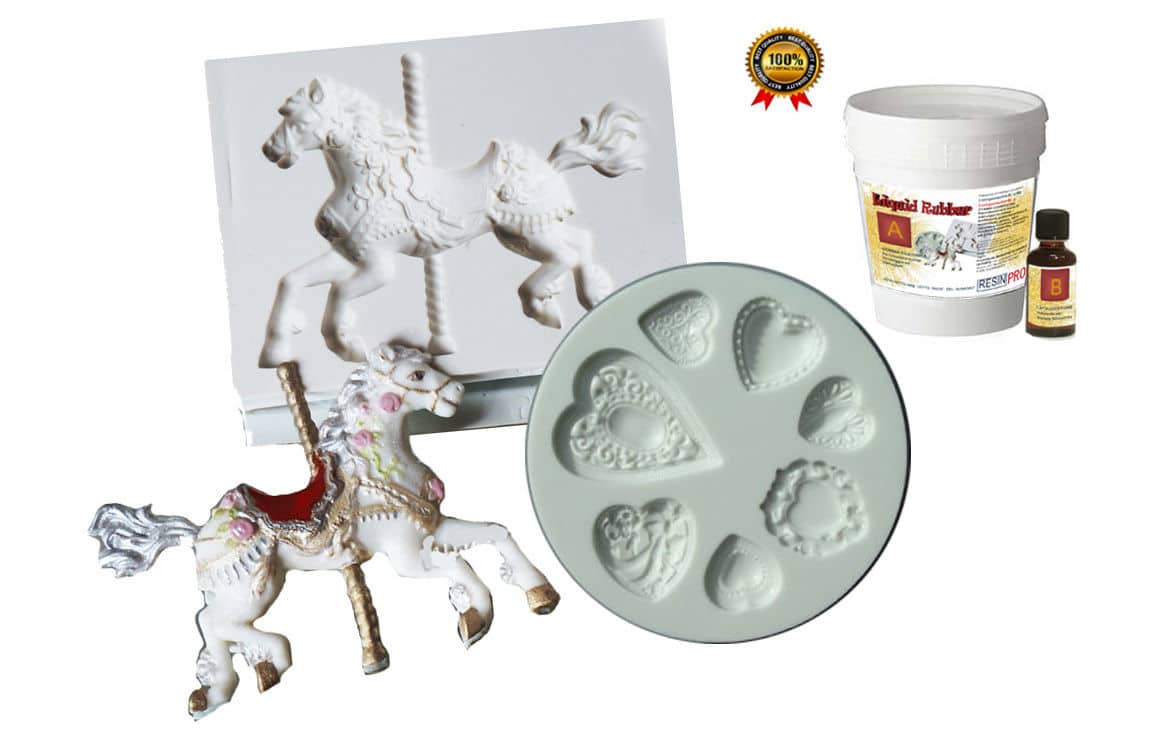
- “Liquid Mould” – Casting Liquid Silicone Rubber, 5-40 Shores, Bi-Component A+B: Well-suited for small objects and multiple reproductions with fine detail and undercuts.
- “Liquid Mould” – Casting Liquid Silicone Rubber, 15 Shores 20.8 kg: Perfect for highly detailed projects or batch production.
- “I–Gum” – Non-Toxic Silicone Putty for Mould Making: Ideal for small, fast projects or decorative items.
- Mixing cups, weighing scales, and stir sticks
- Protective sheet or newspaper for your work area
- Original item/model for making the mould
- Gloves and apron (optional, depending on silicone used)

Key Silicone Rubber Types for Mould Making
Liquid silicone rubbers are ideal for casting fine details while silicone putties simplify mould making for small items. Choose based on project size, working time, and desired flexibility. Using an appropriate product ensures your mould captures every contour and releases easily.
Step 1: Plan and Prepare Your Work Area
Begin by choosing a well-ventilated, dust-free space with a flat surface. Lay down your protective sheet or newspaper to catch any spills. Make sure your work area is free from moisture and debris, as contaminants can affect the finish of your silicone mould.
Gather all your materials in advance and read the specific instructions for the silicone rubber you plan to use. This will save time and help avoid rushed mistakes once you begin the mixing and curing process.


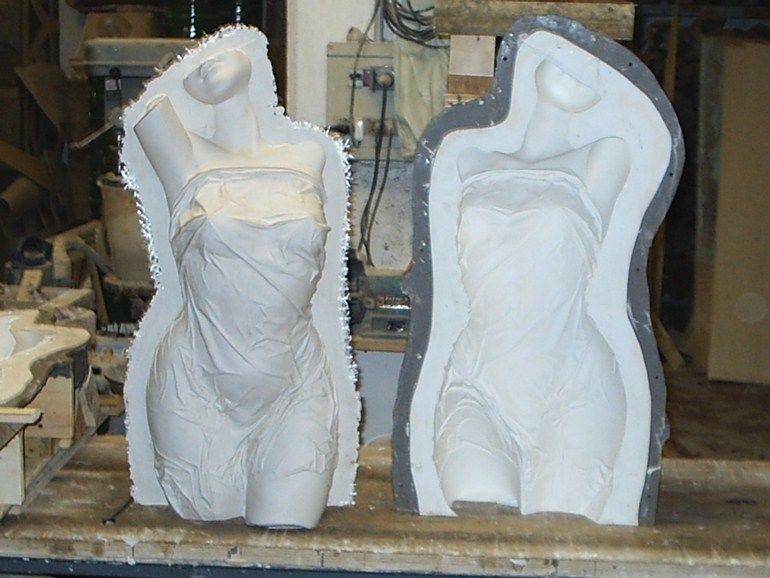
Step 2: Select and Prepare the Original Model
The item or model you want to cast should be clean and dry, free from grease and dust. If your item is particularly intricate or porous, consider using a mould release agent to help ensure easy demoulding and preserve delicate details. Position the original within a mould box just larger than the object, leaving enough space for the silicone to flow around.
Ensure the silicone fully covers every detail to avoid air pockets or missing areas in the finished mould.
Step 3: Mix and Pour the Silicone Rubber
Accurately measure the two components (base and catalyst) of your chosen silicone rubber. For example, “Pure Mould” – Translucent Liquid Silicone Rubber for Mould Making and “Liquid Mould” – Casting Liquid Silicone Rubber, 5-40 Shores, Bi-Component A+B require a 1:1 ratio, ensuring a proper cure and consistent results.
Blend gently but thoroughly to minimise air bubbles, scraping the sides and bottom of the cup. Slowly pour the silicone mixture into your mould box, starting at the lowest point and allowing it to flow over the model naturally.
Accurately measure and mix both components for best performance and to prevent sticky or incomplete curing.
Step 4: Allow the Silicone to Cure Fully
The curing time depends on the silicone used—ranging from about 20 minutes for “I–Gum” – Non-Toxic Silicone Putty for Mould Making to 3–12 hours for liquid silicone rubbers. Check your product instructions carefully.
Ensure the mould box is undisturbed while curing, as movement can distort the shape. Once set, test a corner for firmness before removing the silicone mould from its support.
Allow complete cure before demoulding to prevent tearing or warping.
Step 5: Demould and Inspect Your Silicone Mould
Carefully remove the mould from its box, gently flexing the silicone away from the model. Standard silicone rubbers release easily, but for trickier details, peel slowly to avoid damage. Inspect the cavity for missed detail or air pockets, as these can affect your casting results.
Once satisfied, your mould is ready to use with resin, wax, plaster, soap, or other casting materials. Clean the mould with mild soap and water after each use to extend its life.

Tips, Common Mistakes & Troubleshooting
- Work in a clean, dust-free environment to prevent imperfections on your mould surface.
- Weigh components precisely—guessing amounts can result in failed cures or product waste.
- If bubbles appear, gently tap the mould box or use a pressure pot if your project requires ultra-high detail.
- Do not attempt to demould too early; patience saves time and preserves the integrity of your negative.
- Store finished moulds away from heat and UV to preserve flexibility and life span.
Improving Silicone Mould Performance
Carefully preparing and cleaning your model before pouring silicone greatly increases mould quality. For intricate shapes, pour slowly and patiently. Store all silicone rubbers in their original containers to maintain freshness and usability for future projects.

- "Pure Mould" – Translucent Liquid Silicone Rubber for Mould MakingPrice range: £23.95 through £166.95"Pure Mould" liquid silicone rubber is suitable for creating detailed moulds compatible with various materials including resins and plasters.
- "Liquid Mould" – Casting Liquid Silicone Rubber, 5-40 Shores, Bi-Component A+BPrice range: £14.45 through £387.45"Liquid Mould" Casting Liquid Silicone Rubber is suitable for moulds with fine details and undercuts, compatible with resin and wax.
- "Liquid Mould" – Casting Liquid Silicone Rubber, 15 Shores 20.8 kg£348.85"Liquid Mould" is a casting liquid silicone rubber designed for making detailed moulds suitable for resin, soap, and various pastes.
- "I–Gum" – Non-Toxic Silicone Putty for Mould MakingPrice range: £24.00 through £104.95"I–Gum" silicone putty is a two-component, non-toxic product for mould making compatible with materials like epoxy resin.
Frequently Asked Questions
What is the best silicone rubber for detailed moulds?
Liquid silicone rubber is most suitable for detailed and intricate moulds due to its ability to flow into fine details and reproduce complex shapes.
How long should silicone moulds cure?
Curing time varies: silicone putty may be ready in 20 minutes, while liquid silicones typically require 3 to 12 hours. Always check product instructions.
Can silicone rubber moulds be used for resin, wax, or soap?
Yes, moulds made from silicone rubber are suitable for casting resin, wax, soap, and other similar materials.
How can I prevent air bubbles in silicone moulds?
Mix and pour silicone slowly, allowing bubbles to rise. For extreme detail, use a pressure pot to remove trapped air.
How should silicone moulds be cleaned and stored?
Wash moulds with mild soap and warm water after use. Store in a cool, dry place away from sunlight to preserve flexibility.
Can I cast silicone moulds from porous models?
Yes, but it is best to use a release agent or seal the surface to avoid bonding or surface defects.
When should I use putty vs liquid silicone?
Use silicone putty for quick moulds of small, simple objects. Liquid silicone is preferred for intricate or larger projects.