 Free shipping on orders over £29,85


how to make a resin doll
Crafting your own resin doll allows you to bring unique characters to life, whether you’re an experienced model maker or a hobbyist exploring a new creative avenue. This guide walks you through each essential step, from preparing your workspace to perfecting the final details, ensuring your handmade resin doll turns out beautifully and with lasting charm.
Step-by-step guide to crafting detailed resin dolls


What You’ll Need
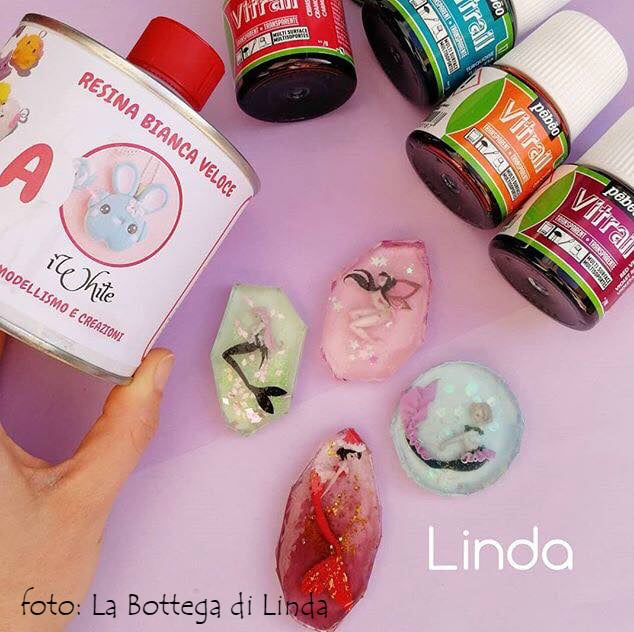
- “IWhite” – Polyurethane Casting Resin – White, Fast-Curing Two-Part System – For quick, highly detailed casting of doll parts.
- “ICreation” – Fast Epoxy Resin, 6h Demoulding, Transparent Gloss Finish – Useful for transparent or semi-clear doll accents and decorations.
- “Icrystal” – Clear Epoxy Resin – Odourless Formula – Up to 1.5cm – Ideal for layers or pieces needing glass-like clarity.
- “One-2-One” – Epoxy Resin for Handcraft, 1:1 Mixing Ratio – Great for beginners and batch work, providing a glossy durable finish.
- Clean, high-quality silicone doll moulds
- Mixing cups and stirrers
- Protective gloves and an apron
- Pigments, paints, or powders (if colouring your resin)
- Cotton swabs and fine sandpaper (for finishing)

Essential Tools for a Professional Finish
Investing in quality tools and precision moulds helps achieve sharp lines and realistic detail in your finished doll. Always use clean mixing vessels and gloves for each resin batch to prevent contamination between different colours or materials.

Step 1: Prepare Your Moulds and Workspace
Use a clean, high-quality silicone mould to shape your resin doll parts. Ensure your moulds are free from dust, oil, or residue for a flawless finish. Lay out protective sheeting on your workspace and gather all tools and materials, including gloves for safety. Work in a well-ventilated area to minimise fumes and prevent dust from landing on uncured resin.
Careful mould preparation prevents imperfections and supports crisp detail, especially for faces, hands, and small accessories. If your doll will include transparent elements, such as wings or inlaid details, line up those moulds separately to avoid contamination from coloured or opaque resin.
Step 2: Measure and Mix Your Resin
Read the mixing instructions for your chosen resin, as ratios and handling vary between products. For example, “One-2-One” – Epoxy Resin for Handcraft offers a user-friendly 1:1 ratio by volume, while “Icrystal” – Clear Epoxy Resin requires a 2:1 mix. Pour the required amounts into a mixing cup, then stir slowly and consistently. Take care not to whip air into the mixture, as bubbles will mar the detail of your casting.
If you wish to colour the resin, now is the time to add pigments. Mix until the colour is evenly distributed, checking for streaks or unmixed areas. Use separate mixing tools if working with multiple colours or resins to avoid cross-contamination.
Step 3: Cast the Resin into the Mould
Pour the resin slowly and carefully into the prepared mould, starting from the deepest or most detailed part. This prevents air from becoming trapped in small features. Do not overfill; allow a little space for the resin to settle and expand slightly as it cures.
For highly detailed or intricate pieces, you may prefer a fast-curing product such as “IWhite” – Polyurethane Casting Resin, enabling rapid prototyping and fine detail capture. If you’re including embedded objects or layers (like transparent wings with ICreation fast epoxy resin), pour in stages, letting each layer partially cure before adding the next.
Tap the mould gently to release trapped air. You may also use a cocktail stick to guide bubbles away from the surface or push resin into complex features.
Step 4: Cure and Demould Your Doll Parts
Follow the recommended curing times for your chosen resin. Polyurethane types like “IWhite” typically harden within 30 minutes, whilst some epoxies such as “ICreation” are demould-ready in about 6 hours. Do not rush the process, as early removal may result in distortion or incomplete hardening.
Allow the resin to cure fully before demoulding. Carefully flex the silicone mould and support delicate parts as you unmould them to avoid snapping. Place finished pieces in a dust-free area for final hardening if required.
Step 5: Finish and Assemble the Resin Doll
Finishing touches make all the difference. Use fine sandpaper to smooth seam lines or minor imperfections, working gently to preserve details. Apply acrylic paints or special doll paints for features such as eyes, lips, or clothing. Cotton swabs dampened with isopropyl alcohol help clean up stray paint.
Assemble the parts using suitable adhesives, inserting joints or connecting components as required. For extra shine or protection, you may brush on a thin coat of clear resin, such as “Icrystal”, to highlight surfaces. Allow all paints, coatings, and adhesives to dry or cure fully before handling your finished doll.
Tips, Troubleshooting, and Common Mistakes
Be patient with mixing and curing times to avoid tackiness or weak spots. Always measure resin accurately, as incorrect ratios lead to poor curing and brittleness. If bubbles persist, consider warming the resin slightly before mixing, or use a toothpick for precise bubble removal in crevices. Protect your workspace from dust and work methodically from preparation to finishing for the best results.
Common Doll-Making Challenges
Avoid rushing the demoulding process to prevent fragile parts from bending or breaking. Fast-curing resins are ideal for reducing wait time but always check that your workspace remains free from dust during the crucial curing phase.

- “IWhite” – Polyurethane Casting Resin – White, Fast-Curing Two-Part SystemPrice range: £22.85 through £34.85IWHITE is a fast-curing, highly fluid polyurethane resin suitable for precise moulding and rapid prototyping in doll making.
- "ICreation" – Fast Epoxy Resin, 6h Demoulding, Transparent Gloss FinishPrice range: £19.40 through £52.85"ICreation" fast epoxy resin is designed for clear, quick-curing finishes suitable for resin art and jewellery making.
 "Icrystal" – Clear Epoxy Resin – Odourless Formula – Up to 1.5cmPrice range: £11.65 through £954.85Clear epoxy resin suitable for craft and artistic creations with high transparency and easy usage in resin doll making.
 "One-2-One" – Epoxy Resin for Handcraft, 1:1 Mixing RatioPrice range: £14.85 through £56.85ONE–2–ONE epoxy resin is a medium viscosity resin designed for easy 1:1 mixing, suitable for jewellery and decorative projects.
Frequently Asked Questions
What are the best moulds for resin doll casting?
High-quality silicone moulds are recommended, as they provide flexibility, capture detail, and make removal easier without damaging the resin doll parts.
Can you mix different resins in the same doll?
You can layer or combine different resins for unique effects, but ensure each cures fully and is compatible to avoid adhesion problems.
How do you remove air bubbles from resin?
Pour resin slowly, tap the mould lightly, and use a cocktail stick or heat gun on low to help bubbles rise and pop before curing.
How can I paint and detail resin dolls?
Use acrylic paints and fine brushes on fully cured resin parts. Sand lightly before painting for best adhesion and crisp details.
Why is my resin not curing properly?
Incorrect resin ratios, poor mixing, or insufficient curing time cause soft spots or tacky surfaces. Double-check measurements and environment.
What is the best way to sand and polish resin doll parts?
Use fine-grit sandpaper, progressing to higher grits for smoothness, then gently buff with a soft cloth. Avoid over-sanding to keep detail.