 Free shipping on orders over £29,85


How to Make Resin Casts
Step-by-step guidance to achieve perfect resin castings


Resin casting allows you to create detailed objects, keepsakes, and decorative items by pouring liquid resin into a prepared mould. Whether you are making jewellery, preserving flowers, or crafting models, mastering the technique ensures crisp results and long-lasting creations. This guide will take you through every key stage, helping beginners and seasoned crafters achieve success with resin casts.
What You’ll Need
- “Pure Mould” – Translucent Liquid Silicone Rubber for Mould Making – perfect for crafting your own detailed silicone moulds.
- “Trasparente” – Multipurpose Clear Epoxy Resin for Casting – Up to 2cm – ideal for clear or decorative pours up to 2cm thick.
- “IWhite” – Polyurethane Casting Resin – White, Fast-Curing Two-Part System – excellent for rapid, detailed, and opaque castings.
- “Silicone Hexagons Mould” – For Creating with Epoxy Resin – 24x21cm – reusable for coasters and artistic items.
- Mixing tools, protective gloves, and a clean workspace

Essential Tools and Mould Choices
Choose moulds that suit your design and level of detail. Flexible silicone options like the Silicone Hexagons Mould allow easy demoulding, while creating a custom shape is possible with Pure Mould liquid silicone rubber for intricate projects. Always have clean mixing implements and gloves ready for safe, accurate work.

Step 1: Prepare Your Mould
Start by selecting your mould. Make sure it is clean, dry, and free from dust or oils, as residue can affect the finish. If you are making a custom mould, use “Pure Mould” – Translucent Liquid Silicone Rubber for Mould Making to cast around your original model. Follow the product’s 1:1 mixing instructions and allow adequate cure time to form a flexible, detailed mould.
For reusable shapes—like coasters or trays—consider a ready-to-use mould such as the “Silicone Hexagons Mould” – For Creating with Epoxy Resin – 24x21cm. Ensure the mould is placed on a level surface.
Step 2: Mix and Prepare Your Resin
Choose the right casting resin for your project. Opaque items are best created using a fast-setting polyurethane like “IWhite” – Polyurethane Casting Resin – White, Fast-Curing Two-Part System. For crystal-clear or decorative pieces, opt for a clear epoxy such as “Trasparente” – Multipurpose Clear Epoxy Resin for Casting – Up to 2cm.
Always mix components thoroughly for even curing. Measure each part as directed (typically by weight), and slowly stir together in a clean cup, scraping the sides and bottom to avoid unmixed portions. Work at room temperature for best results, minimising moisture or cold drafts.
Step 3: Pour and Cure the Resin
Slowly pour your mixed resin into the prepared mould, taking care to minimise bubbles. Pour in stages if your piece requires layering, and use moulds rated for your resin’s maximum thickness—Avoid using thick layers unless your resin is rated for deep pours.
If bubbles do arise, gently pop them using a toothpick or by exhaling across the resin’s surface. Some crafters use a heat gun on a low setting for this purpose, but avoid overheating as it can cause premature curing or surface flaws. Place the filled mould where it will remain undisturbed during the curing time recommended by your specific resin.

Step 4: Demould and Finish Your Piece
Once the resin is fully set, carefully flex the mould to release your cast piece. For detailed or soft moulds like those made with “Pure Mould” – Translucent Liquid Silicone Rubber for Mould Making, take your time and avoid rushing. Inspect the piece for any sharp edges or imperfections which can be sanded or trimmed if required.
Let the resin fully cure before unmoulding for best results. Complete curing ensures clarity, strength, and avoids sticking or distortion.

Tips, Common Mistakes, and Troubleshooting
Work in a dust-free environment to prevent particles landing in the wet resin. Mix slowly to avoid introducing excess air bubbles, especially with highly fluid or fast-curing resins. Always check curing times for each product as unmoulding too early can cause distortion or a tacky finish.
If you notice cloudiness or bubbles after curing, it is often due to trapped air or moisture during mixing. For thicker pours or embedding items, pour resin in layers to avoid overheating or incomplete curing. When in doubt, consult the resin product’s instructions for best practice on mix ratios and timing.
Handy Hints for Successful Resin Casts
Take your time during each stage—rushing can lead to bubbles, incomplete curing, or damaged moulds. Remember to follow each product’s instructions, maintain your workspace, and choose the right casting resin for your specific project. Patience and attention to detail yield the best and most beautiful results every time.

- "Pure Mould" – Translucent Liquid Silicone Rubber for Mould MakingPrice range: £22.85 through £158.85"Pure Mould" liquid silicone rubber is a translucent product suited for making durable moulds compatible with varied materials.
- “IWhite” – Polyurethane Casting Resin – White, Fast-Curing Two-Part SystemPrice range: £22.85 through £34.85IWHITE is a fast-curing, fluid polyurethane resin suitable for detailed moulding and rapid prototyping in crafts and modelling.
 "Trasparente" – Multipurpose Clear Epoxy Resin for Casting – Up to 2cmPrice range: £8.45 through £948.85"Trasparente" is an ultra-clear epoxy resin suitable for clear casting up to 2cm thick, designed for detailed DIY and woodworking projects.
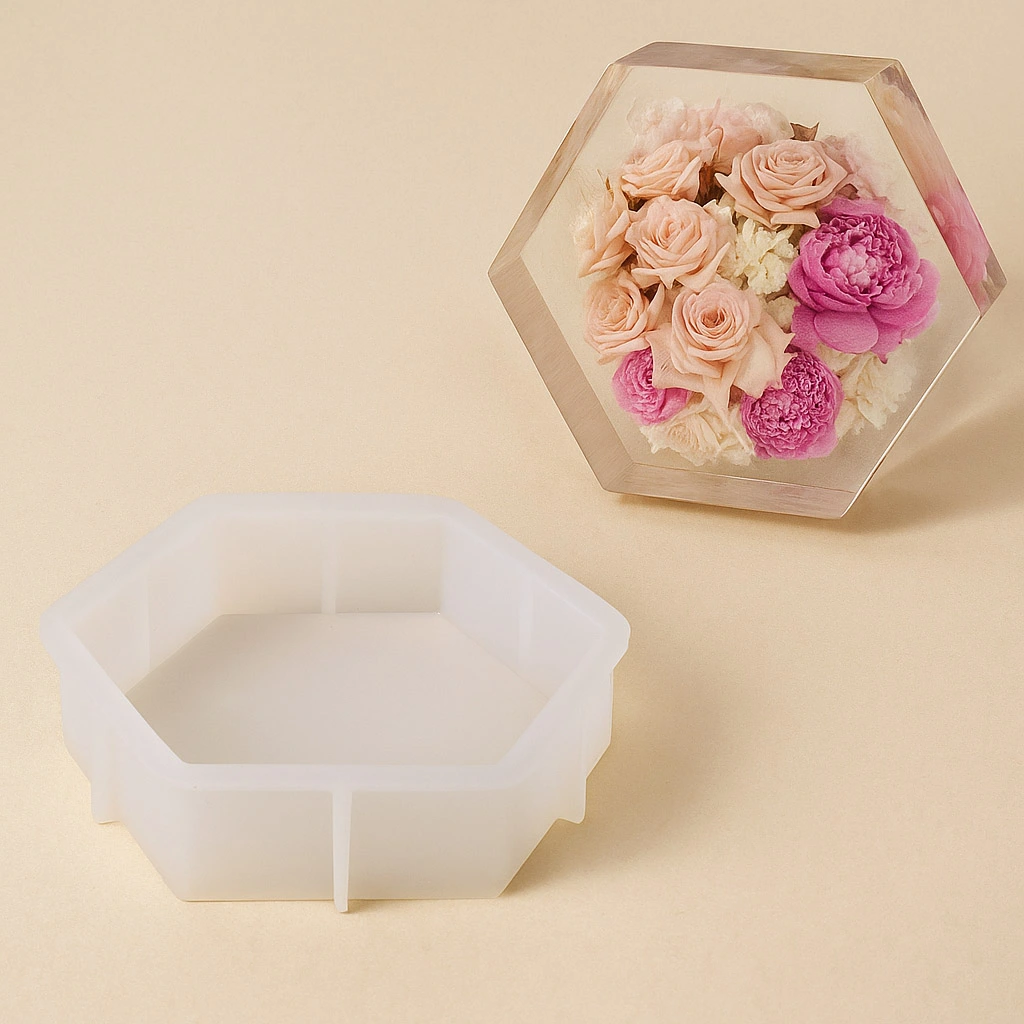 "Silicone Hexagons Mould" – For Creating with Epoxy Resin – 24x21cm£12.85A flexible silicone mould designed for making decorative resin objects such as coasters and keepsakes.
Frequently Asked Questions
Can I make my own silicone moulds?
Yes, you can create custom moulds using silicone rubber like Pure Mould by casting it around an original object.
Which type of resin should I use for clear casting?
Epoxy resins such as 'Trasparente' are ideal for clear castings up to 2cm thick, offering a glossy and bubble-free finish.
How can I avoid bubbles in my resin casts?
Mix your resin slowly and pour in thin layers. Release surface bubbles with a toothpick or gentle warm airflow before curing.
Is polyurethane or epoxy resin better for casting?
Polyurethane cures faster and is suitable for detailed, opaque items. Epoxy is best for clear, decorative finishes or thick pieces.
How long should I wait before demoulding my resin cast?
Wait until the resin is fully cured per the product instructions. Demoulding early can damage both your cast and mould.
Can I paint or tint my cast resin?
Polyurethane resin can be tinted before curing or painted after. Epoxy is also compatible with pigments designed for resin.