 Free shipping on orders over £29,85


how to make silicone rubber for jewellery
Creating your own silicone rubber moulds opens up endless design opportunities for jewellery makers. This guide explains each step— from preparing models to mixing and curing— to help you make resilient moulds that capture the finest details, suitable for both resin and mixed-media jewellery crafting.
Create precise silicone moulds for unique jewellery projects


What You’ll Need
- “Pure Mould” – Translucent Liquid Silicone Rubber for Mould Making: Translucent, easy-mix liquid silicone ideal for detailed and versatile moulds.
- “Liquid Mould” – Casting Liquid Silicone Rubber, 5-40 Shores, Bi-Component A+B: For high-detail small object moulds, including complex jewellery designs.
- “I–Gum” – Non-Toxic Silicone Putty for Mould Making: Handy for fast, odourless, custom-shaped jewellery moulds.
- “Five” – 5-Piece Silicone Mould Set for Jewellery Making 9x8cm: Ready-made moulds for simple pendant and casting projects.
- Disposable mixing pots and utensils
- Precise digital scales
- Protective gloves (optional, especially for liquid silicones)
- Mould release agent (if needed, for intricate masters and non-silicone-safe items)
- Clean workspace and surface covers

Silicone Rubber Mixing in Action
Observe the mixing of silicone putty and liquid rubber up close, and notice the consistency that results in high-definition moulds for jewellery. Using professional tools and a clean setup enhances both safety and precision, especially when working with intricate models.

Step 1: Prepare Your Jewellery Model and Work Area
Begin by selecting or creating a jewellery master model. This could be a pendant, bead, ring, or any small decorative object you wish to replicate in resin or another casting medium. Ensure the master is clean, dry, and free of oil or dust, as impurities can distort the final impression. Set up your work area so everything you need is within reach and cover surfaces to catch spills. For very detailed or intricate masters, a light coating of mould release agent may be helpful, especially if the master is not made of silicone-safe material.
Step 2: Measure and Mix the Silicone Components
Carefully read the instructions provided with your chosen silicone product. For example, “I–Gum” – Non-Toxic Silicone Putty for Mould Making simplifies things with an easy 1:1 ratio (equal parts base and catalyst). For two-part liquid silicones like “Pure Mould” – Translucent Liquid Silicone Rubber for Mould Making or “Liquid Mould” – Casting Liquid Silicone Rubber, 5-40 Shores, Bi-Component A+B, use a precise digital scale to weigh out the correct proportions (usually 1:1 by weight, but always check the packaging). Work in a well-ventilated space and, for liquids, don gloves if you prefer. Mix your parts slowly and thoroughly to avoid trapping air bubbles and to ensure a fully homogeneous blend for even curing.
Step 3: Mould Building and Silicone Pouring/Application
Secure your jewellery master in a suitable container—this forms the ‘mould box.’ It should be just large enough to surround your design with at least 1 cm of silicone on all sides for protection. Press soft putty like “I–Gum” firmly around the model to capture detail, or pour prepared liquid silicone slowly in a thin stream to minimise air entrapment. Tap the sides gently to release any bubbles. Fill to cover the master fully. For multiple or repeat designs, consider using the “Five” – 5-Piece Silicone Mould Set for Jewellery Making 9x8cm, which is ready for pouring resin and other media.

Step 4: Allow to Cure Fully Before Demoulding
Let the silicone cure for the recommended time, which varies by product—typically, putties like “I–Gum” take about 20–30 minutes, while liquids such as “Pure Mould” or “Liquid Mould” can take from 3 up to 12 hours depending on formulation and quantity. Resist the temptation to disturb or demould early, as premature removal may stretch or tear the silicone or result in incomplete detail. Once cured, carefully flex the mould to release your master. If the mould feels at all sticky, allow more time.

Step 5: Clean and Store Your Silicone Jewellery Moulds
After use, gently wash the moulds with mild soap and lukewarm water, avoiding aggressive solvents. Ensure the moulds are completely dry before storage to prevent mildew or deformation. Store flat or supported to help retain shape, away from direct sunlight or heat sources, safeguarding the details of future jewellery castings.
Tips and Common Mistakes to Avoid
- Always measure your components accurately: Even small mismatches in ratio can cause improper curing.
- Mix thoroughly to prevent soft spots in your mould: Scrape the sides and bottom of the mixing vessel.
- Avoid rushing the curing process: Hurrying can ruin the detail and integrity of your final mould.
- Clean your mould and workspace properly: A well-prepped environment reduces dust, debris, and failed moulds.
- For complex shapes, lightly vibrate or tap the filled mould box to minimise air bubbles, or consider using a pressure pot for ultra-fine detail with liquid silicones.
- If a mould comes out dull or with surface marks, check for dirt or incomplete mixing before repeating the process.
Cured Silicone Moulds and Finished Results
Finished silicone rubber moulds reveal the full potential of detailed jewellery casting. Whether you use putty or liquid silicone, a well-cured mould provides crisp, repeatable results for pendants, beads and more.

- "Pure Mould" – Translucent Liquid Silicone Rubber for Mould MakingPrice range: £22.85 through £158.85"Pure Mould" is a fast-curing translucent liquid silicone rubber suitable for mould making, compatible with various materials used in jewellery…
- "Liquid Mould" – Casting Liquid Silicone Rubber, 5-40 Shores, Bi-Component A+BPrice range: £13.45 through £368.85"Liquid Mould" is a casting liquid silicone rubber suitable for making detailed moulds of jewellery and small objects.
 "I–Gum" – Non-Toxic Silicone Putty for Mould MakingPrice range: £22.85 through £99.85"I–Gum" is a non-toxic silicone putty designed for mould making, suitable for various materials and used with simple 1:1 mixing.
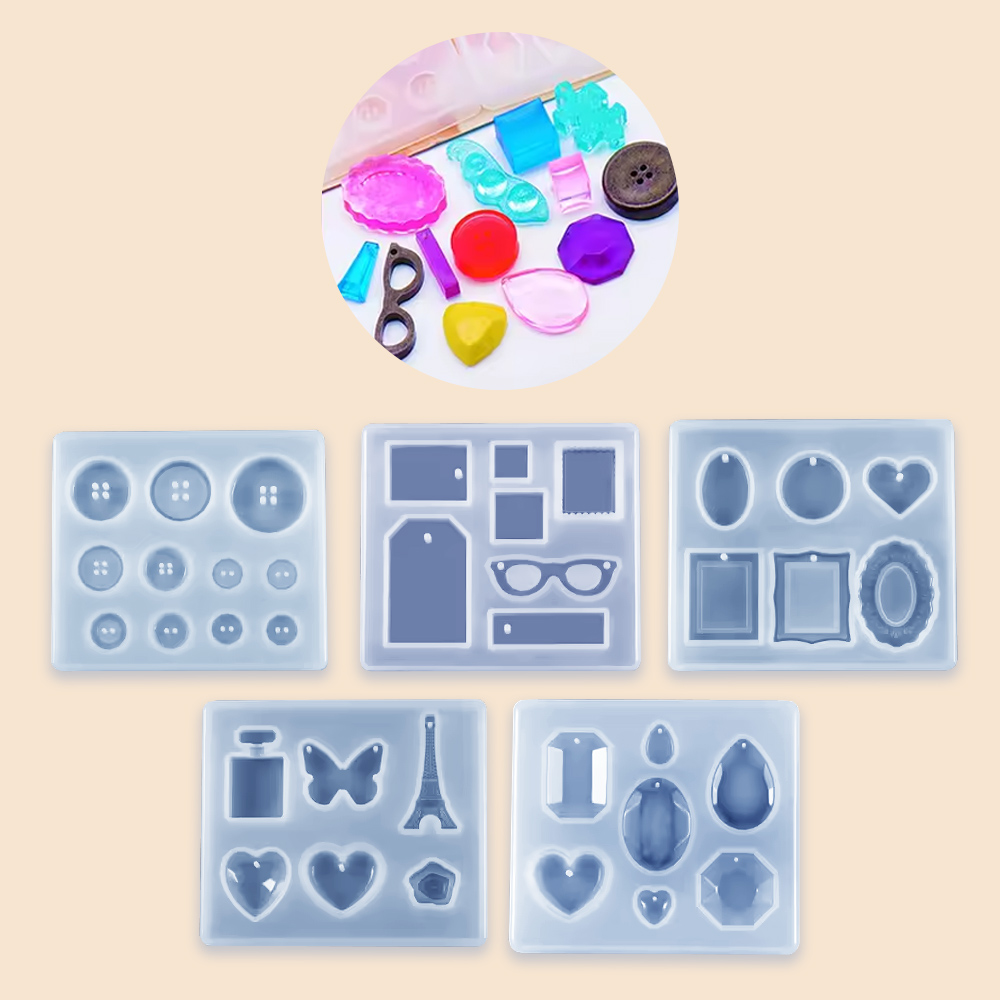 "Five" – 5-Piece Silicone Mould Set for Jewellery Making 9x8cmOriginal price was: £12.85.£9.15Current price is: £9.15.Set of five reusable, heat-resistant silicone moulds suitable for creative jewellery making and personalised resin gifts.
Frequently Asked Questions
Which silicone rubber is best for casting resin jewellery moulds?
For most jewellery projects, a liquid silicone rubber like "Pure Mould" or a silicone putty such as "I–Gum" both offer excellent detail and ease of use.
How do I prevent air bubbles in my silicone moulds?
Mix the silicone slowly and pour in a thin stream. Tapping the mould gently, or using a pressure pot with liquid silicones, also helps release trapped bubbles.
How long does silicone rubber take to cure for jewellery moulds?
Curing time varies: putties cure in 20–30 mins and most liquids in 3–12 hours. Always check the product guidance.
Are these silicone moulds suitable for other casting materials besides resin?
Yes, suitable silicones can be used with resin, wax, plaster, cement, soap, and polymer pastes for different creative projects.
Is a mould release agent needed when making jewellery silicone moulds?
A release agent is usually not required for resin models but can help with very intricate or non-silicone-safe masters.
How should I clean my silicone moulds after use?
Wash with mild soap and water. Avoid harsh solvents to preserve mould details and surface quality.
Why does my silicone rubber feel tacky and not set?
Incomplete curing is often due to incorrect ratios or insufficient mixing. Recheck the product ratios and ensure thorough blending.