 Free shipping on orders over £29,85


How do you pour epoxy resin into a mould?
A step-by-step guide for smooth, bubble-free resin casting


Pouring epoxy resin into a mould opens the door to beautiful, customised creations, from coasters and jewellery to intricate keepsakes. Whether you are a beginner or a seasoned crafter, mastering this skill is key to achieving bubble-free, well-cast resin pieces. This guide walks you through the essential steps for perfect results every time, while highlighting common mistakes and how to avoid them.
What You’ll Need
- “One-2-One” – Epoxy Resin for Handcraft, 1:1 Mixing Ratio – Medium viscosity, non-toxic resin with a simple mixing ratio, suitable for casting decorative items.
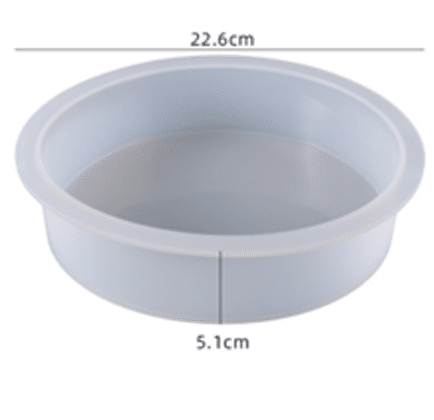
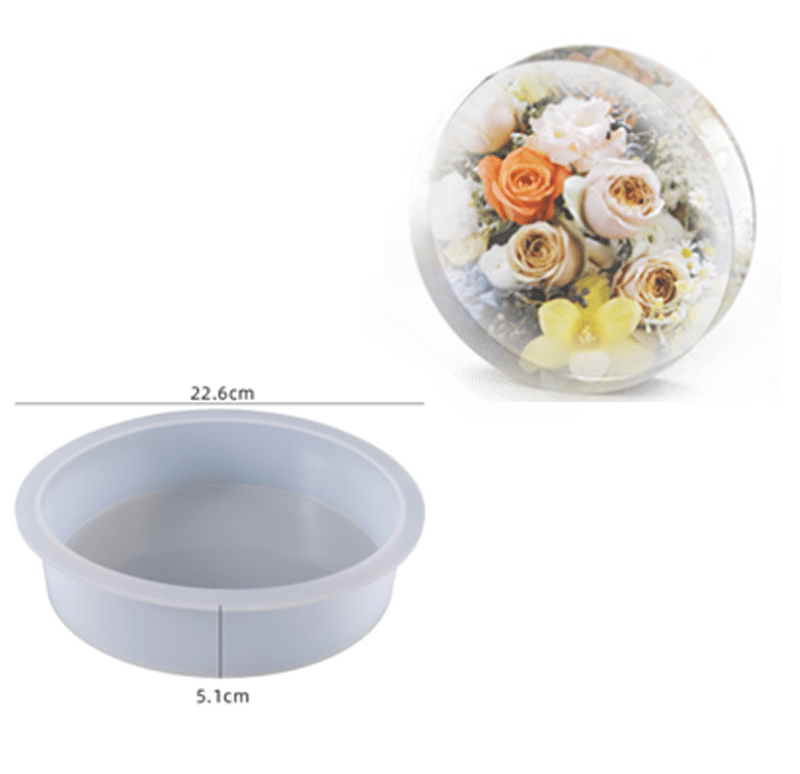
- “Silicone Circle Mould” – For Creating with Epoxy Resin, Ø 20cm – Flexible and reusable for producing coasters or artistic objects.
- Flexible Silicone Cup for Mixing and Pouring Resin – Ideal for accurate, mess-free mixing and pouring.
- “Pure Mould” – Translucent Liquid Silicone Rubber for Mould Making – For those wanting to craft custom silicone moulds for their projects.
- Nitrile gloves, safety glasses, wooden stir sticks, digital scale or measuring jug, alcohol wipes or isopropyl alcohol.
See Useful Tools in Action
Watch how a Flexible Silicone Cup for Mixing and Pouring Resin enables mess-free, precise handling while preparing your mixture. Notice how a quality silicone mould supports easy demoulding for a smooth, professional finish.
Step 1: Prepare Your Workspace and Mould
Begin by selecting a level, clean surface free from dust and debris. Any particles can mar the finish of your resin piece. Cover your workspace with plastic sheeting or silicone mats for easy cleanup. Assemble your materials in advance so everything is within reach. Work in a clean, dust-free area and always follow safety instructions.
If using a ready-made silicone mould, such as the “Silicone Circle Mould” – For Creating with Epoxy Resin, Ø 20cm, ensure it is clean and dry before use. For custom projects, you can create your own mould with “Pure Mould” – Translucent Liquid Silicone Rubber for Mould Making.
Step 2: Mix the Epoxy Resin
Measure the resin and hardener as directed, using a digital scale or a measuring jug to ensure the correct ratio, which is often 1:1 by volume with products such as “One-2-One” – Epoxy Resin for Handcraft, 1:1 Mixing Ratio. Pour each component into your Flexible Silicone Cup for Mixing and Pouring Resin. Wear nitrile gloves, protective eyewear, and ensure good ventilation.
Mix the resin and hardener together slowly but thoroughly, scraping the sides and bottom of the cup to avoid unmixed portions. Stir resin slowly and consistently for best results. If mixed too vigorously, you may introduce unnecessary air bubbles.
Step 3: Pour the Resin Into the Mould
Slowly pour the mixed resin into your prepared mould. Start from one edge and allow the resin to flow naturally, which helps reduce the formation of air bubbles. If you are embedding objects or layers, pour a thin base first, allowing it to settle briefly before adding further resin. Pour in a thin, steady stream to minimise air bubbles.
Use a toothpick or heat gun on a low setting to coax out any surface bubbles that appear, being careful not to overheat the resin or the mould.

Step 4: Curing and Demoulding
Consult the resin product’s recommended curing times and leave your mould undisturbed in a level area. Most epoxy resins require at least 24 hours to cure, although factors like depth and room temperature can affect this. Do not rush the demoulding process.
Once the resin has fully cured, gently flex the silicone mould to release your finished piece. If you have created your own mould using “Pure Mould” – Translucent Liquid Silicone Rubber for Mould Making, ensure all corners are loosened to avoid damage to either the cast or mould.

Tips and Troubleshooting
Prevent common pitfalls by thoroughly planning your mould and workspace. Ensure all measuring tools are clean and dry, and avoid working in high humidity. If air bubbles persist, allow the mixed resin to sit for a minute before pouring, or apply gentle heat. Never use a mould with leftover residue; this can spoil the clarity of your next project. Always check moulds for residue after each use.
If your cured resin is sticky, double-check your mixing ratios and measuring tools. For stuck pieces, flex the mould gently or use isopropyl alcohol to ease release. Experiment with small batches to refine your technique and confidence.
Quick Troubleshooting for Flawless Projects
If you notice bubbles or a dull surface, simply allow the resin to rest before pouring and ensure even, gentle heat. Always choose clean, reusable silicone moulds for best results and longevity in every creative project.

- "Silicone Circle Mould" – For Creating with Epoxy Resin, Ø 20cm£12.85Flexible silicone mould suitable for creating decorative epoxy resin items like coasters and keepsakes.
- "One-2-One" – Epoxy Resin for Handcraft, 1:1 Mixing RatioPrice range: £14.85 through £56.85"One-2-One" epoxy resin offers easy 1:1 mixing and a clear, glossy finish suited to jewellery and decorative crafts.
 Flexible Silicone Cup for Mixing and Pouring Resin£5.85A flexible silicone cup designed for mixing and pouring epoxy resin, suitable for artists and craft enthusiasts.
 "Pure Mould" – Translucent Liquid Silicone Rubber for Mould MakingPrice range: £22.85 through £158.85"Pure Mould" silicone rubber is translucent and fast casting, suitable for mould making compatible with multiple materials.
Frequently Asked Questions
What tools are best for mixing epoxy resin before pouring?
Flexible silicone cups and wooden stir sticks are ideal, as silicone lets you easily remove cured resin and reduces waste.
How do I remove air bubbles from poured epoxy resin?
Pour resin slowly in a thin stream and use a toothpick or heat gun on low to release bubbles from the surface.
Which moulds are suitable for epoxy resin?
Flexible silicone moulds are best for epoxy resin as they are non-stick, heat-resistant, and reusable.
Why is my resin sticky after curing and what should I do?
Sticky resin is usually due to incorrect mixing ratios or insufficient mixing. Ensure precise measurements and consistent stirring.
How do I clean and reuse silicone moulds for resin?
Wash moulds with lukewarm water and mild soap, making sure they're completely dry before the next use for best results.
What affects the curing time of epoxy resin in a mould?
Temperature, humidity, mould size, and resin depth all influence curing. Always check your resin's instructions for specifics.