 Free shipping on orders over £29,85


On sale
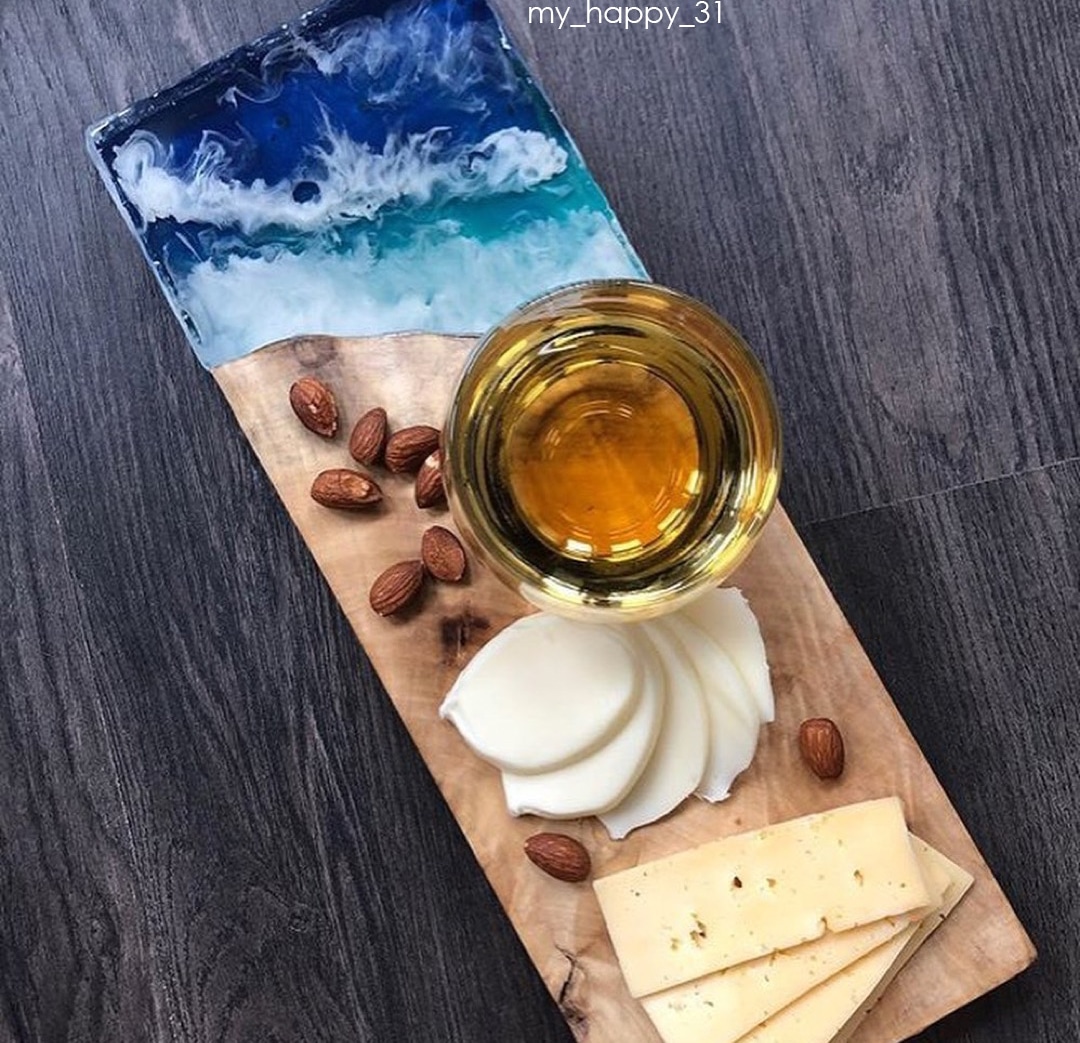
“EpoxyFood” – Certified Clear Food Contact Epoxy Resin for Coating
 Available, ready for shipping
 Order now to receive your product between Tuesday 23 June and Wednesday 24 June.
 Shipping from £1.97 - Free for orders over £29.85
 Price range: £20.95 through £146.95
Sat, 20. Jun
Ordered
Sat, 20. Jun - Mon, 22. Jun
Order Shipped
Mon, 22. Jun - Tue, 23. Jun
Estimated delivery
Introducing EPOXYFOOD, your ideal food-safe transparent resin for a variety of epoxy projects! 🍎 Perfect for coating plates and cutting boards, this non-toxic resin ensures safety for cold snacks while offering excellent clarity.
- 🍽️ **Food Safe:** Certified for contact with food items.
- 🛡️ **UV Protection:** 10-year warranty against yellowing.
- ✨ **Easy to Use:** Mix in a simple 100:55 ratio for flawless application.
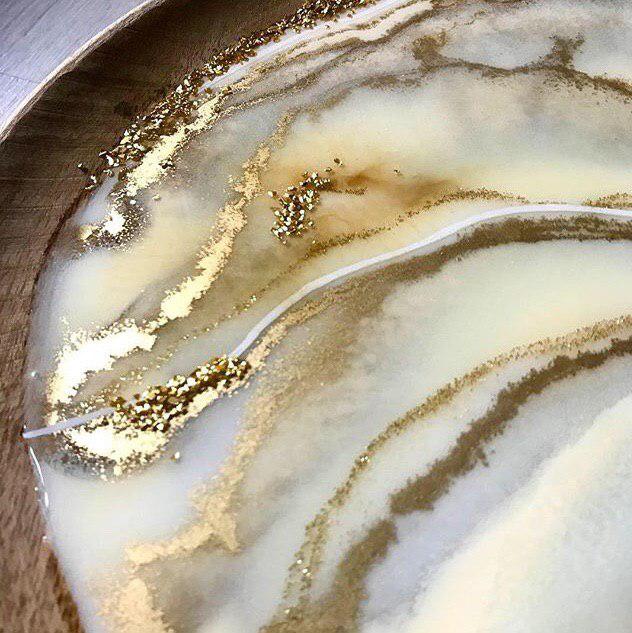
- 💎 **Perfect Gloss Finish:** Achieve true liquid crystal transparency.
Description
Description
💥 About
EPOXYFOOD clear food contact epoxy resin is a pioneering, transparent, food-safe formulation designed for safe and durable surface coatings. Certified for direct contact not only with solid foods but also with liquids, it is perfect for coating dishes, chopping boards, glasses, cups, and resin displayware. Its odourless and solvent-free composition ensures a comfortable working environment indoors. Ideal for professional caterers, resin artists, and DIY enthusiasts, EPOXYFOOD delivers exceptional clarity, high mechanical strength, and excellent resistance to household chemicals such as acids and alkalis, making it the preferred choice for functional and decorative applications requiring food safety and durability.
💡 Key Benefits
Food-Safe Certification Ensures compliance with EU Regulation No. 10/2011 for food contact, including liquids. 🍽️
Non-Toxic, Odourless, and Solvent-Free Formula Manufactured using only approved raw materials for health safety and comfortable indoor use. 🧪
Crystal Transparent Finish Achieves liquid glass aesthetics to showcase craftsmanship. 💎
UV Resistant 10-year anti-yellowing protection for enduring clarity. 🛡️
High Mechanical Strength and Chemical Resistance Withstands household chemicals including acids and alkalis for long-lasting durability.
Heat Resistance Suitable up to 70°C for versatile applications.
☝🏽 Useful Information
Mix Ratio 100:55 by weight for optimal results
Long Working Time Allows ample time for pouring complex surfaces without rush
Cure Times Usable after approximately 10 hours, fully cured in 24–48 hours depending on conditions
Mechanical Stability High resistance suitable for reliable outdoor and professional use
Traceability Documentation and certification available on request for peace of mind
🎯 Who It’s For
– Resin artists and crafters
– Hobbyists and DIY enthusiasts
– Professional caterers requiring food-contact surfaces including liquids
Join the community of resin artists creating beautiful food-safe pieces with EPOXYFOOD!
Create beautiful and safe kitchenware with confidence—get EPOXYFOOD for a crystal-clear, food-grade finish!

The system is composed using only raw materials included in the positive list of substances allowed for food contact (EU Regulation No. 10/2011 January 14, 2011)
* Documentation ensures that the raw materials used are those listed by the Ministry of Health and the migration laboratory test on cured resin samples shall furtherly ensure that the final product does not release any harmful substances, if applied following the instructions. This information can be consulted by the end users in the HCCP certification which is responsibility of the user.
Food Contact Certificate:


Useful articles Epoxy Resin Casting 11 articles ▸
- Epoxy resin for thick casting & river tables
- Epoxy resin for thin casting
- Epoxy resin. Single or multiple pours?
- Epoxy resin for thin casting and final touch
- Epoxy resin for final touch
- epoxy resin, apply additional layers?
- Epoxy resin: tips for thick pours of two inches and beyond?
- Epoxy resin for thick casting
- Epoxy resin for thick casting
- Epoxy resin for final touch and thin casting
- What plaster should be applied on thixotropic epoxy resin?
Useful articles Resin Types and Uses 63 articles ▸
- What can I put instead of resin?
- Who installs resin?
- How good is Resin Pro resin?
- What can I encapsulate in resin?
- What is resin used for?
- What is made with resin?
- How is transparent resin used?
- Who sells transparent resin?
- What type of resin is used to make crafts?
- What do I get from resin?
- Can I use resin for vertical applications?
- What are resins used for?
- Who sells water-effect resin?
- What kind of material is resin?
- Differences Between Resins: Choose the Right Resin!
- What is the catalyst in resin used for?
- Which resin is most suitable for jewellery?
- What is resin?
- What is obtained from resin?
- Which resin model is best for creating seascapes?
- What is the resin base coat used for?
- What are resins?
- What materials does resin not adhere to?
- What is resin used for in welding?
- What resin can be used on polystyrene?
- Which resin should be used in junction boxes?
- How to buy from Nord Resine?
- What does polyester resin look like?
- Which resin should be used for photovoltaic modules?
- Does the resin release toxic fumes?
- What printer is needed for resin stickers?
- What is vinyl resin made of?
- What resin is used to terminate fibre optics?
- Who produces two-component resin in China?
- Who makes resin castings in Macerata?
- Which resin is suitable for AUO pockets?
- How is resin used?
- How do you get wood resins?
- What material is resin?
- What resin should be used for jewellery?
- What type of resin is suitable for a kitchen?
- How are resin pellets made?
- What type of resin is used for artistic compositions?
- What drill hole should be made when using resins?
- What kind of material is resin for statues?
- What causes resin?
- What resin should be injected for delaminated boards?
- Which resins should be used to cover a canvas painted with acrylic paint?
- What resin does Games Workshop use?
- How is the resin frame of mirrors made?
- Which is more durable, plastic or resin?
- How do you recognize a resin watch?
- Who sells resin?
- Which resin is used for a shower tray?
- What glue should be used for resin models?
- What resin should be used for wood?
- What does resin mean?
- What glue should be used for resin?
- What surfaces does resin not stick to?
- What kind of resin is used for carbon?
- What is resin thickener used for?
- What resin is used for fibre optics?
- Which paints can be used to paint resin?
Useful articles Uses of Epoxy Resin 36 articles ▸
- What can I do with epoxy resin?
- How to choose epoxy resin?
- What can you do with epoxy resin?
- What types of prints should be used for epoxy resin?
- Who sells epoxy resin?
- Can I apply epoxy resin to a painted surface?
- What is transparent epoxy resin used for?
- What brand is the epoxy resin?
- Can epoxy resin be used for outdoor applications, and if so, what precautions should be taken?
- What do you put on an epoxy paint?
- What is epoxy resin used for?
- Can epoxy resin be used to repair a damaged fibreglass surface?
- How to distinguish polyester resin from epoxy resin?
- Epoxy resin’s resistance to temperature and abrasion?
- What are the differences between epoxy and polyurethane resin?
- What is epoxy paint used for?
- What maximum temperature does epoxy resin reach?
- Who sold epoxy resin in Avellino?
- What is epoxy primer used for?
- What medications are taken for those allergic to epoxy resin?
- What is epoxy putty used for?
- Who produces epoxy adhesives?
- What is an epoxy thinner?
- What does epoxy mean?
- Does epoxy resin adhere to silicone?
- What to take for epoxy and polyurethane resin allergy?
- How Do Epoxy Adhesives Work?
- What is epoxy glue used for?
- What is the temperature resistance of epoxy resin?
- What are epoxy adhesives?
- What doesn’t epoxy resin stick to?
- What is used as a release agent for epoxy resin?
- With anticorrosive epoxy resin primer minimum thickness 5 microns?
- What torch should be used for epoxy resin?
- What is epoxy putty for iron used for?
- What is epoxy filler used for?
Technical data
Technical data
Usage ratio 100:55 (by weight)
Pot Life (150 g at 30° C) [0,33 lb at 86 F]: 40 min, therefore we recommend to design the drawing first and then apply the resin.
Film catalysis (1 mm at 30° C) [0,03” at 86 F]: 3:00′.
Full catalysis after 24 hours.
Maximum pouring level: 1.5cm*
Minimum thickness – 1.5mm
Instruction
Instruction
💪🏽 LET`S START! 💪🏽
We would like to pay your attention – We don`t recommend working at temperatures below of 20 ° C and over 28 ° C, avoiding humid environments (or surfaces) application (if you are not sure on the humidity, let the resin warm up the components before pouring).
If epoxy resin was storage at temperatures below of 20 ° C and became murky, please, warm your epoxy up before using to full transparency. More detailed, please, read below.
👉🏽 LET`S MIX! 👈🏽
THE PROPORTIONS ARE PRINTED ON THE BOTTLES/TANKS, PLEASE CHECK IT BEFORE USING.
Being a two-component resin, you have 2 bottles at your disposal, one containing resin “A” and the other containing hardener “B”. You will need some electronic scales to weigh grams and a mixing container where you can combine the liquids.
How to calculate, how much hardener do you need? Take your proportions –JUST AN EXAMPLE – 100:55. Then take the weight of component A and multiply on B, (if 100:55 – A*0.55; if 100:70 – A*0.70; if 100:87 – A*0.87).
Please, use some electronic scales and weigh in grams to get the best results.
After an accurate dosage, the resin must be mixed irregularly (meaning, always in the same direction) for at least 5-8 minutes. This part is very important, because if it is mixed only for a few seconds, it will not be homogeneous at the molecular level, therefore will remain soft / opaque in some parts.
Mix evenly on the edges and bottom of the container. (Do not mix very quickly or forcefully because that would cause a lot of bubbles). We do not recommend using a mixer (of course, you can, but, please, not at high speeds!), as this leads to the formation of microbubbles, which will be difficult to remove. The carefully you mix – the less bubbles.
Remember, the quality of the future casting depends on a good mixing of the two components!
Important! Try to make the mix carefully, so that the smallest fractions of air are not formed in the resin, because visible bubbles will easily disappear from the surface naturally, and micro fractions of air are often practically invisible, but during the curing and heating of the epoxy mixture, the air in them expands and after complete curing, bubbles can be visible in the casting. This can and should be avoided if you do the kneading correctly.
How to remove the bubbles?
Although degassing (vacuum) is necessary to eliminate 100% of the bubbles, there are some tricks that can help you minimize the presence of bubbles during the creations.
1) Mix the resin longer but in a more delicate and uniform way.
2) Before mixing, heat component A (in the sun or using a radiator), so that it becomes more liquid and the bubbles rise more easily.
3) Leave it to rest for a few minutes to release the air bubbles.
4) Once launched, use a heat source (thermal pistol or fire, NOT a hairdryer) to burst the bubbles on the surface.
👋🏼 LET`S COLOUR! 👋🏼
Practically everything, including powder and metallic pigments. As long as the dyes are “dry” (for example, dust or sands) there are no problems (as long as they are perfectly dry), when, instead, you want to add pastel or liquid colours, make sure they are compatible with epoxy resins. If they are not compatible (for example enamels, tempera, acrylics) only a few drops can be added, since an excessive dosage could compromise the mechanics of the resin and its brightness (for example making it soft or sticky). There is also a “gold rule” – no more than 5% from mix weight.
Remember, it`s important to avoid contact of epoxy resin with water! From the ingress of water into the resin, it may become cloudy or not solidify! And if the hardener has been stored for a long time with a loosely twisted lid, then it can absorb moisture and it condenses in the form of microbubbles in the thickness of the casting during the curing process.
👍🏽 WHAT`S NEXT? 👍🏽
After pouring epoxy into your formwork be ensured in the “sterility” of the room so that dust and dirt will not get into the epoxy.
Important! We don`t recommend covering the filling with plywood or something dense, because this will disrupt the heat sink during the solidification of the resin!)
Remove micro-bubbles stuck in the surface layer using a hair dryer or a manual gas burner. We also recommend that you do not overheat the epoxy filling with a burner or a hair dryer, because this can cause overheating and boiling of the resin.
The full curing time of the FOOD SAFE resin is from 24 hours(depending on the temperature and humidity in the workshop. The lower the temperature and the higher the humidity, the longer the curing time of the resin.
❄️ FROZEN EPOXY ❄️
Epoxy can become frozen under 20C. PLEASE! DON`T USE FROZEN EPOXY. This may affect the result.
There is no excuse that you hold your epoxy inside a warm room, the epoxy could be frozen much before, and only proper defrosting will return the lost transparency and liquidity.
How to understand why your epoxy was frozen? The component A is murky or solid, like frozen water. Don`t worry, there is no need to dispose of your epoxy and run to leave a bad review. It`s okay. You need to do only one thing – to defrost it, warming component A to 50-70 ° C. We usually put the closed tank inside the sink with very hot water and leave it for 20-30 minutes. The problem is next – the more epoxy inside the tank, the more difficult to warm it properly, so just repeat the procedure. If it doesn`t help, just try again, because we sold thousands of tons of the epoxy resin and every time the problem was sorted out by waiting a little bit longer in hot water (of course with the closed lid). Yes, we totally understand that it causes excessive movements, but it`s natural and it could happen with any other epoxy.
Of course, after defrosting you need to cool the component A to room temperature before using.
🔥 HOW TO AVOID OVERHEATING? 🔥
Maximum pouring level: 1.5 cm. It may vary from the full weight of poured epoxy, sizes of project and temperature when you pour. Not following instructions may cause overheating.
If you need to make a larger layer, just pour in several steps, waiting 8-10h the first time; 10-12h in the second time and 12+h the third time).
When creating a coating with epoxy resin, do not fill the mixture with a thickness of less than 1.5 mm, otherwise, after curing, there is a chance of shrinkage with the formation of “craters” – small depressions on all surfaces of the fill.
If one side of casting is more than 100cm long, please, create your project in layers (each layer being 1-2cm thinner than recommended) with a time interval like above – (waiting 8-10h the first time; 10-12h the second time and 12+h in the third time).
If you do a Round casting, and the required weight A+B exceeds 3kg, create your project in the same way as above (less thickness per application + longer waiting between layers).
Be especially careful when working with resins for large castings, when mixing a large amount of resin, do not leave the mixture for a long time in one container – pour it immediately into other smaller containers to avoid the “mass” effect: the resin begins to heat up quickly and hardens instantly with defects without the chances to change it in any way.
IF YOU MEET MORE THAN ONE EXCEPTION IN YOUR PROJECT, REDUCE THE SIZE OF YOUR APPLICATION AGAIN.
WARNINGS:
During processing, use protective masks, gloves, and other protective clothing.
In case of contact with eyes, immediately rinse with cold water for 15 minutes and immediately consult a doctor.
Videos
Videos
Paper in Resin – Food Safe Resin Snack Set
Cloudy / Frozen epoxy. How to restore transparency to resin?
Reviews
Reviews
COD:
XL-Y93L-DYWFmain