Free shipping on orders over £29,85
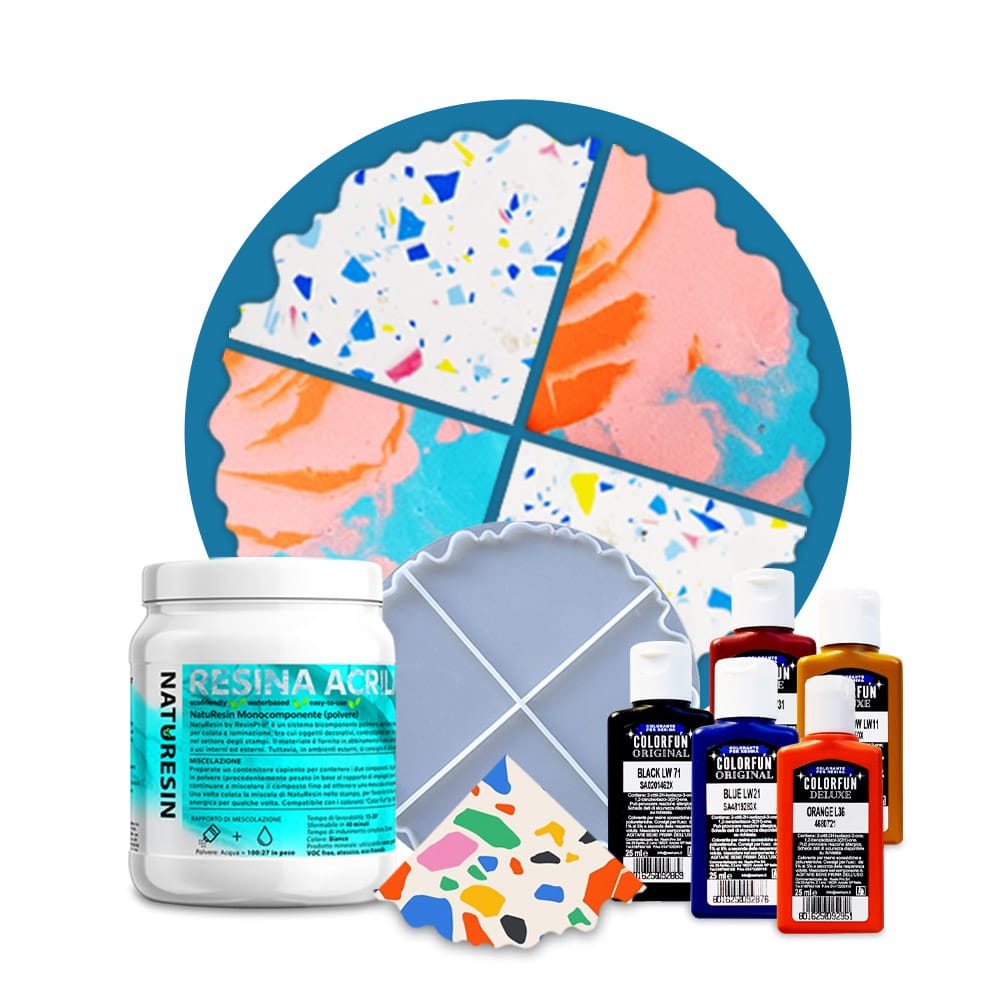
“Coasters” – Creative Kit with Mineral Resin and Silicone Mould
 Available, ready for shipping
 Order now to receive your product between Tuesday 23 June and Wednesday 24 June.
 Shipping from £1.97 - Free for orders over £29.85
£40.95
Sat, 20. Jun
Ordered
Sat, 20. Jun - Mon, 22. Jun
Order Shipped
Mon, 22. Jun - Tue, 23. Jun
Estimated delivery
Create stunning custom coasters with the COASTERS resin craft kit, perfect for resin artists and DIY enthusiasts. This complete set is based on eco-friendly mineral resin (acrylic gypsum), a safe alternative to traditional epoxy, offering a matte, natural stone or ceramic-like texture that feels pleasant to touch.
- 🖌️ All-in-one kit – Includes 1kg of mineral resin and silicone moulds, enough for four coasters plus extra creative projects
- 5 vibrant colour pigments – Mix and match to create an endless palette from soft pastels to rich hues
- ⏱️ Phenomenal speed – Unmould after just 60 minutes, fully hardened within 4–8 hours, ideal for creative fun with children or quick gift-making
- Easy step-by-step process – Includes gloves and mixing tools for convenience
Description
Description
💥 About
Get inspired with the COASTERS resin craft kit featuring Naturesin – an innovative, eco-friendly, water-based mineral resin that is odourless and completely safe for home use, even around children. Unlike traditional epoxy, this “smart” mineral formula requires only ordinary water and kitchen scales for preparation. The kit includes 1kg of mineral resin – a generous amount that’s enough to create a full set of 4 coasters plus additional experiments. Thanks to its fast curing time, with demoulding possible in just 40–60 minutes, you can explore advanced decorative techniques like terrazzo (mosaic) or layered pouring all in one day.
💡 Key Benefits
- Comprehensive kit – Contains 1kg mineral resin, 5 natural pigments, silicone mould, gloves, and tools 🧤
- Fully customisable designs – Blend and layer colours to achieve eye-catching effects 🎨
- Quick, reliable curing – Demould in 40–60 minutes; full hardness within 4–8 hours (results may vary with pigment use) ⏱️
- Creative techniques included – Try mosaic and layered designs using detailed instructions 📘
☝🏽 Useful Information
- Mineral resin to water mixing ratio – 100:27 by weight (100g powder : 27g water)
- Easy cleanup – Lay down a protective tarp or newspapers before starting
- Alternative methods – Mosaic and layered effects explained in included guide
- Finished surface – The cured coasters have a refined matte finish reminiscent of natural plaster or stone, while offering high durability and strength
🎯 Who It’s For
- – Resin artists and crafters
- – Hobbyists and DIY enthusiasts
Take your resin crafting to the next level with this all-in-one kit, delivering stunning handmade coasters for your home or as unique gifts.
 Instruction
Useful articles Resin Storage Solutions 100 articles ▸
- How to create with resin?
- How do you make resin concrete?
- How do you make resin?
- how to do resin work
- How do you make a resin casting?
- how to create a resin coating
- How do you use bodywork resin?
- how to make a resin countertop
- How to make a resin panel?
- How do you make resin objects?
- How to make homemade resin
- What can be done with resin?
- How to Make Clear Resin
- How to Make a Multi-Purpose Resin Court?
- How do you engrave resin?
- How do you polish resin creations?
- How do you make a resin ball?
- How to make resin statues?
- How to make scuff resin?
- How to Make Cement Resin
- How to Put Phrases in Resin?
- How to create a decorative resin panel?
- How do you resin a camper?
- How to make resin figurines?
- How to embed writing in resin?
- How do you make a resin bust?
- How to glue resin pieces together
- how to work with resin sheet video
- How to Make Clear Resin Vases
- How to make shaker resin
- How to make resin hash
- How to work with synthetic resins
- How to make a small box with resin?
- How to make a resin sphere?
- how to create the cell effect in resins
- How to Get Perfect Spheres with Resin?
- How to create with Erika resin book?
- How do you use anchoring resin on the bars?
- how to glue two resin objects together
- how to make resin creations by Lady Giorgia
- how to do it with resin
- How to work with resin?
- How do you work with resin?
- What to do with resin?
- how to make resin
- How to make resin for filling cracks?
- How do you put things under resin?
- how to make repairs with resin
- How do you make objects with resin?
- How do you pour resin?
- How to make resin creations?
- How do you make resin cement?
- How to make a resin sculpture?
- How do you make a resin sink?
- How do you start working with resin?
- How to make artificial resin
- How to build a resin landscape?
- How to drill resin?
- How to make transparent resin?
- How to store resin?
- How do you make a resin staircase?
- How do you make a DIY resin pour?
- How to make resin objects
- How to make a resin shower tray?
- how to make resin sculptures
- How to make a resin handle
- how to make resin stone
- How to create the wave effect with resin?
- How to make resin at home?
- how to make writing in resin
- How do you make resin to use with wood?
- How to create a sculpture with resin?
- How to make spray resin
- How do you work with resin for a sink countertop?
- What Do You Need to Work With Resin?
- How to make gede with resin?
- how do you work with liquid resin?
- How to Make Stones Using Resin
- How to make a frame for resin
- How to embed objects in clear resin?
- How do you make resin at home?
- How do you make a resin log?
- How do you build a resin sand pool?
- What do you need to make resin creations?
- How do you make a hole in resin?
- how to make boat resin
- How do you glue resin pieces together?
- How to Make Resin Pots
- How do you pour resin into wood?
- How do you glue a resin model?
- How to Make a Resin Bath
- How to get transparent red resin?
- How to Make a Surfboard with Resin?
- How do you install a resin cage?
- How to make resin bookends?
- How to make balls with synthetic resin
- How do you make a resin clock?
- How to Make Resin Miniatures
- How do you pour resin on a table with bottle caps?
- How to make resin lures?
Useful articles Resin Sticker Creation 17 articles ▸
- How to get sticky resins?
- How to make resin-coated stickers
- How to make fluorescent resin
- how to make resin-coated labels
- How to glue resin to metal
- how to make resin page markers
- How to make resin magnets
- how to make polyurethane resin stickers
- How to Make Resin Bookmarks
- How to make resin adhere to metal?
- how to make resin stickers
- How to anchor iron with resin?
- How to make resin stick to ceramic and metal?
- how to make resin bookmarks with prints
- How to make resin stamps
- How to resin flexible stickers?
- How to create resin-coated stickers?
What's included
What's included
- “NatuResin” – Mineral Resin & Water System 1 kg
- “FOUR IN ONE” – Silicone Coaster Mould – ⌀21cm
- Dyes (25 ml):
Oxide red
Black
Blue
Orange
Oxide yellow
Instruction
Instruction
How to use your Naturesin kit
Create beautiful colourful castings with a smooth matte finish using Naturesin and your silicone mould.
Mixing ratio: 100:27 by weight
For every 100g of Naturesin powder, use 27g of water.
Before you start
- Protect your work surface with a plastic tarp or old newspapers.
- Make sure the silicone mould is clean and dry.
- Prepare all materials in advance, including cups, dyes, water and a scale.
Basic method
- Using a scale, weigh Naturesin powder and water in the ratio of 100:27 by weight.
- Slowly add the powder to the water, mixing constantly and thoroughly until the mixture becomes smooth, creamy and homogeneous.
- Work steadily — you have around 10 minutes before the mixture begins to set.
- Divide the mixture into several cups or containers.
- Add a few drops of dye to each container and mix well to create your desired shades.
- Pour the different colours into various areas of the silicone mould for a unique marbled effect.
- If you notice air bubbles, gently tap or shake the mould so the bubbles rise to the surface.
- Leave the casting to harden for 40–60 minutes.
- After about 1 hour, remove your piece from the mould.
- Your creation will continue to harden over the next 4–8 hours.
Please note: when using dyes, curing time may sometimes be slightly longer.
Alternative creative methods
Layered effect
Mix a small portion of Naturesin using the same 100:27 ratio.
Add your chosen colour and apply it to the mould in drops, splashes or stripes.
Leave this first layer to harden for 30–40 minutes.
Then prepare a second mixture in a contrasting colour and fill the mould for a bold layered finish.
Mosaic effect
Fill the mould completely with a coloured Naturesin mixture and allow it to cure fully.
Remove the piece from the mould and carefully break it into small fragments.
Place the fragments back into the mould and fill the gaps with a fresh mixture in a different colour.
This creates a striking mosaic-style result.
Helpful tips
- Always measure accurately for the best results.
- Mix thoroughly, but avoid whipping in too much air.
- Prepare your colours quickly before the mixture starts to set.
- If needed, allow extra curing time for a harder finish.
Technical data
Technical data
TECHNICAL DATA
“NatuResin” – Mineral Resin & Water System:
- Mix ratio: 100:27 by weight – Gypsum/Water
- Working time: (25°C): 10-12 minutes
- Demoulding time: 18-20 minutes
- Full catalysis: 10 hours (depends on the thickness, shape of the product and the temperature of the medium)*
- Maximum pouring level: not limited
- Heat resistance after full curing time: 80 °C
- Coverage 1kg: 100*60*0.15cm
- 1sqm consumption (1.5mm thickness): 5kg
* The product will be solid in 15-20 minutes after pouring, but in the next 15 hours the strength of the material will increase.
Reviews
Reviews
COD:
JBLUYU8888